3 Gateway Initialization and Network Configuration
This chapter provides detailed instructions for the gateway Web management interface, covering login methods, network configuration, LoRa parameter setup, external platform connection, and built-in NS operation.
3.1 Accessing the Gateway Web Interface
The gateway supports multiple access methods. Choose the most suitable option for your environment.
Note:
- It is strongly recommended to use a PC browser (larger screen), because the gateway UI (including ChirpStack on port 8080, REST API on port 8090, and Node-RED on port 880) displays a large amount of data that cannot be fully viewed on a mobile screen
- Use a modern browser. The gateway UI uses a recent HTML5 framework; outdated browsers (e.g., Internet Explorer) will render incorrectly. Microsoft Edge (built into Windows) is supported.
- Verified browsers for the gateway UI: Google Chrome, Mozilla Firefox, Apple Safari, Microsoft Edge (Windows 11).
3.1.1 Local Connection via LAN Port
This is the most common initial configuration method and is suitable for quick local access.
Steps:
- Connect the PC to the gateway's LAN port (100 Mbps) using an Ethernet cable
- The PC will automatically obtain an IP address in the 192.168.60.x subnet from the gateway's built-in DHCP server
- Install a modern browser: Google Chrome, Mozilla Firefox, Apple Safari, or Microsoft Edge (built into Windows 11). The gateway UI requires a modern HTML5-capable browser.
- Open a browser and navigate to the gateway management address:
http://192.168.60.1 - If HTTPS is configured, use:
https://192.168.60.1
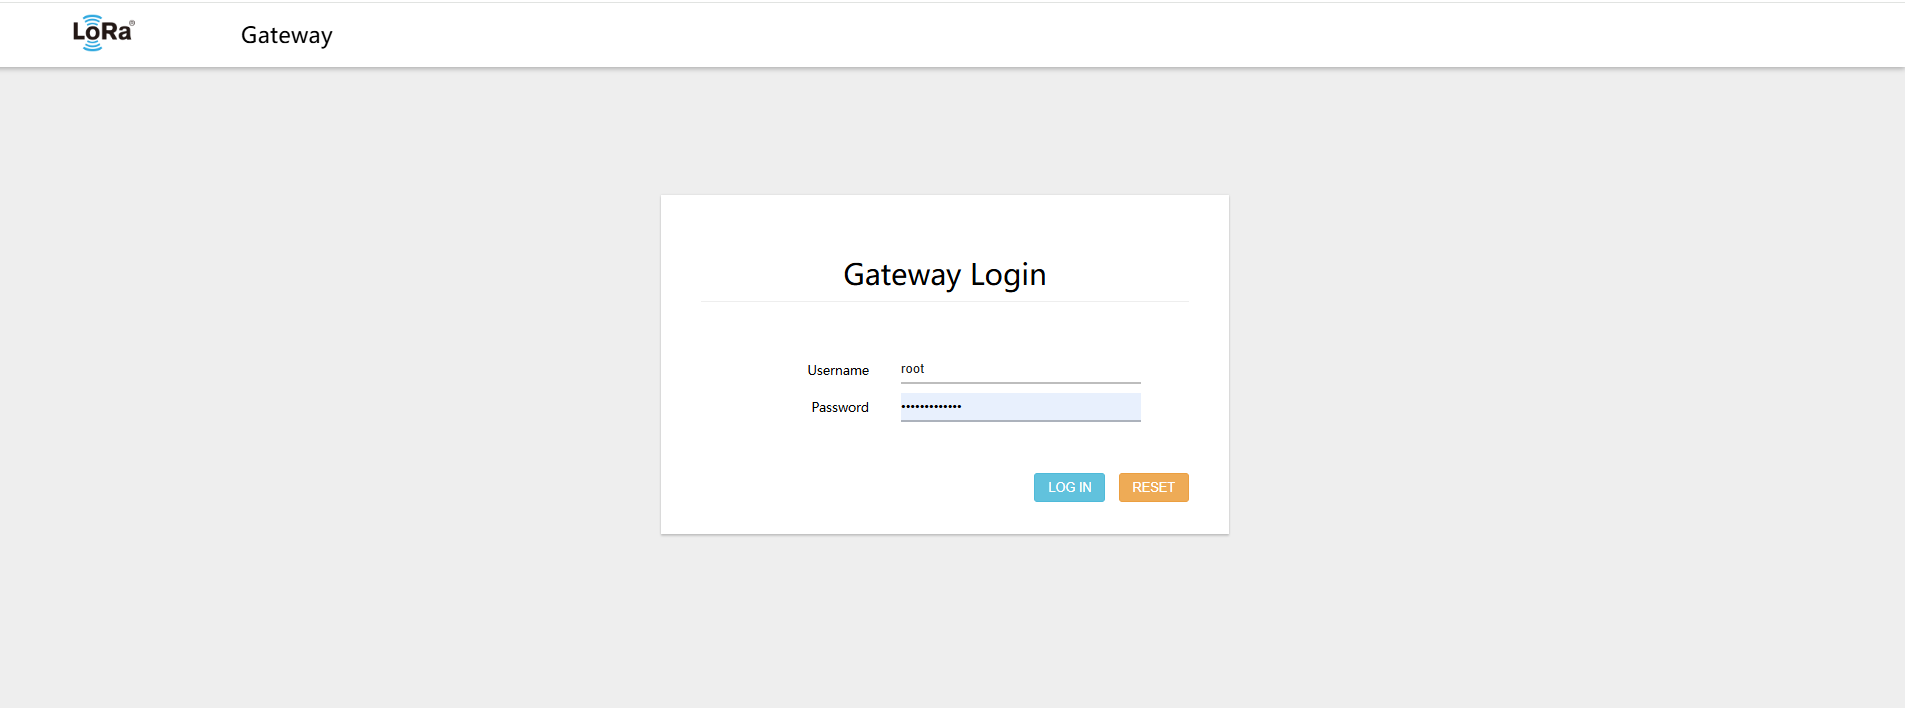
Login Credentials:
- Username:
root - Default Password:
lora88888888
3.1.2 Connection via WiFi Hotspot
On boot, the gateway creates a 5.8 GHz WiFi AP hotspot by default. If WiFi is configured in STA (client) mode to connect to a router, the hotspot (AP mode) is disabled. The gateway supports either AP mode or STA mode — not both simultaneously.。
Steps:
- After powering on the gateway, wait approximately 1–2 minutes for the boot to complete
- In the WiFi list on your PC or phone, look for a hotspot in the following format: - Hotspot name:
WiFi-10_XXXXXX(where XXXXXX is the last 6 digits of the gateway ID) - Example:WiFi-10_A1B2C3 - It is strongly recommended to use a WiFi-capable PC to connect to the gateway's WiFi hotspot (Default Password:
wifi88888888) - Install a modern browser: Google Chrome, Mozilla Firefox, Apple Safari, or Microsoft Edge (built into Windows 11). The gateway UI requires a modern HTML5-capable browser.
- After a successful connection, open a browser and navigate to:
http://192.168.60.1
Login Credentials:
- Username:
root - Default Password:
lora88888888
Note: The gateway ID can be found on the gateway's enclosure label.
3.1.3 Remote Connection via WAN Port
When the gateway is connected to an external network, it can be accessed remotely via the WAN port IP address.
Prerequisites:
- The gateway WAN port is connected to a router or switch
- The gateway's WAN IP address is known (check the router DHCP client list, or log in via the WiFi/LAN port to view it)
Steps:
- Confirm the gateway WAN IP address (e.g., 192.168.31.205)
- Ensure the PC and gateway are on the same network or can route to each other
- Install a modern browser: Google Chrome, Mozilla Firefox, Apple Safari, or Microsoft Edge (built into Windows 11). The gateway UI requires a modern HTML5-capable browser.
- Open a browser and navigate to:
http://<WAN_IP>- Example:http://192.168.31.205
- Enter the login credentials
Login Credentials:
- Username:
root - Default Password:
lora88888888
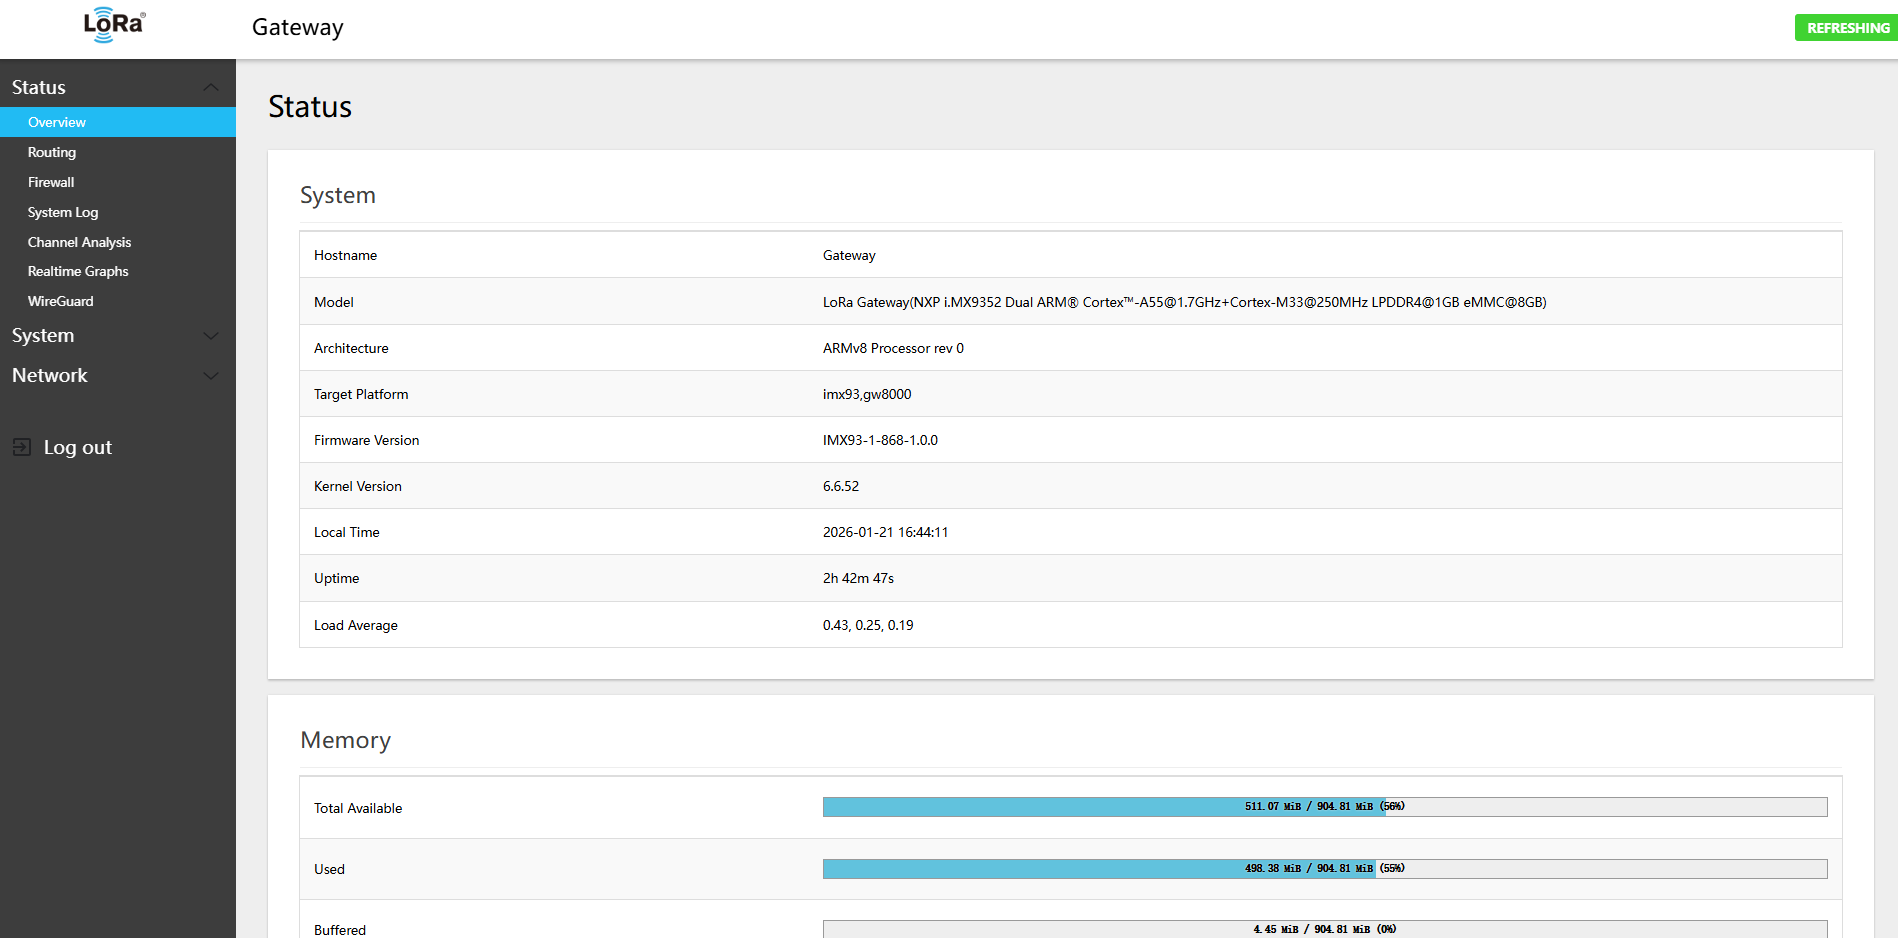
After a successful login, you will be taken to the home page
Security Note: HTTP is used by default. If HTTPS is enabled, use https:// in your browser URL.
3.2 Internet Connection Configuration
3.2.1 WAN Port DHCP Mode
By default, the WAN port is configured as a DHCP client (supports IPv4 and IPv6).
3.2.2 WAN Port Static IP Configuration
By default, the gateway WAN port is configured as a DHCP client. In some scenarios (static IP deployment, port forwarding, etc.) a static IP address must be configured.
Steps:
3.2.2.1 Navigating to the Network Interface Configuration Page
- Log in to the gateway Web management interface
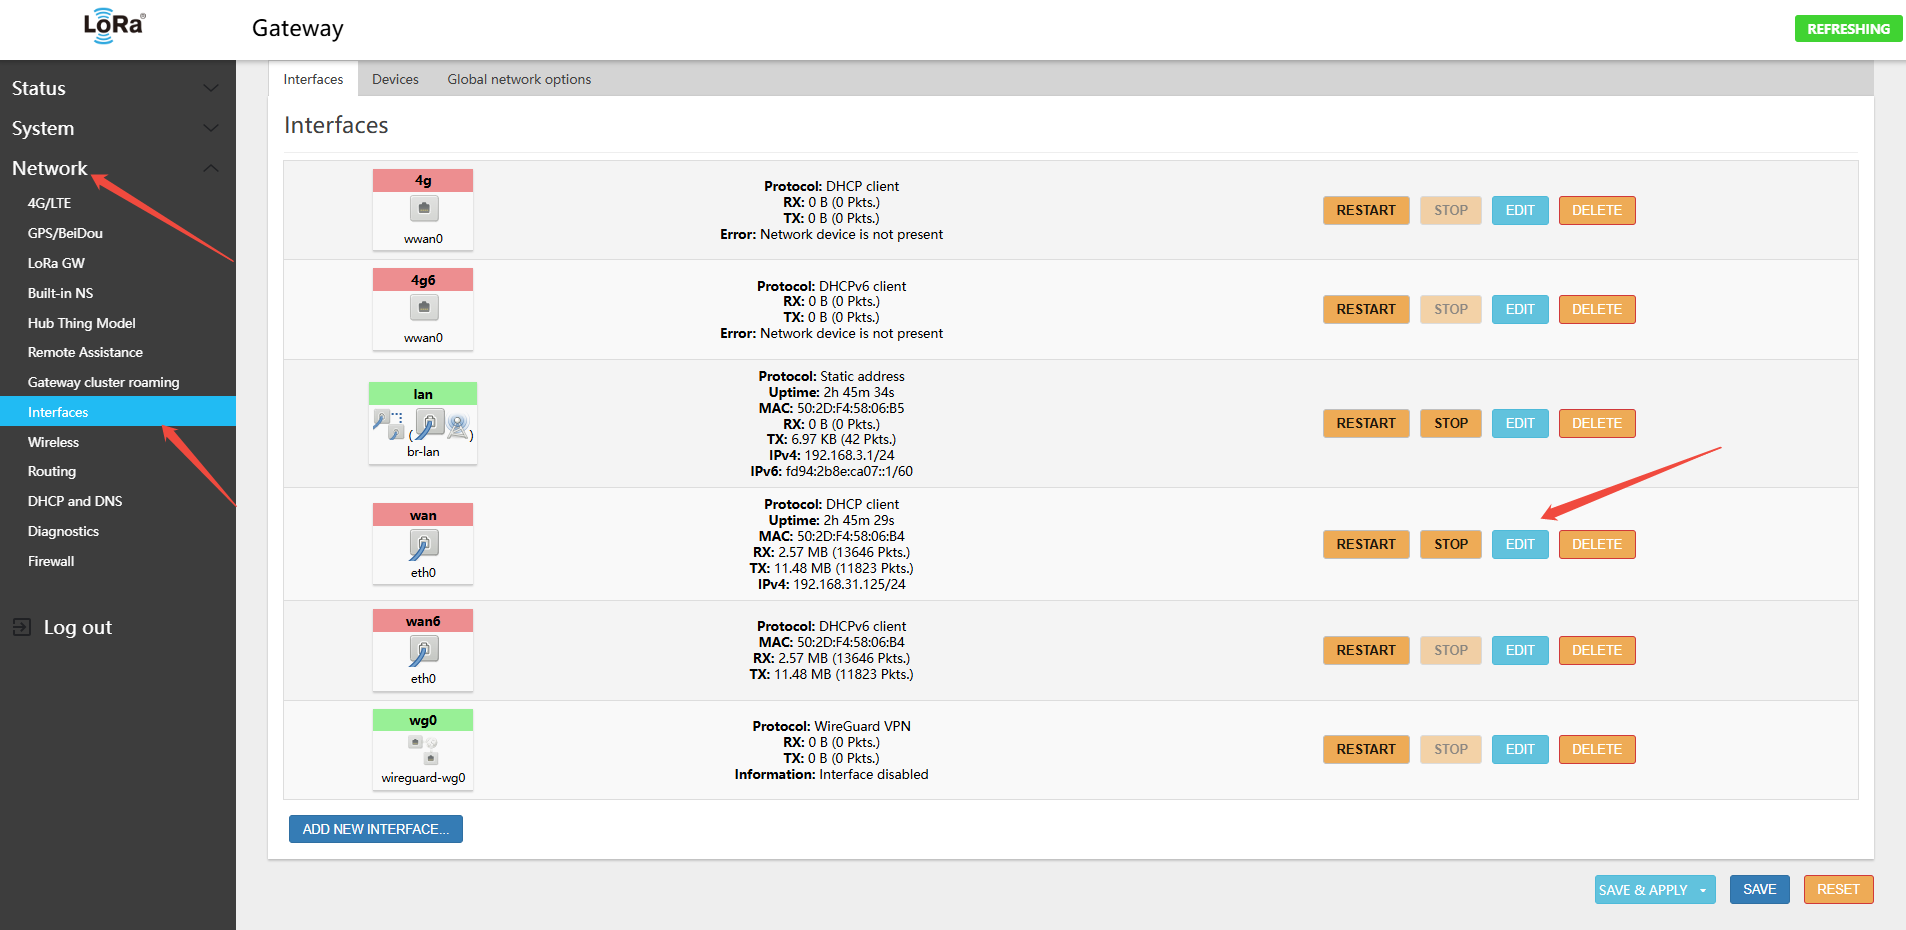
- Click the top menu Network → Interfaces
- In the interface list, find the WAN interface
3.2.2.2 Editing the WAN Interface
- Click the Edit button on the right side of the WAN interface
- Enter the WAN interface configuration page
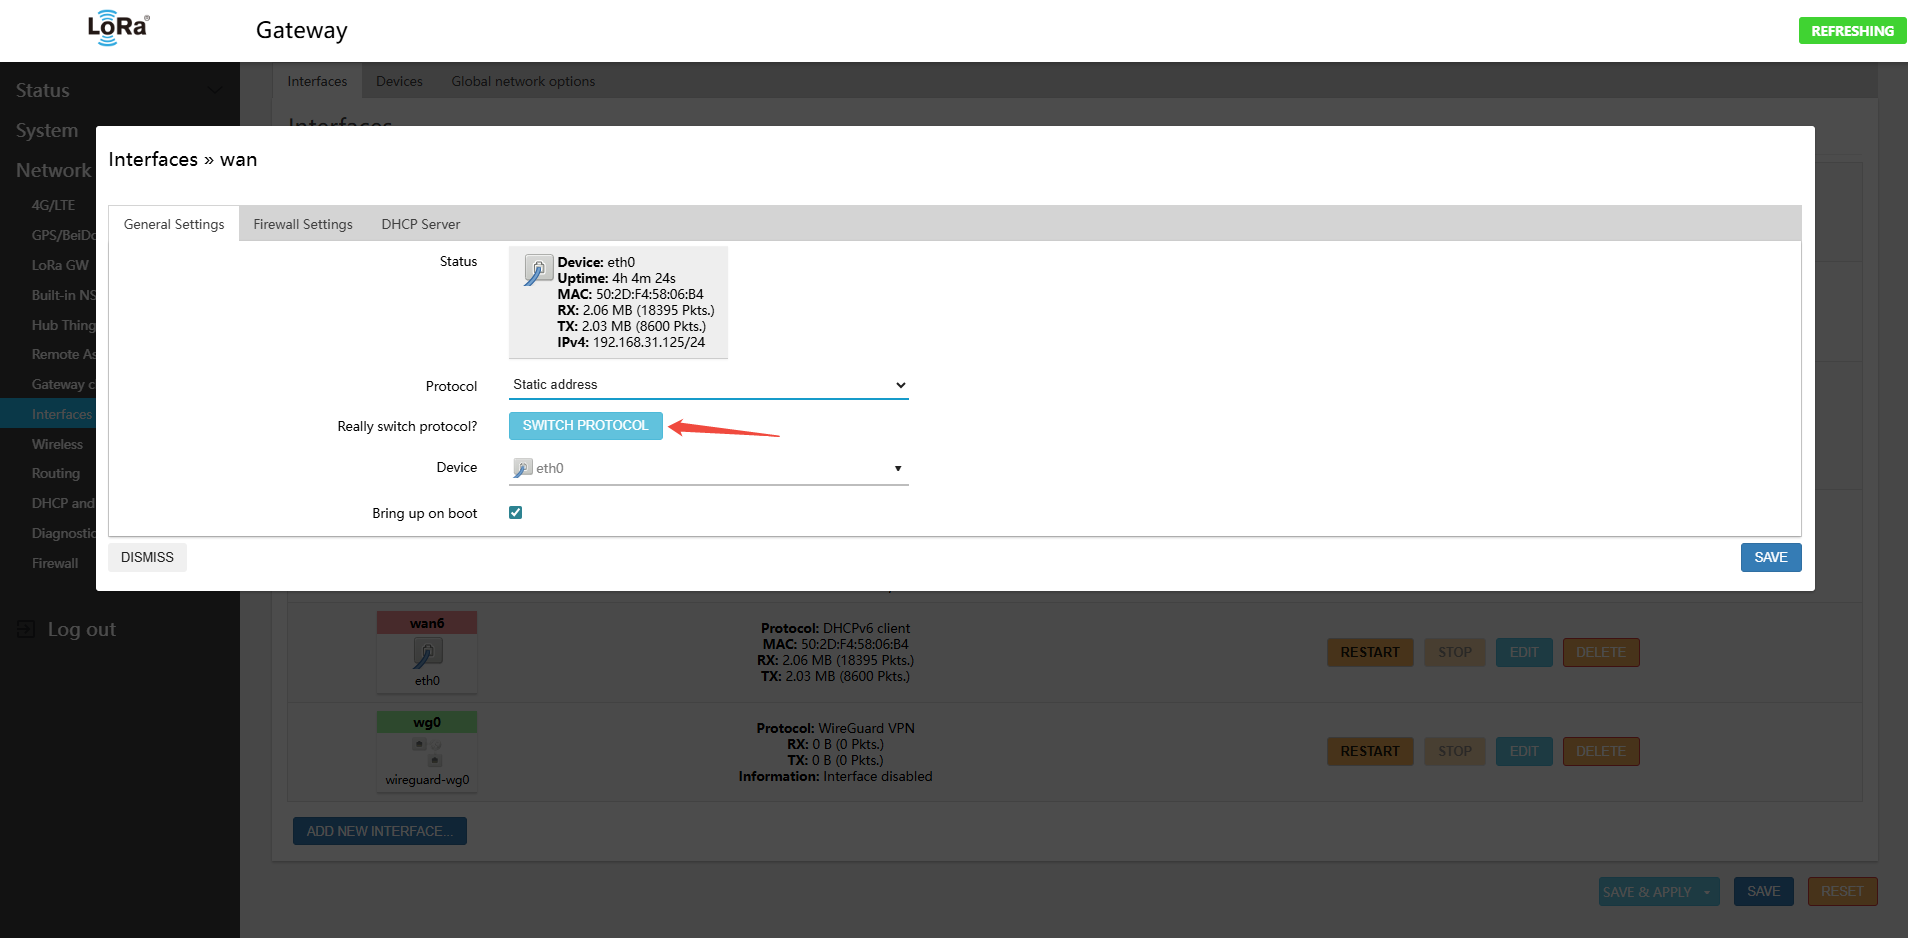
3.2.2.3 Modify Protocol Type
- In the Protocol drop-down menu, change DHCP client to Static address
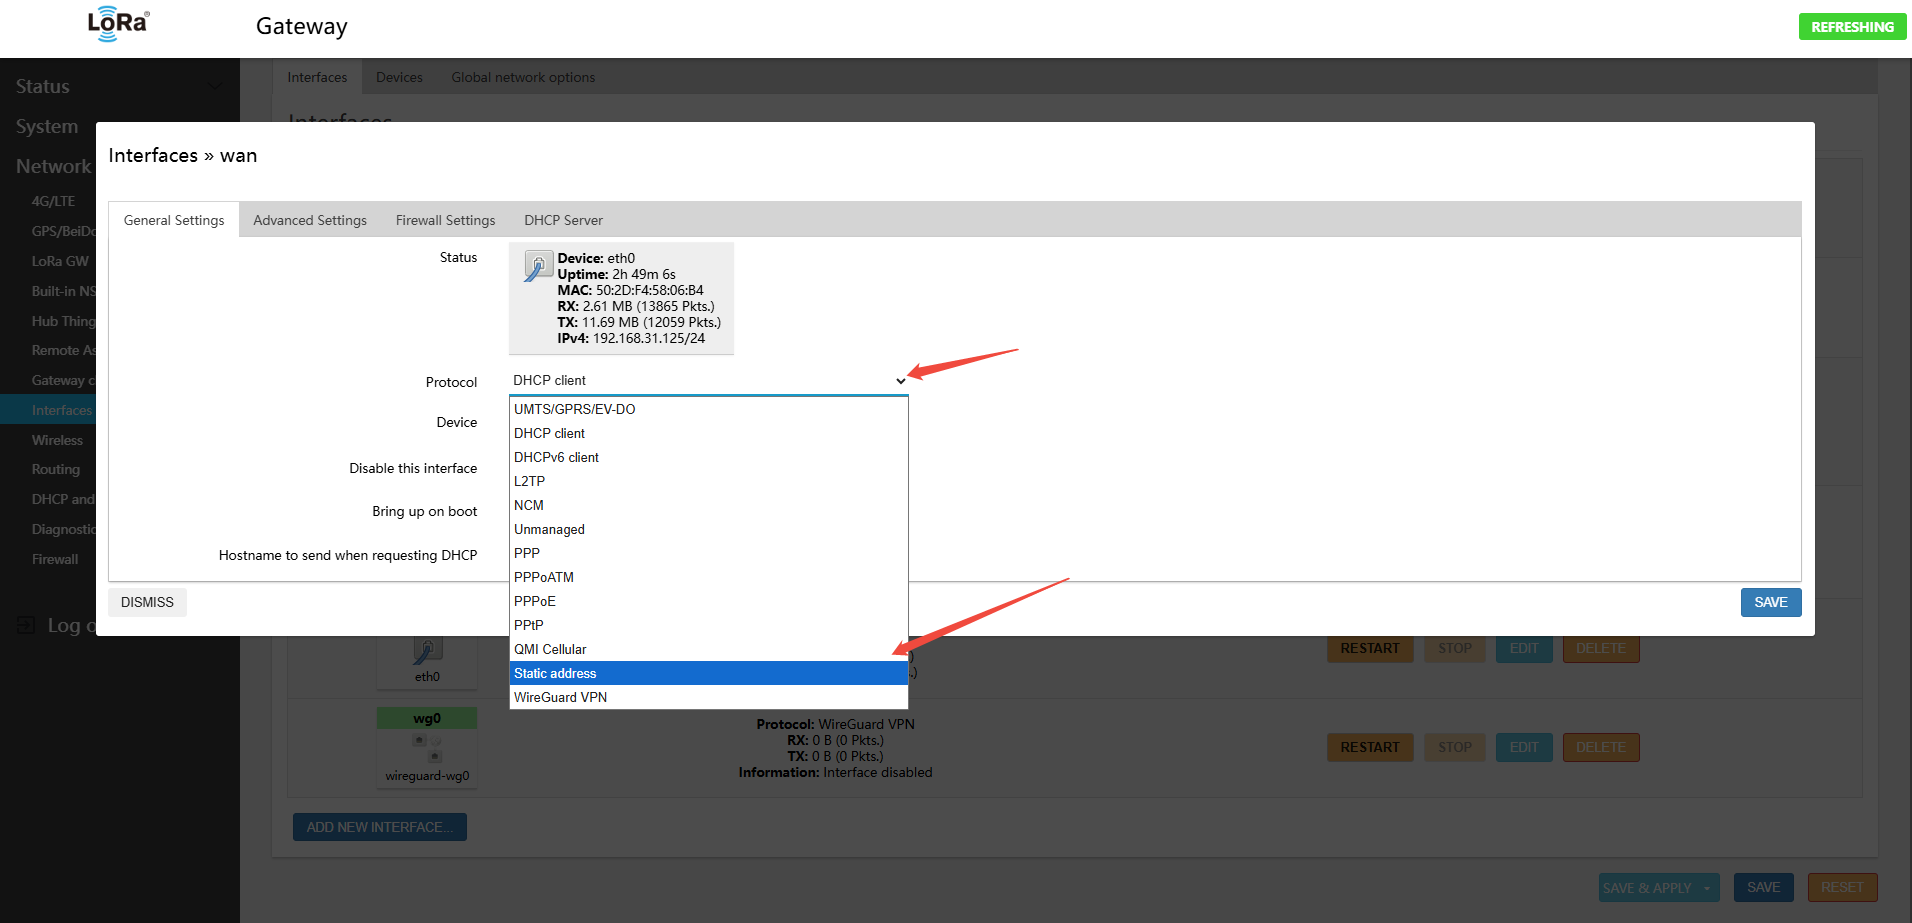
- Switch Protocol
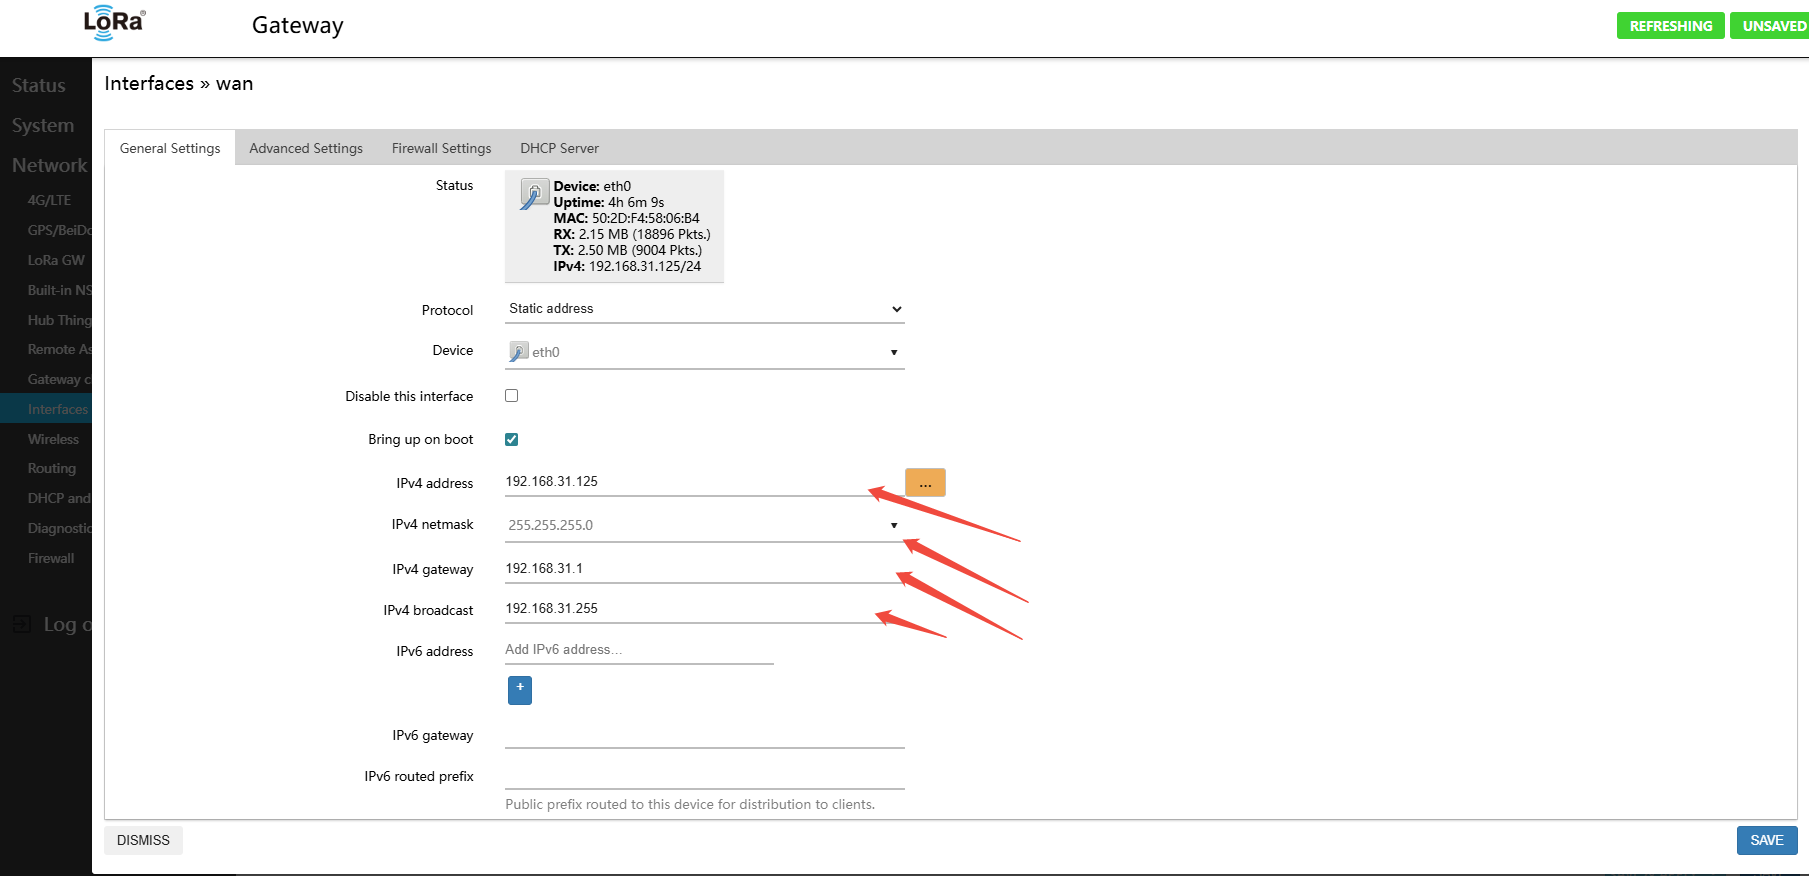
3.2.2.4 Configure Static IP Parameters
Enter the following parameters according to your network environment:
- IPv4 address: The gateway's fixed IP address (e.g., 192.168.31.125, 192.168.31.205)
- IPv4 netmask: Typically 255.255.255.0
- IPv4 gateway address: The IP address of the upstream router (e.g., 192.168.31.1)
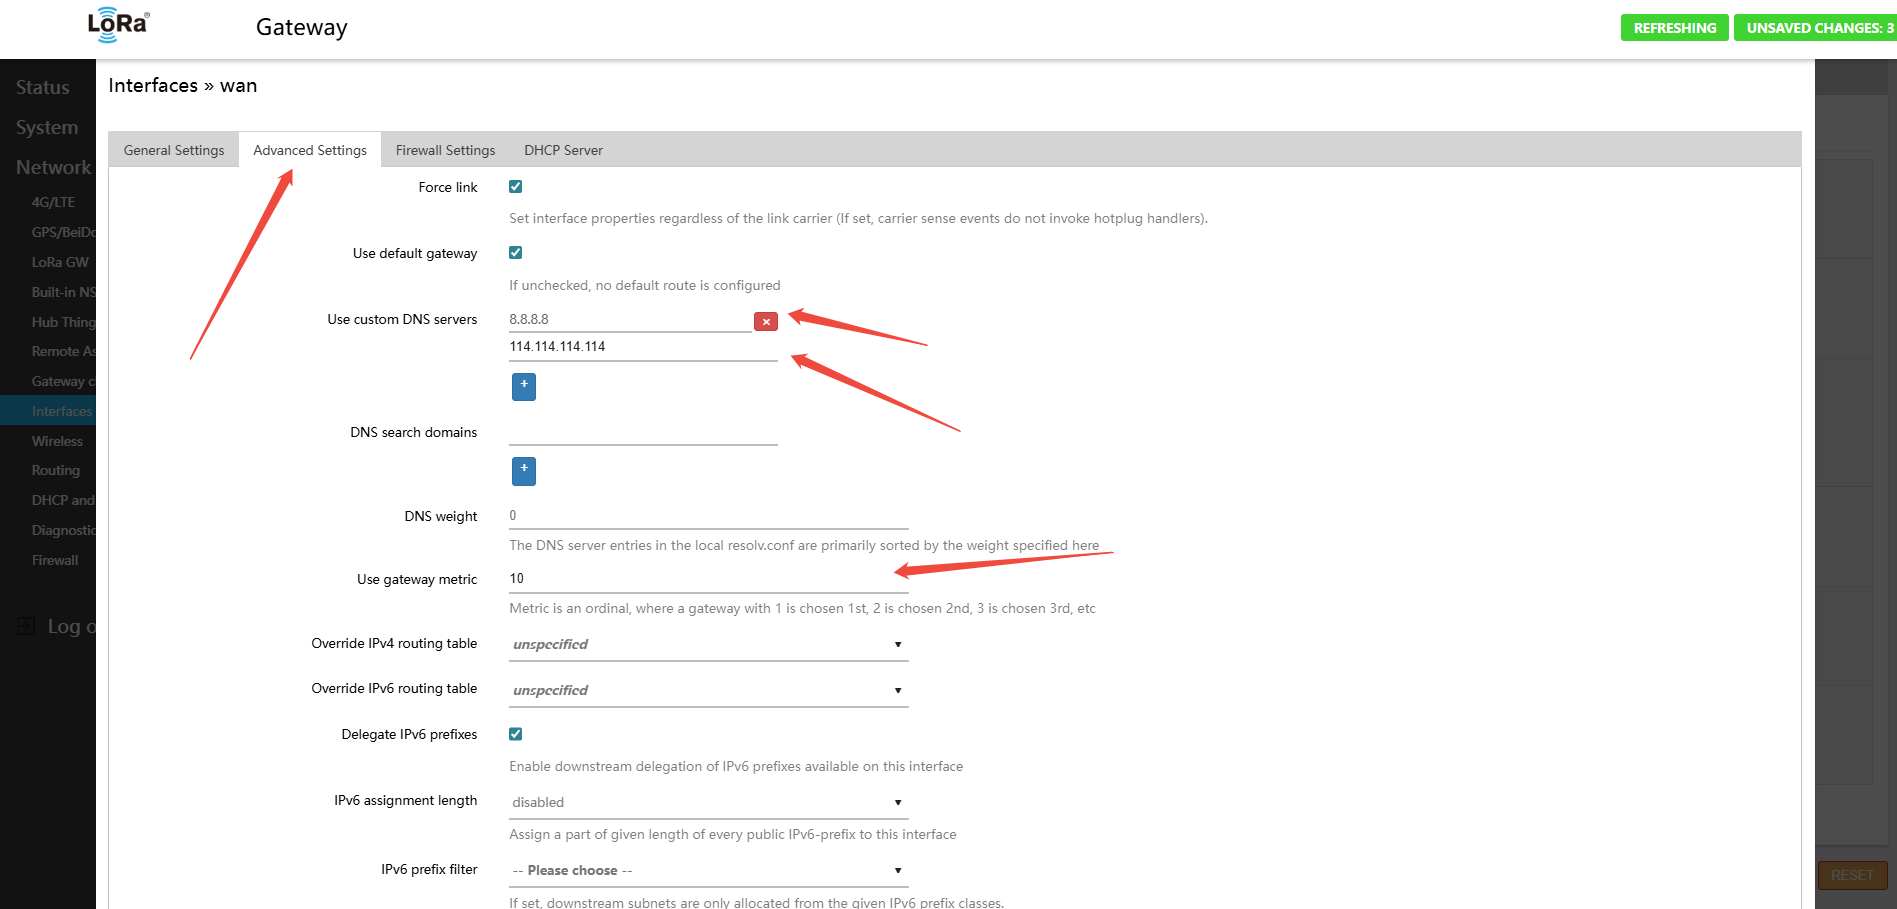
- Use custom DNS servers: Recommended to configure
- DNS Server 1: 8.8.8.8 (Google DNS)
- DNS Server 2: 114.114.114.114 (China DNS)
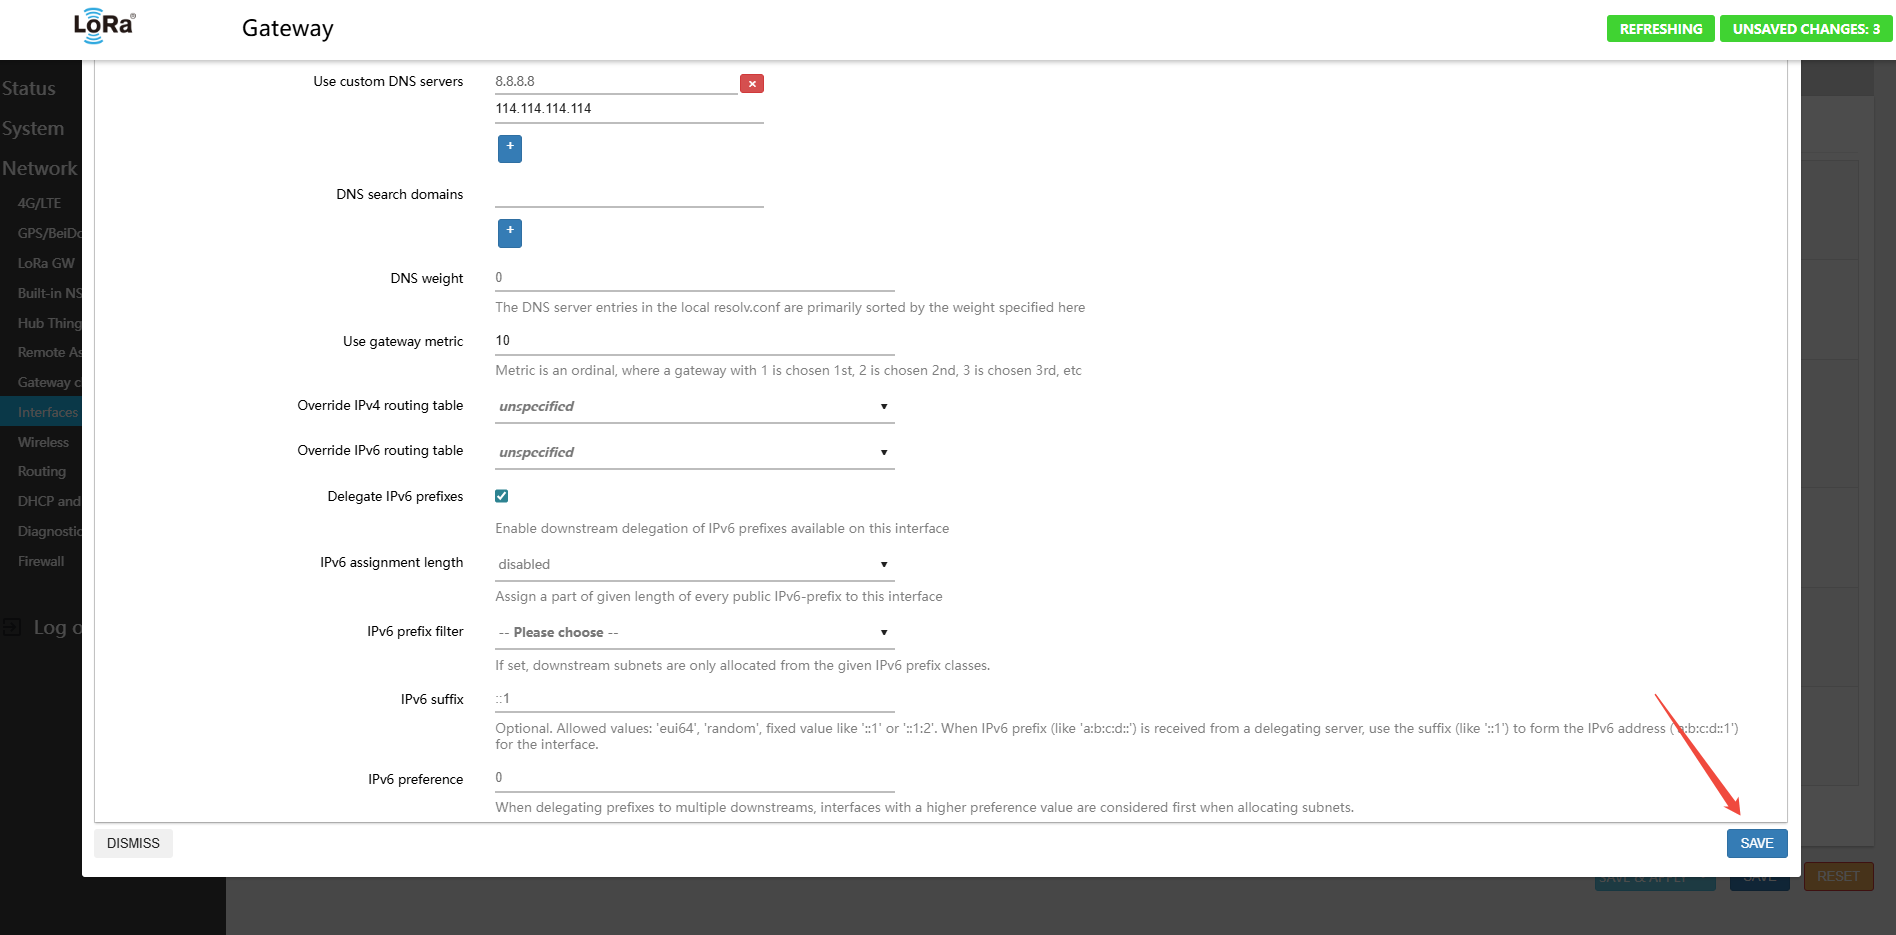
3.2.2.5 Save and Apply Configuration
- Click the Save button at the bottom of the page
- After returning to the interface list page, click the Save & Apply button
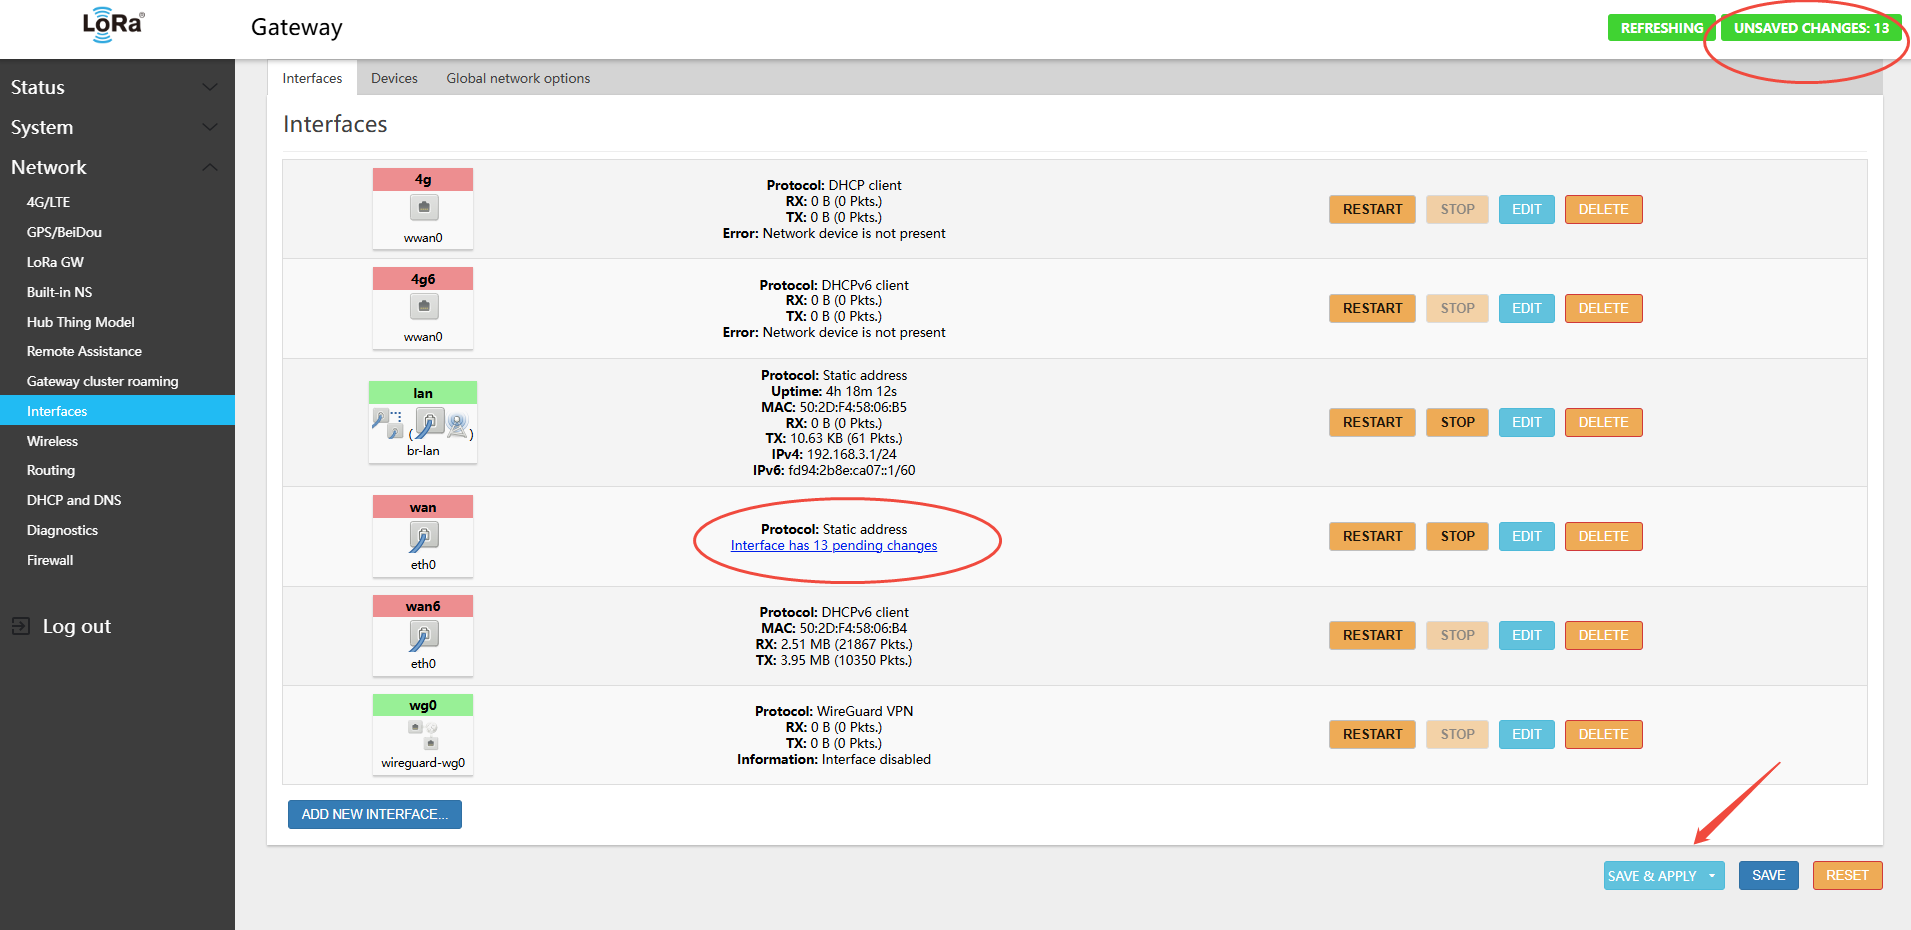
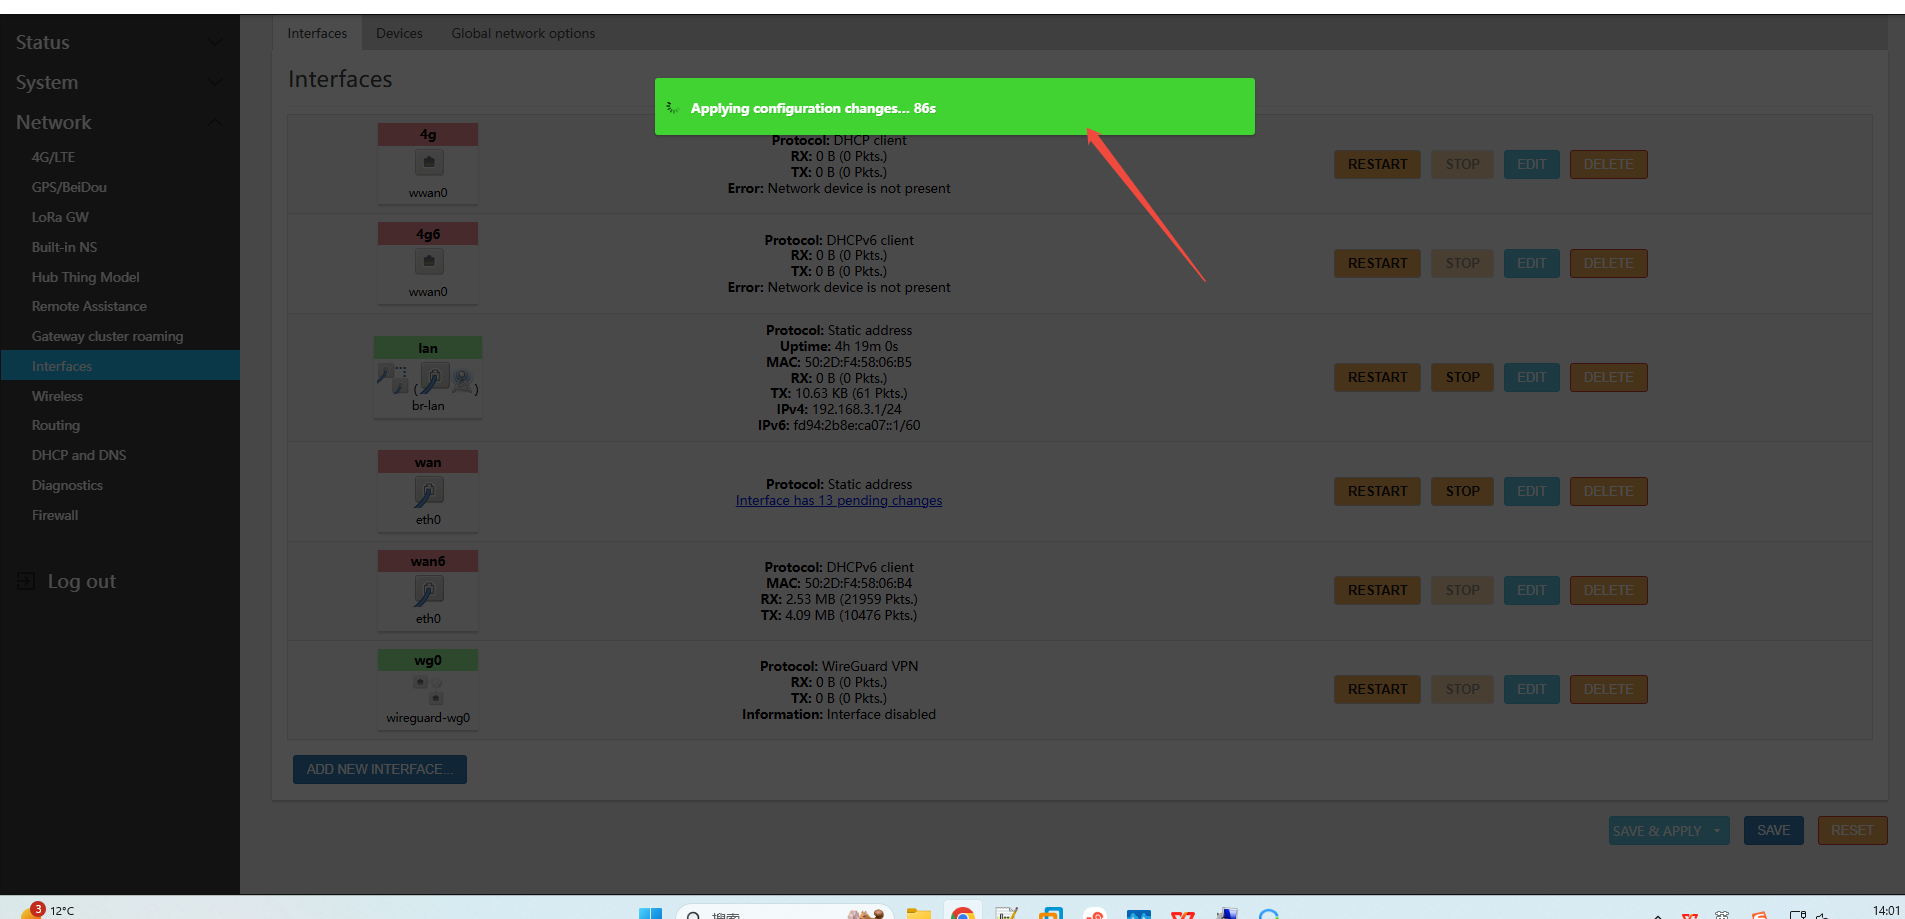
Select Force Apply

- Wait for the configuration to take effect (approximately 10–60 seconds)
WAN port configuration applied successfully
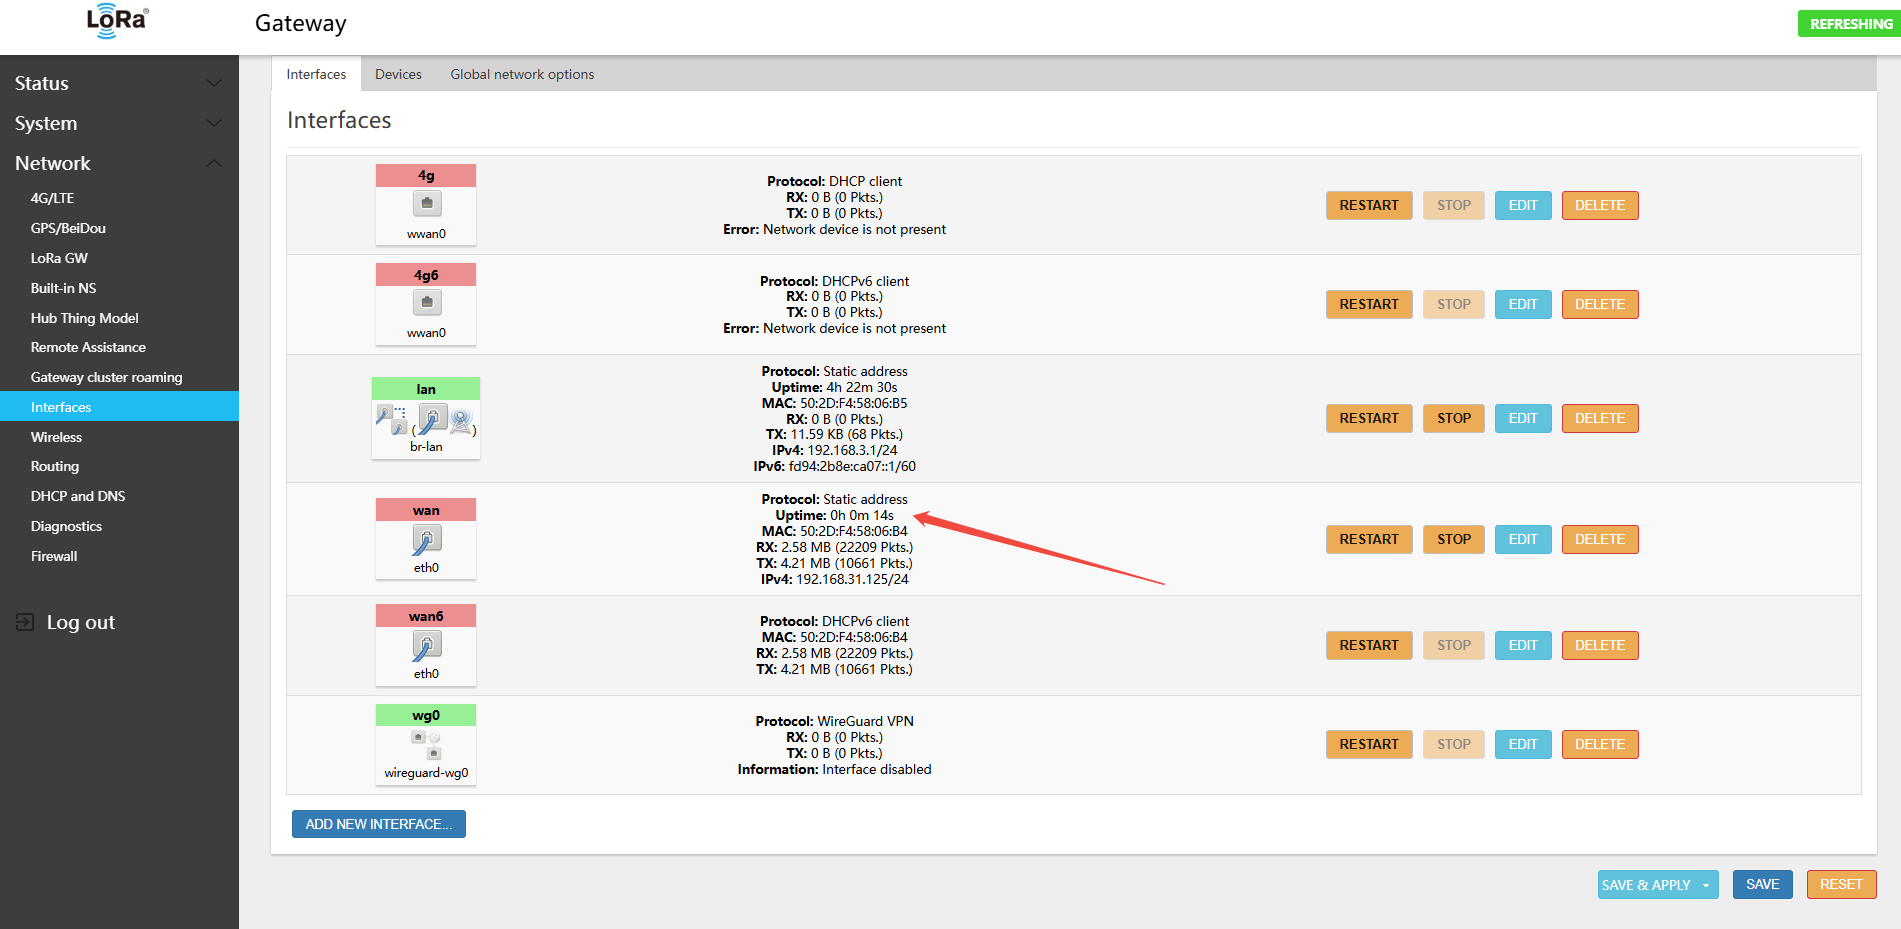
3.2.2.6 Verify Configuration
- Access the gateway using the new static IP address (e.g.,
http://192.168.31.205orhttp://192.168.31.125)
Note:
- Before configuring a static IP, verify that the IP address is not already in use by another device
- Ensure the IP address, subnet mask, and default gateway address match your network environment
- If a misconfiguration locks you out, reconnect via the LAN port or WiFi hotspot to correct the settings
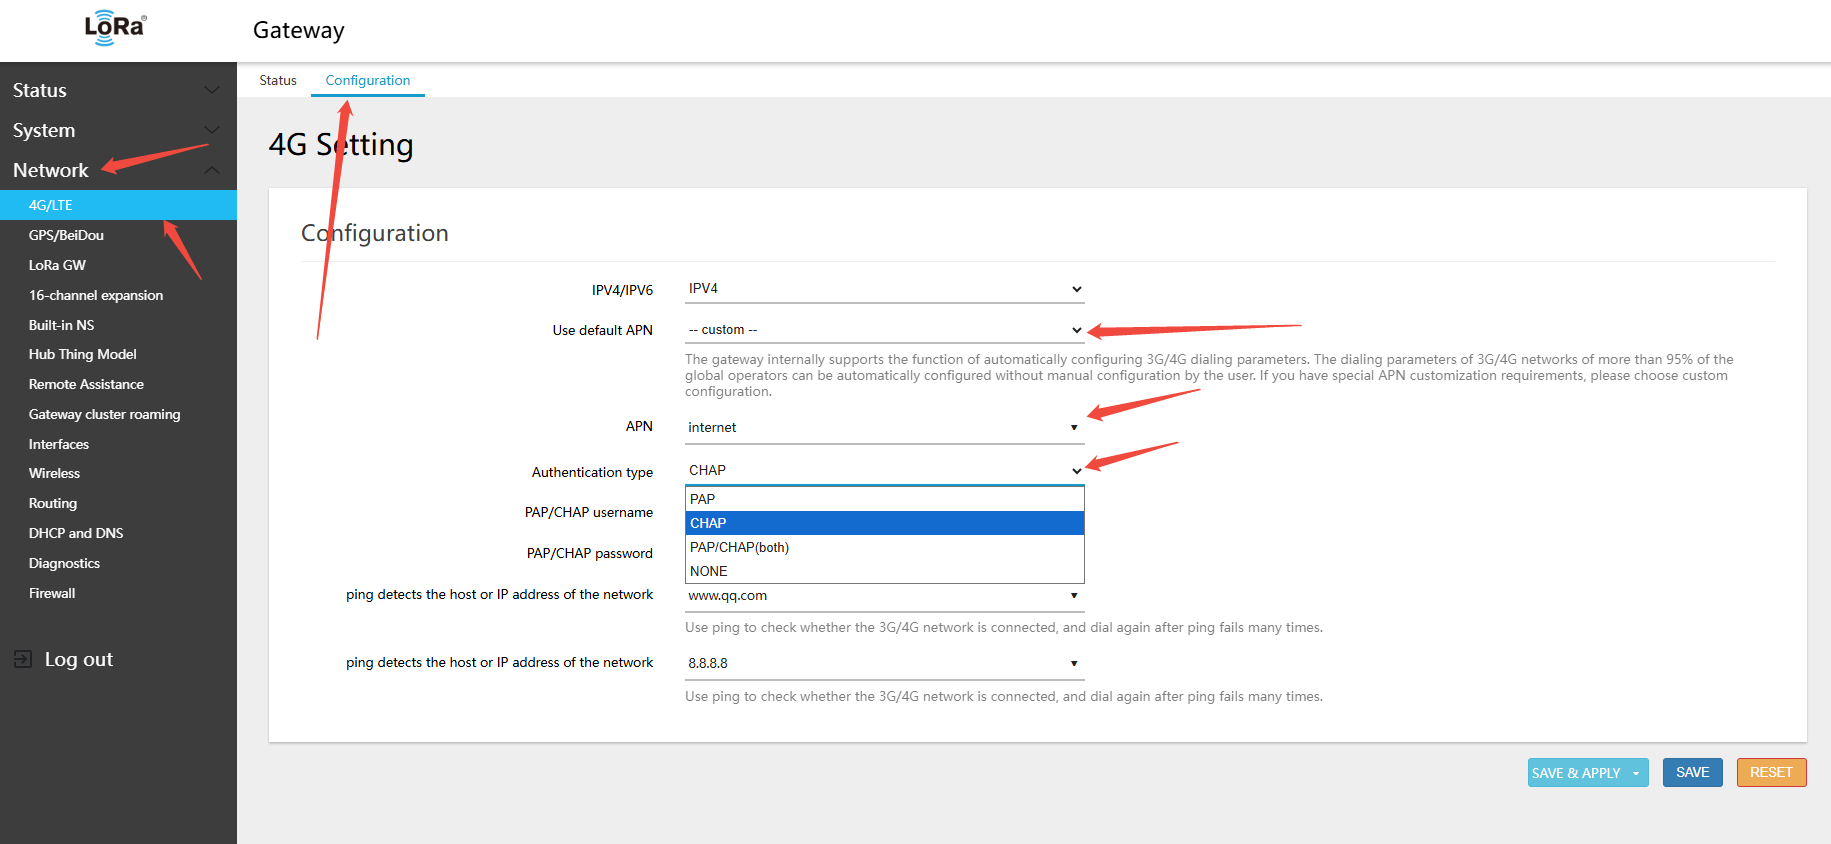
3.2.3 Using 4G LTE
For the 4G LTE version, the gateway is available with domestic (China full-network), European, or global LTE modules. If the SIM card requires no special APN settings, simply power off the gateway, insert the standard-size 4G SIM (the SIM slot does NOT support hot-swap — power off and wait 1 minute for the super-capacitor to discharge before inserting), then power on. The gateway will auto-dial on boot. View the gateway page status

If an APN password is required, configure it on this page
3.2.4 Using 2.4 GHz WiFi
- WiFi-based internet connection is not recommended:
- 1. The GW8000 WiFi module can only operate in either AP mode (hotspot) or STA mode (connect to WiFi router) — not both simultaneously;
- 2. If WiFi is configured in STA mode to connect to a router, the hotspot (AP mode) is disabled. This is different from the GW1000, which supports simultaneous AP and STA mode.
- 3. Wireless connections to the router are relatively prone to disconnection
If the installation environment only has 2.4G WiFi access, follow the steps below
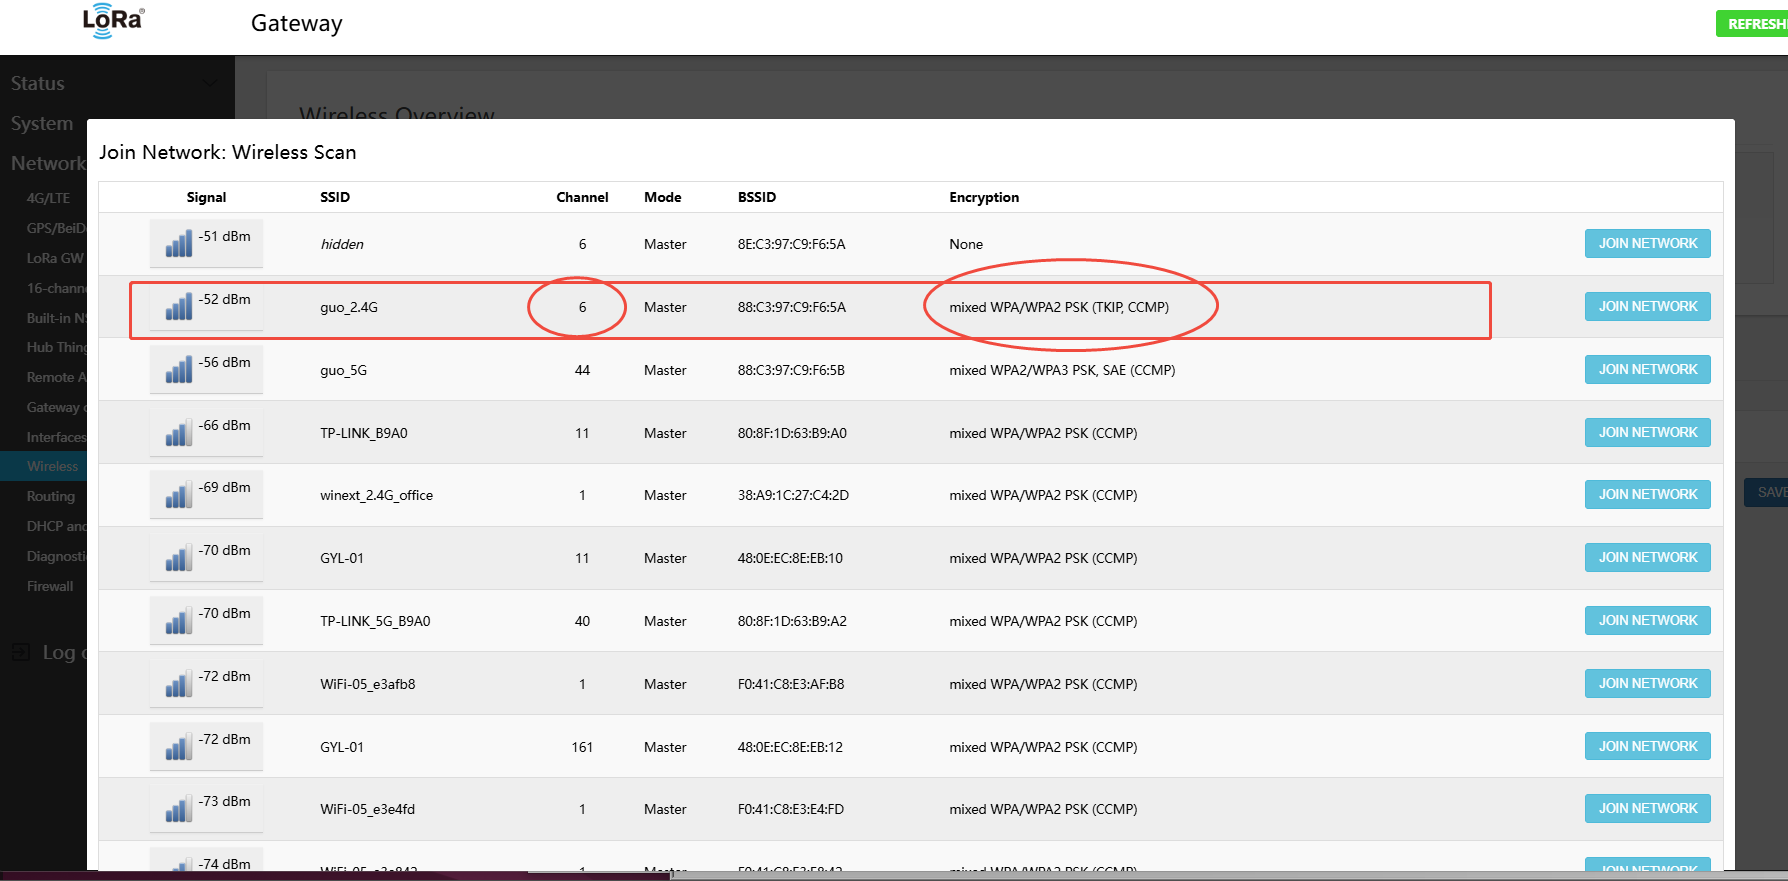
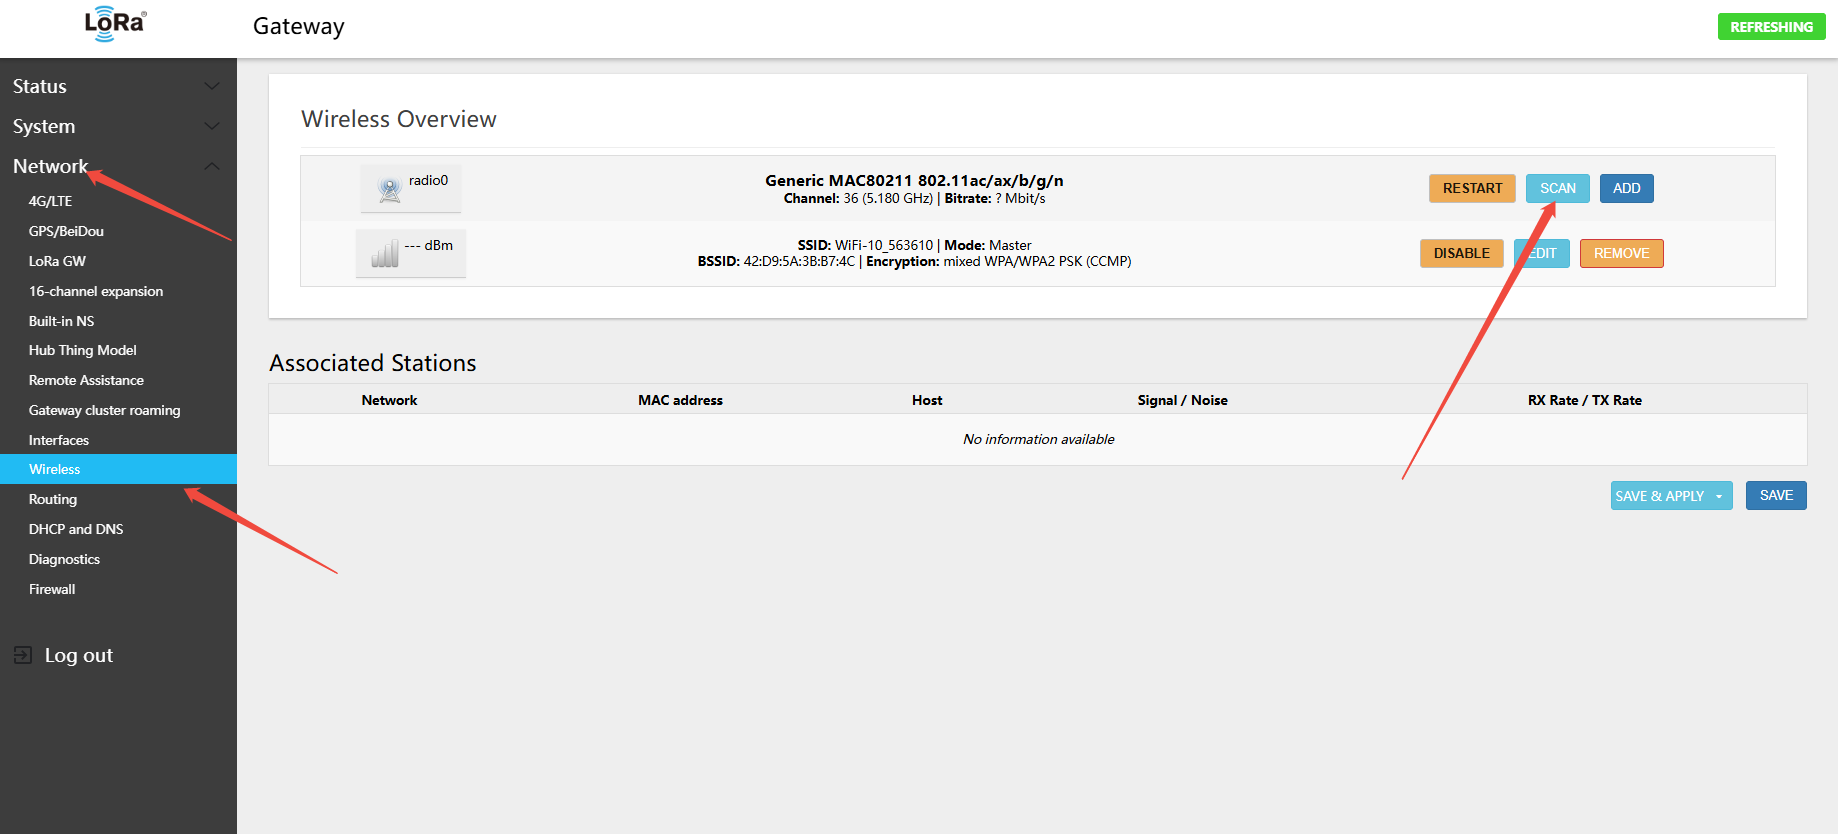
Navigate to Network → Wireless, then click SCAN
Note:
- Note the 2.4 GHz WiFi channel of the network you want to connect to
- Remember the WiFi authentication and encryption method of the network you want to connect to:
- The scan list includes both 2.4 GHz and 5.8 GHz hotspots. The gateway supports both bands but can only operate on one channel at a time.
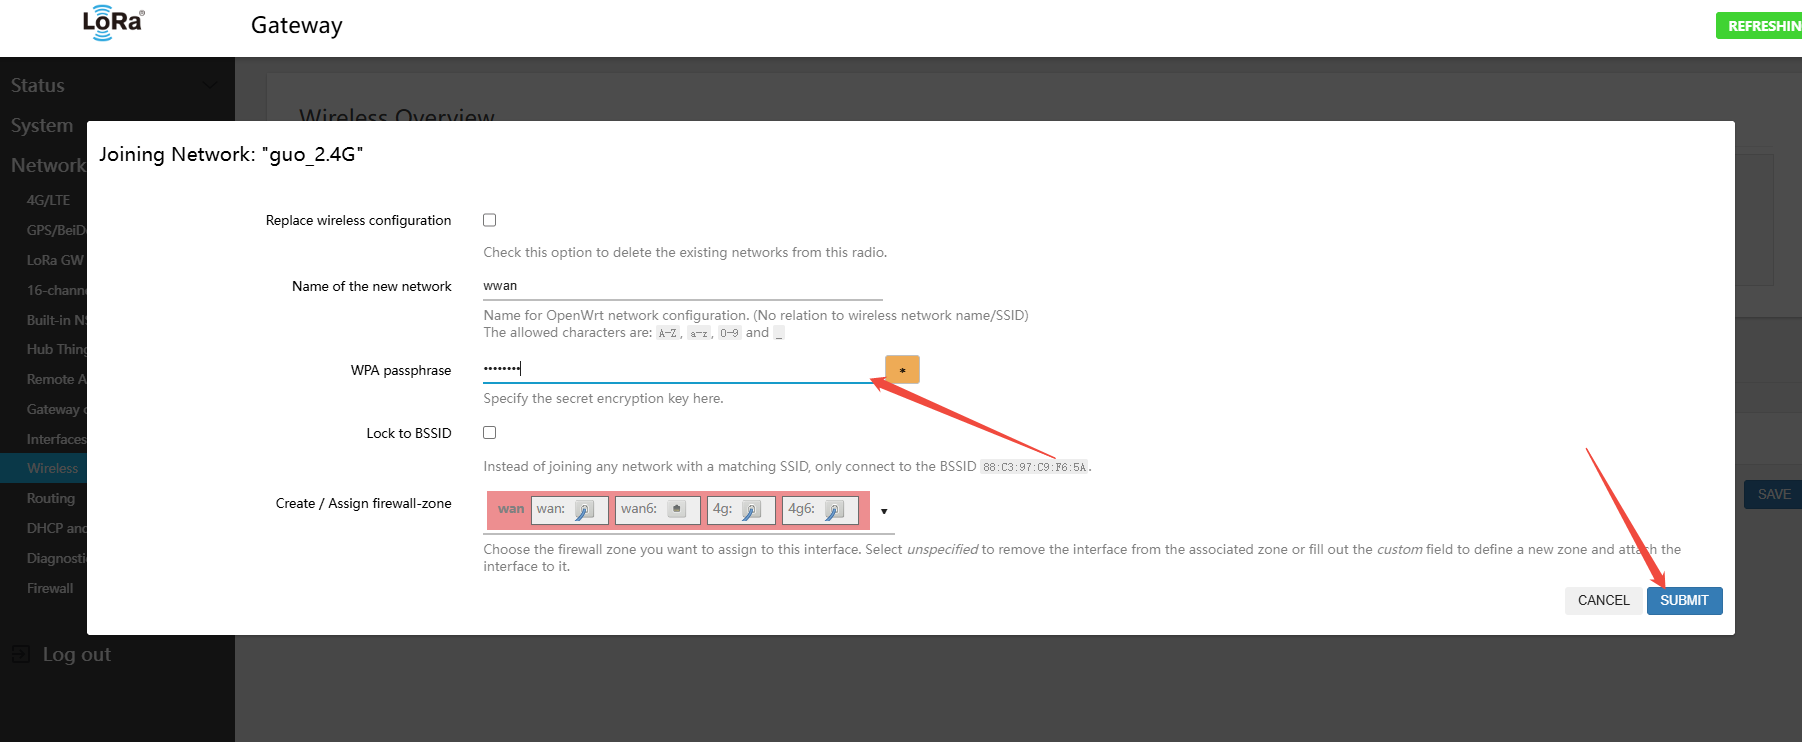
In the corresponding WiFi hotspot row, click "Join Network", enter the WiFi password, then click Save to submit
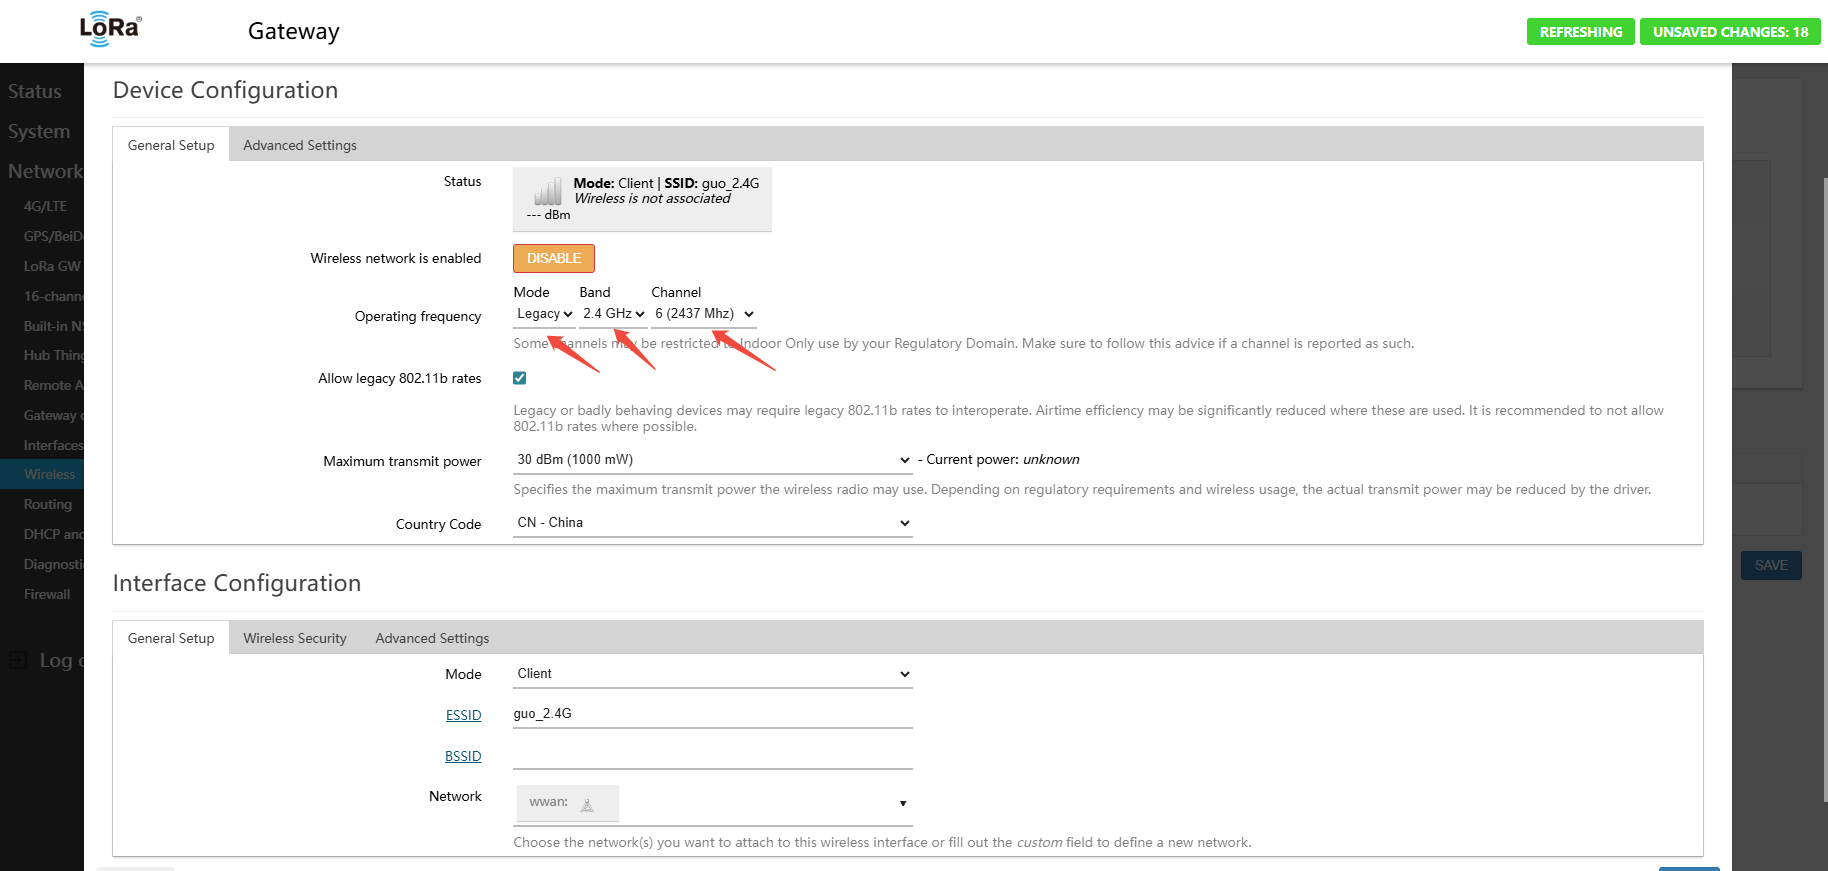
Then select the band information on the page
- Mode: Legacy
- BAND:2.4GHz
- channel: (2.4 GHz WiFi channel range: 1–13) select the channel from the scan, e.g. 6
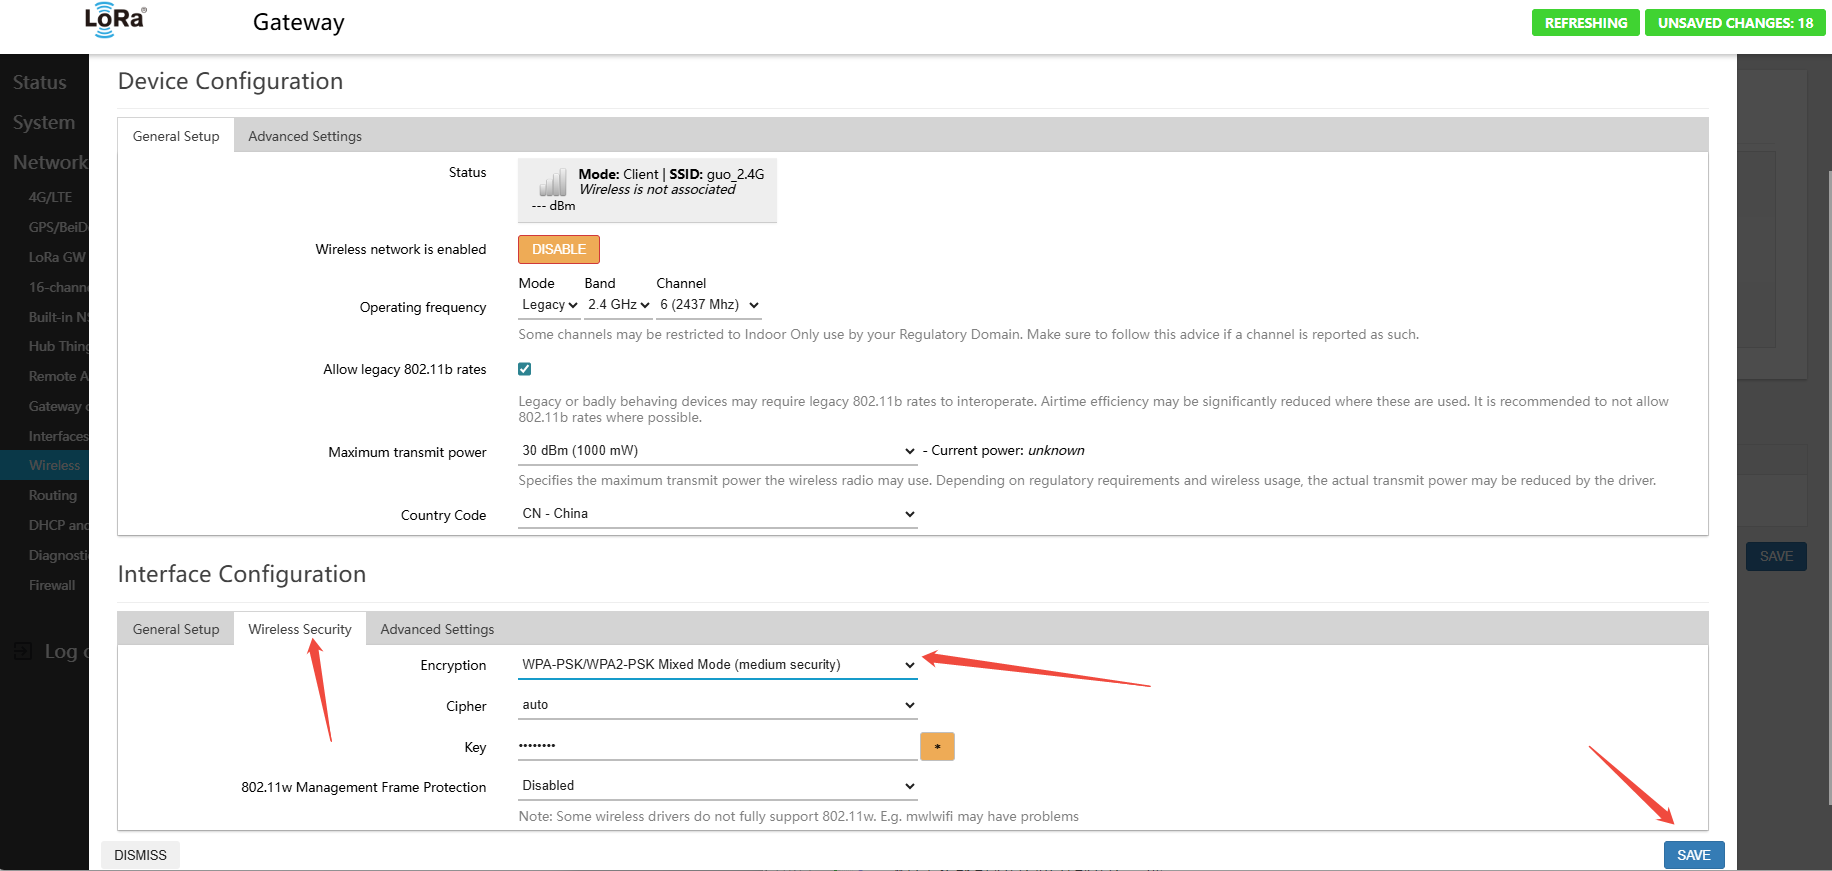
Then select the WiFi authentication and encryption method (options: WPA2-PSK, WPA3-SAE, WPA2-PSK/WPA3-SAE mixed mode, WPA-PSK/WPA2-SAE mixed mode, WPA-PSK)
- Encryption: Select the encryption method detected during scanning (e.g., WPA-PSK/WPA2-SAE mixed mode)

Verify that the channel and encryption method are correct, then click the Save button
Note:
- WiFi can only operate in either AP mode or STA mode at one time — not both
- AP mode means the gateway creates a WiFi hotspot that PCs and phones can connect to
- STA mode means the gateway uses WiFi to connect to the router's WiFi network
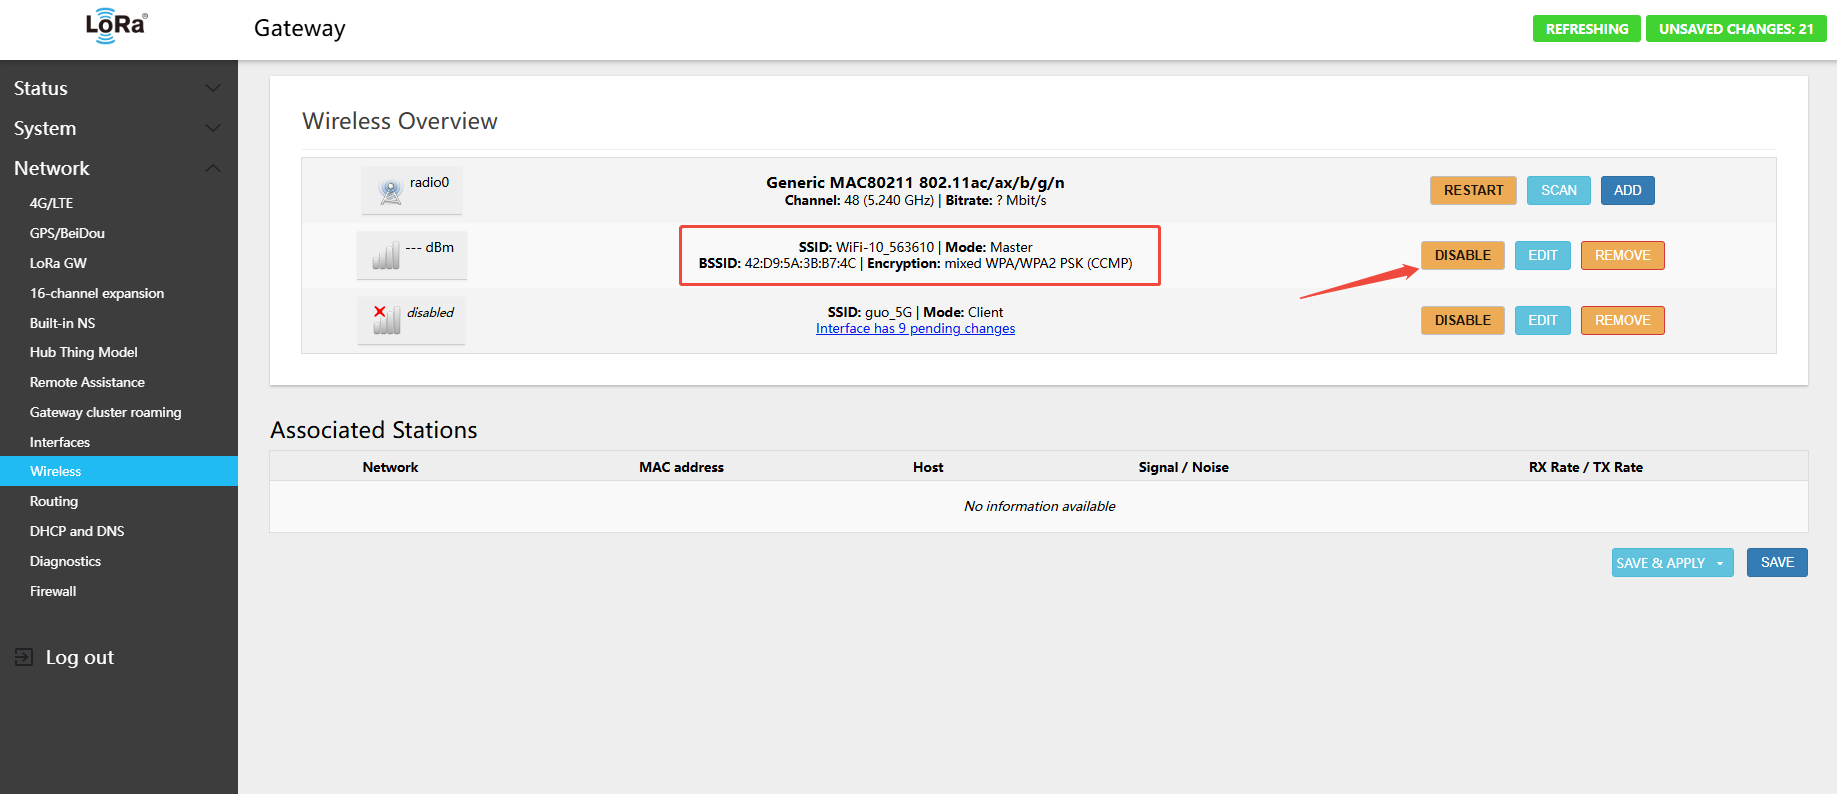
The STA interface is now configured to connect to the router. Disable the AP Master interface by clicking the disabled button
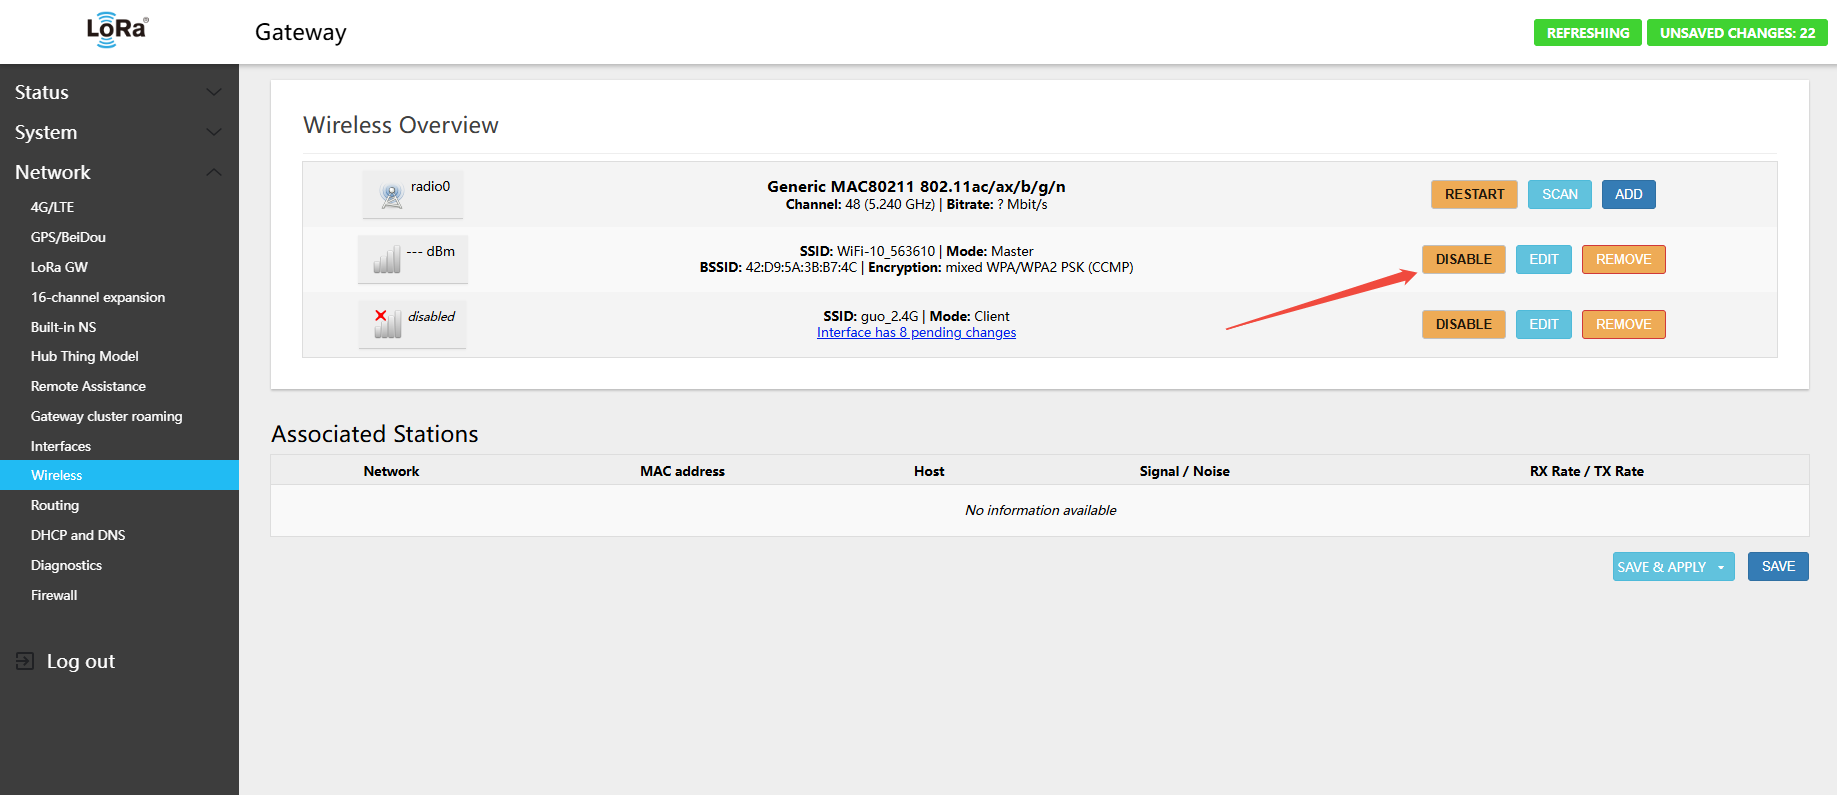
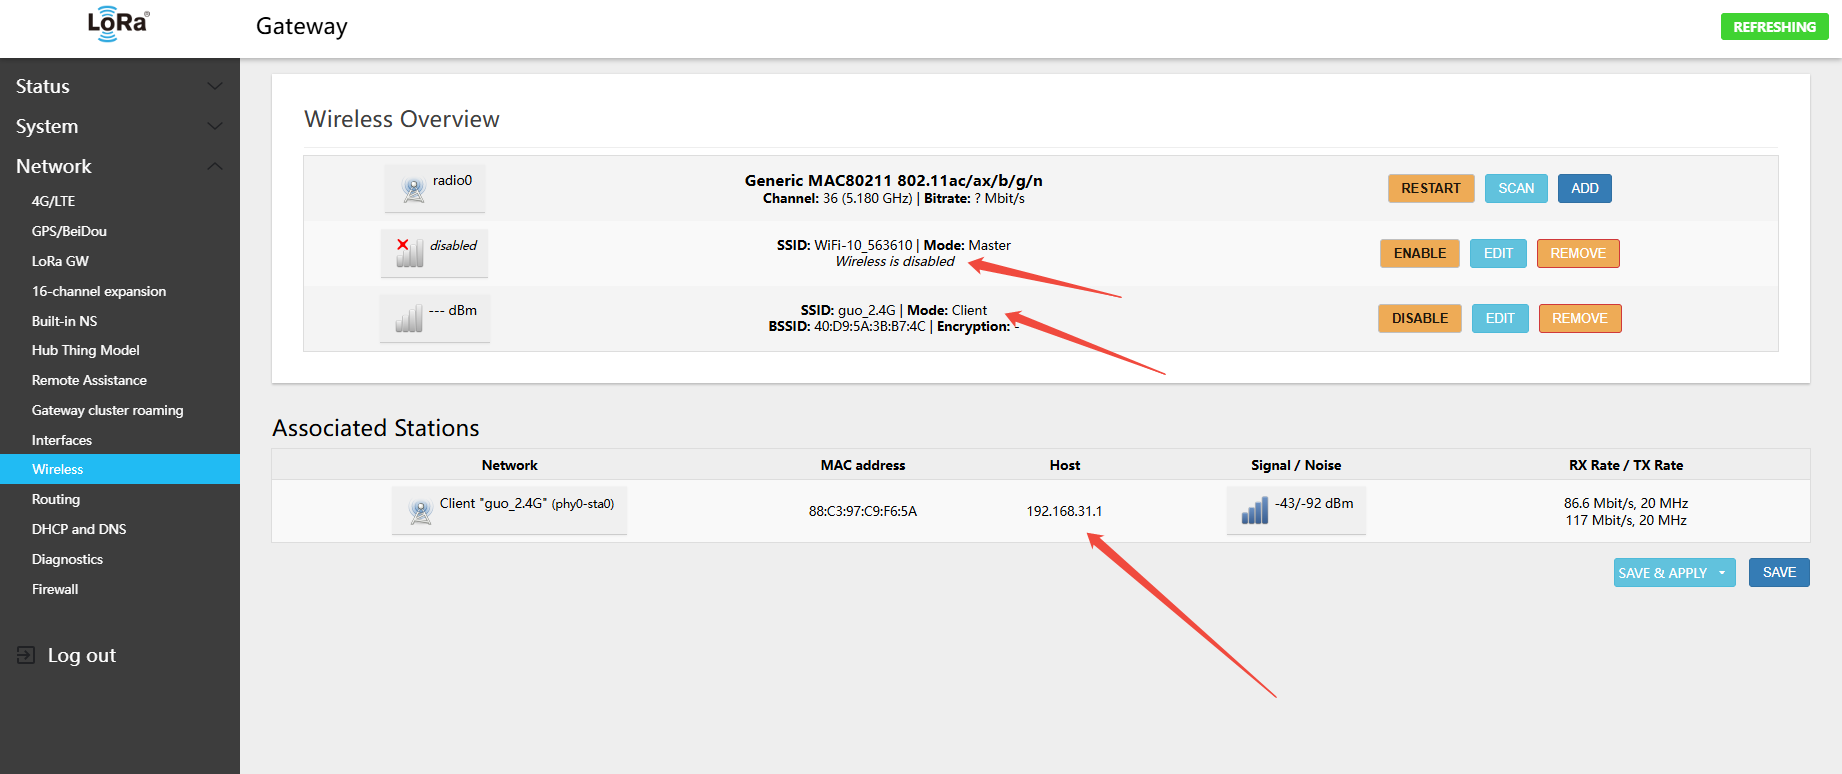
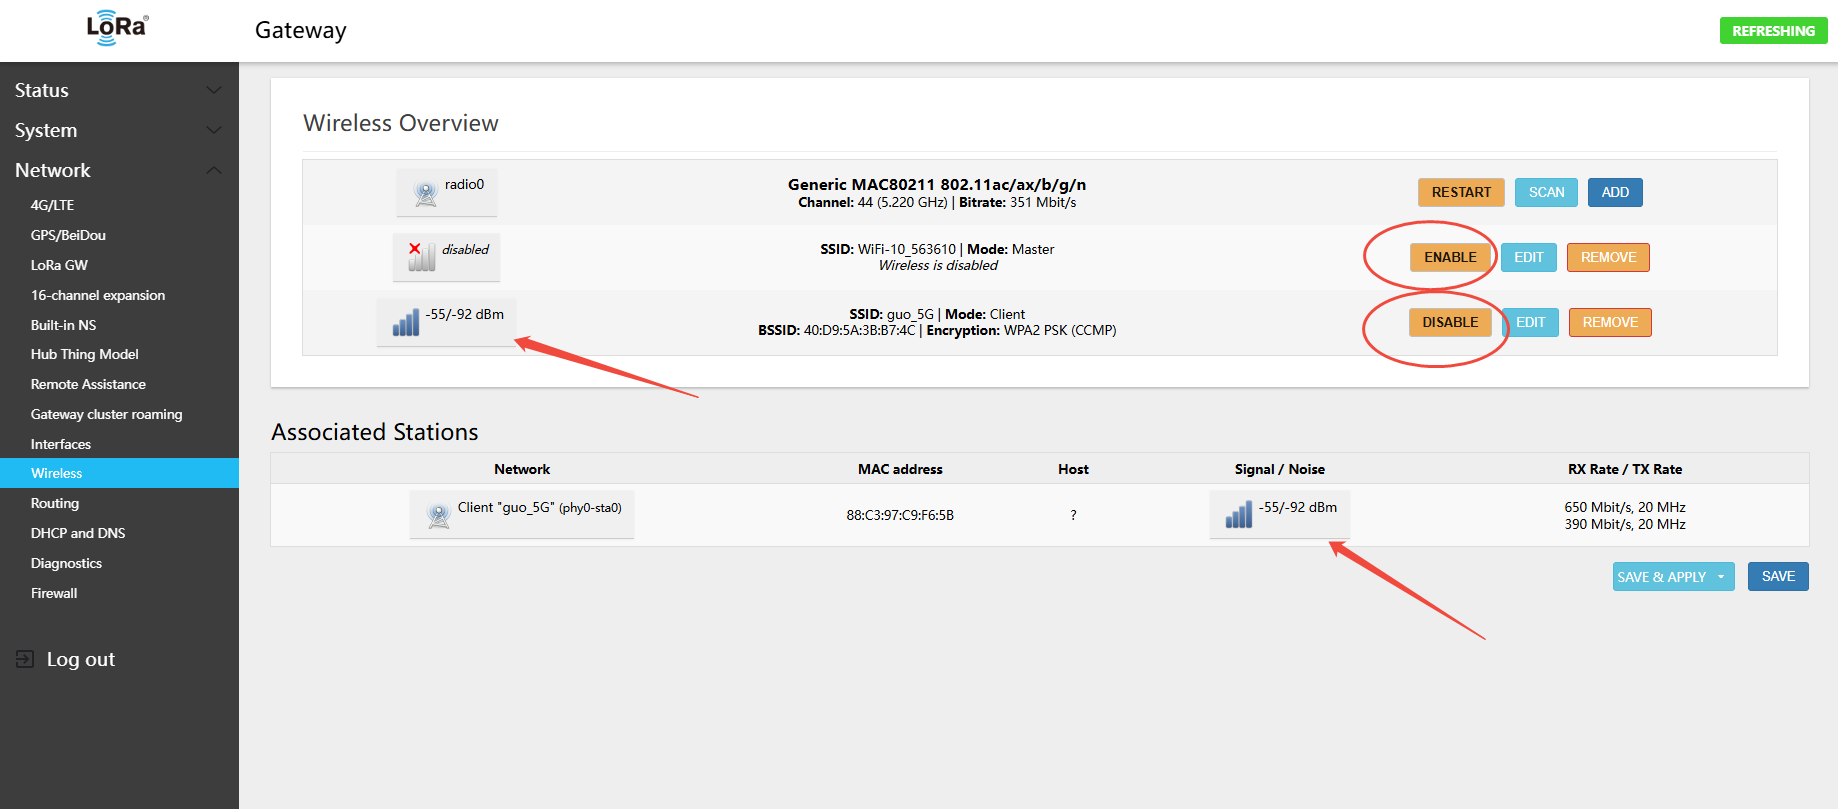
After a successful connection, the AP hotspot is disabled, and the STA connects to the WiFi router — connection is complete
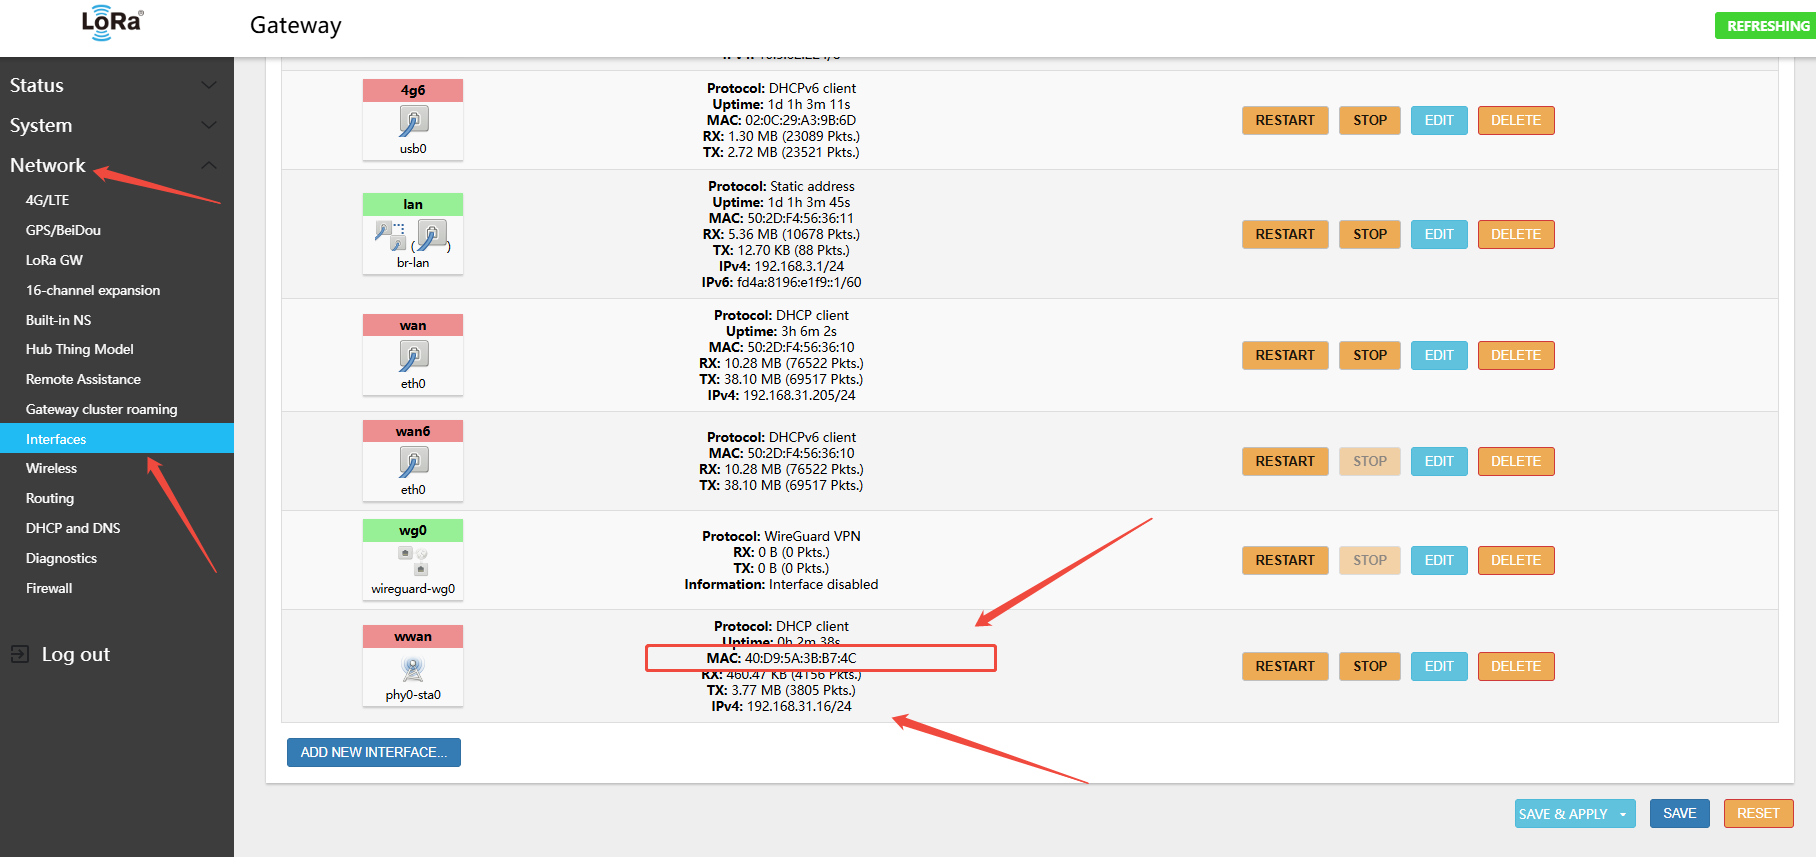
Navigate to Network → Interfaces
Note the WiFi IP address and MAC address. You can bind the gateway's WiFi MAC to a static IP in your router, so you can always access the gateway management page via that IP.
3.2.5 Using 5.8 GHz WiFi
- WiFi-based internet connection is not recommended:
- 1. The GW8000 WiFi module can only operate in either AP mode (hotspot) or STA mode (connect to WiFi router) — not both simultaneously;
- 2. If WiFi is configured in STA mode to connect to a router, the hotspot (AP mode) is disabled. This is different from the GW1000, which supports simultaneous AP and STA mode.
- 3. Wireless connections to the router are relatively prone to disconnection
If the installation environment only has 5.8G (5 GHz) WiFi access, follow the steps below
Navigate to Network → Wireless, then click SCAN
Note:
- Note the 5.8 GHz WiFi channel of the network you want to connect to
- Remember the WiFi authentication and encryption method of the network you want to connect to:
- The scan list includes both 2.4 GHz and 5.8 GHz hotspots. The gateway supports both bands but can only operate on one channel at a time.
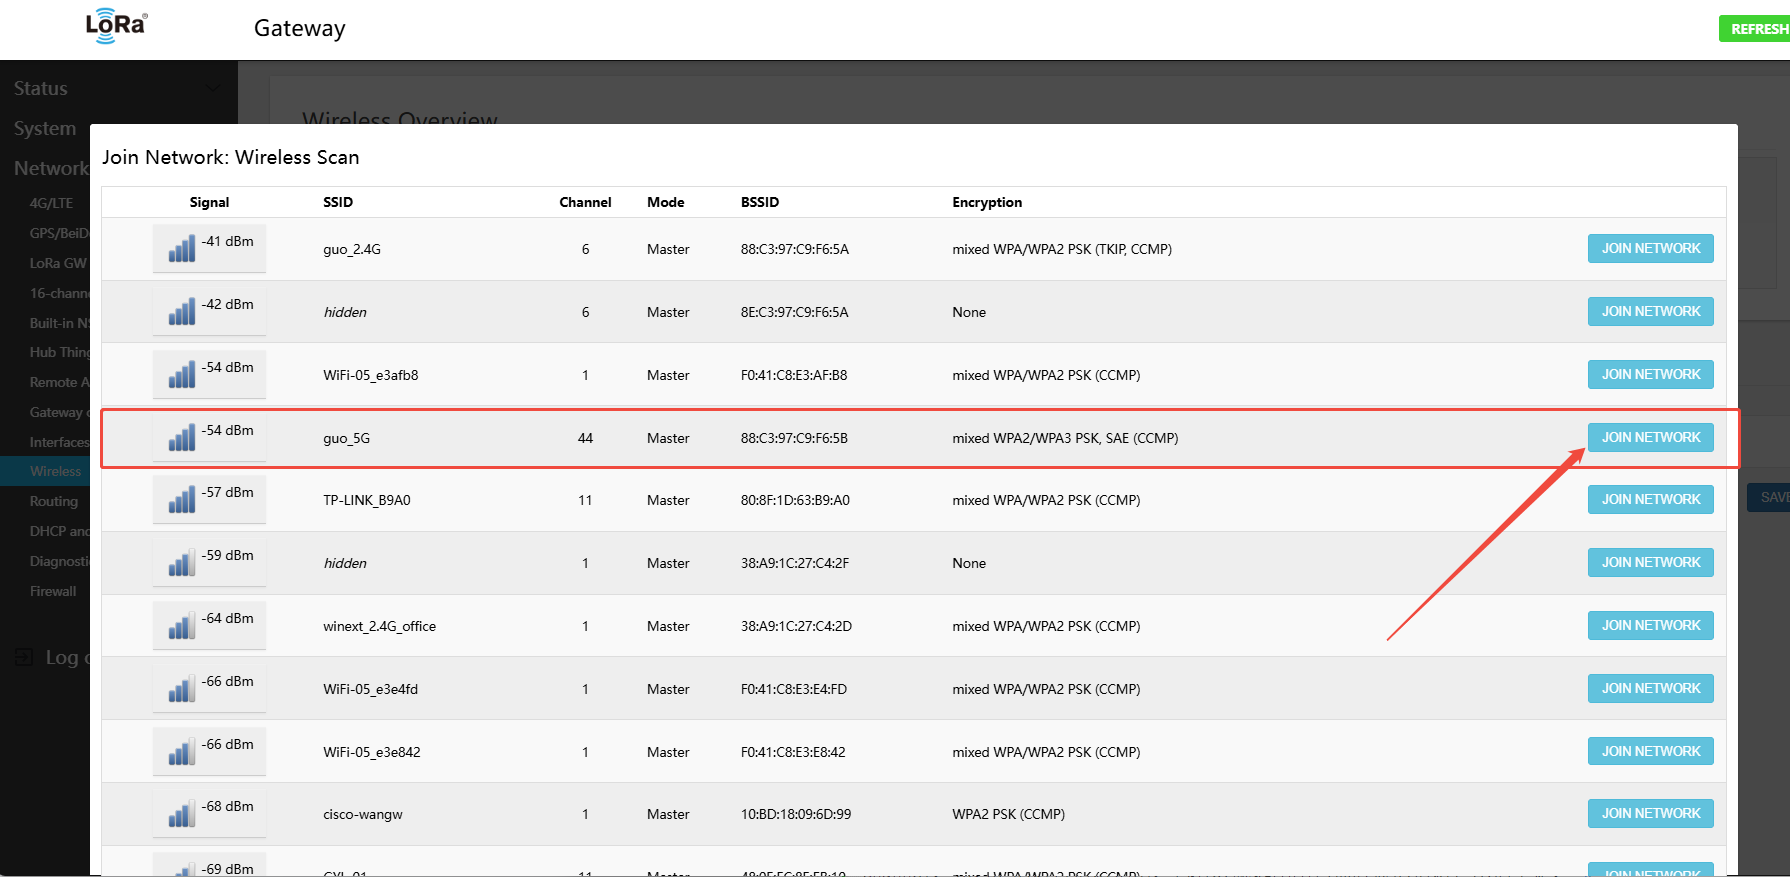
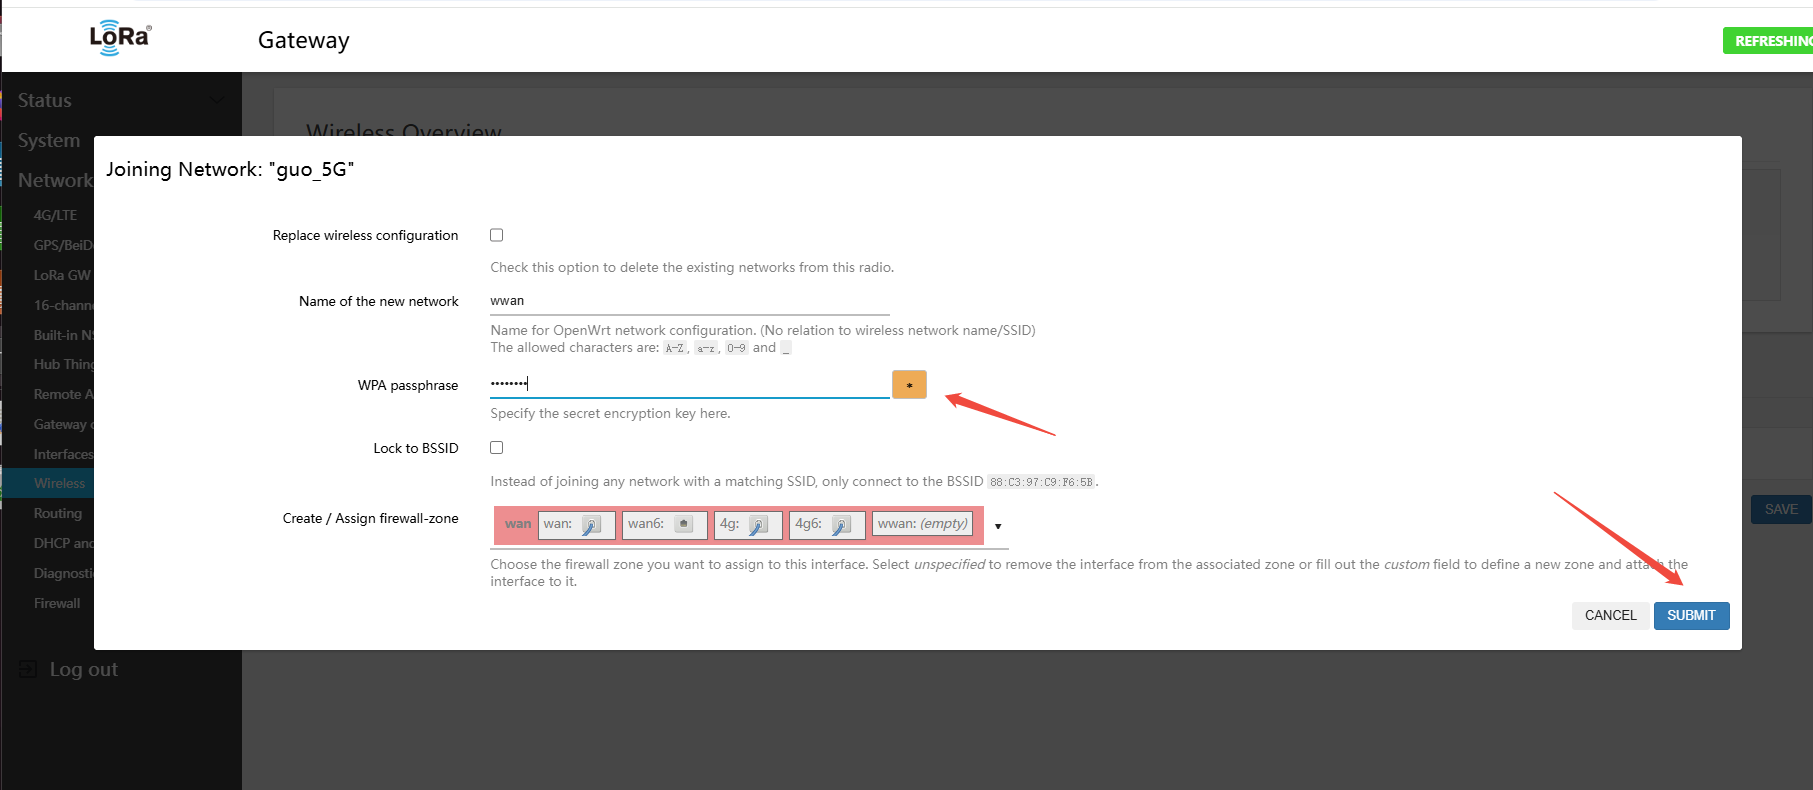
In the corresponding WiFi hotspot row, click "Join Network", enter the WiFi password, then click Save to submit
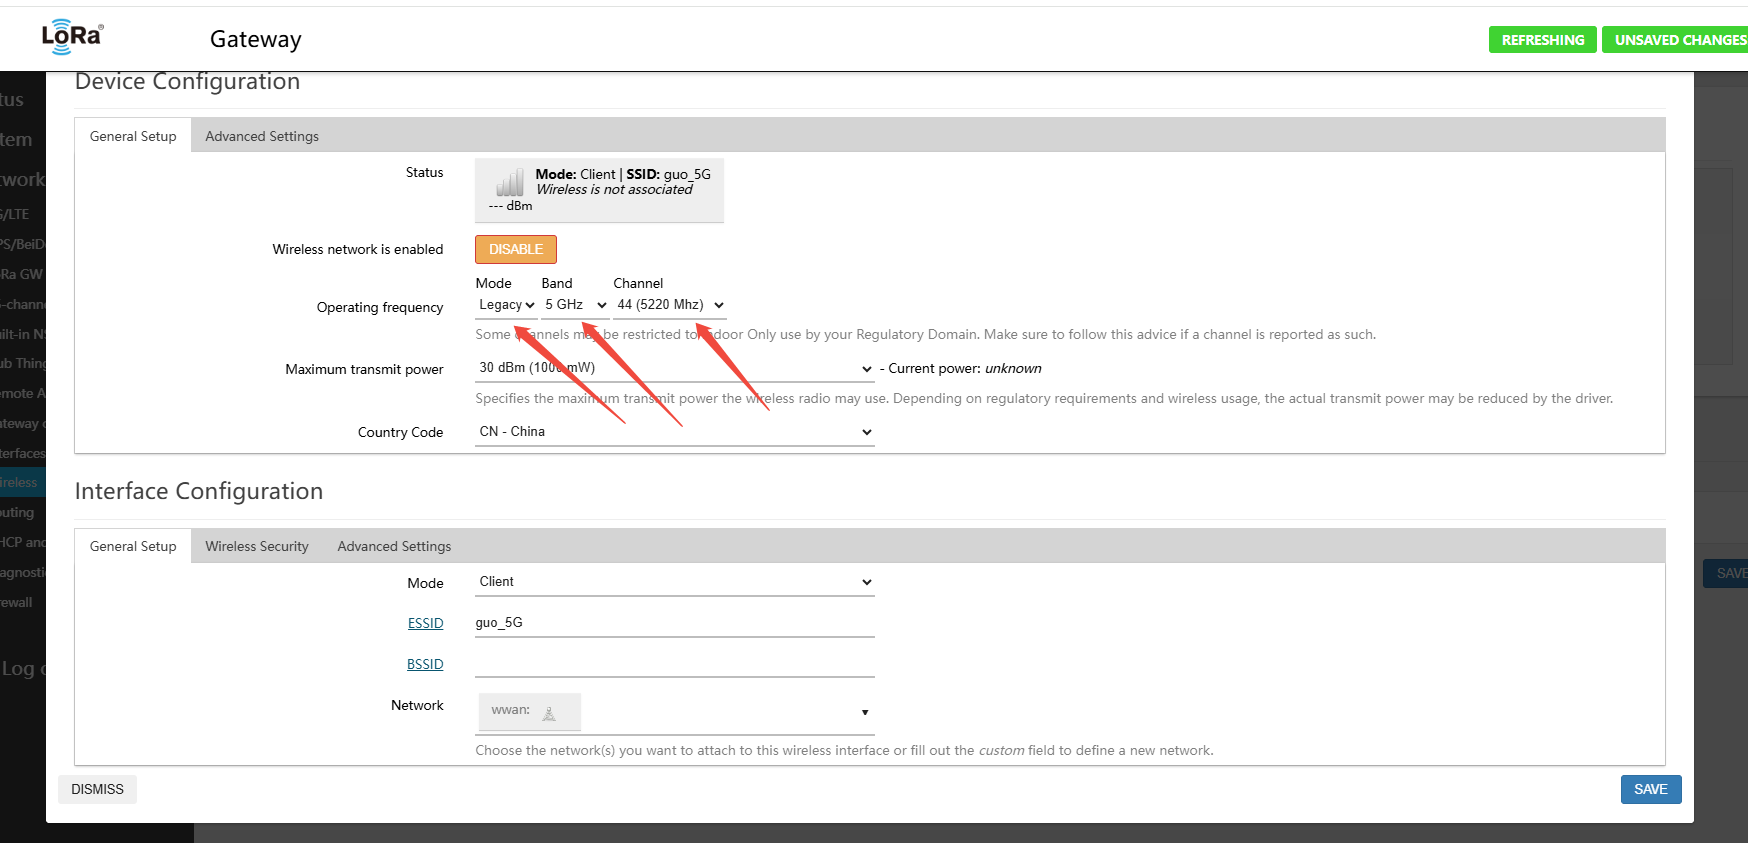
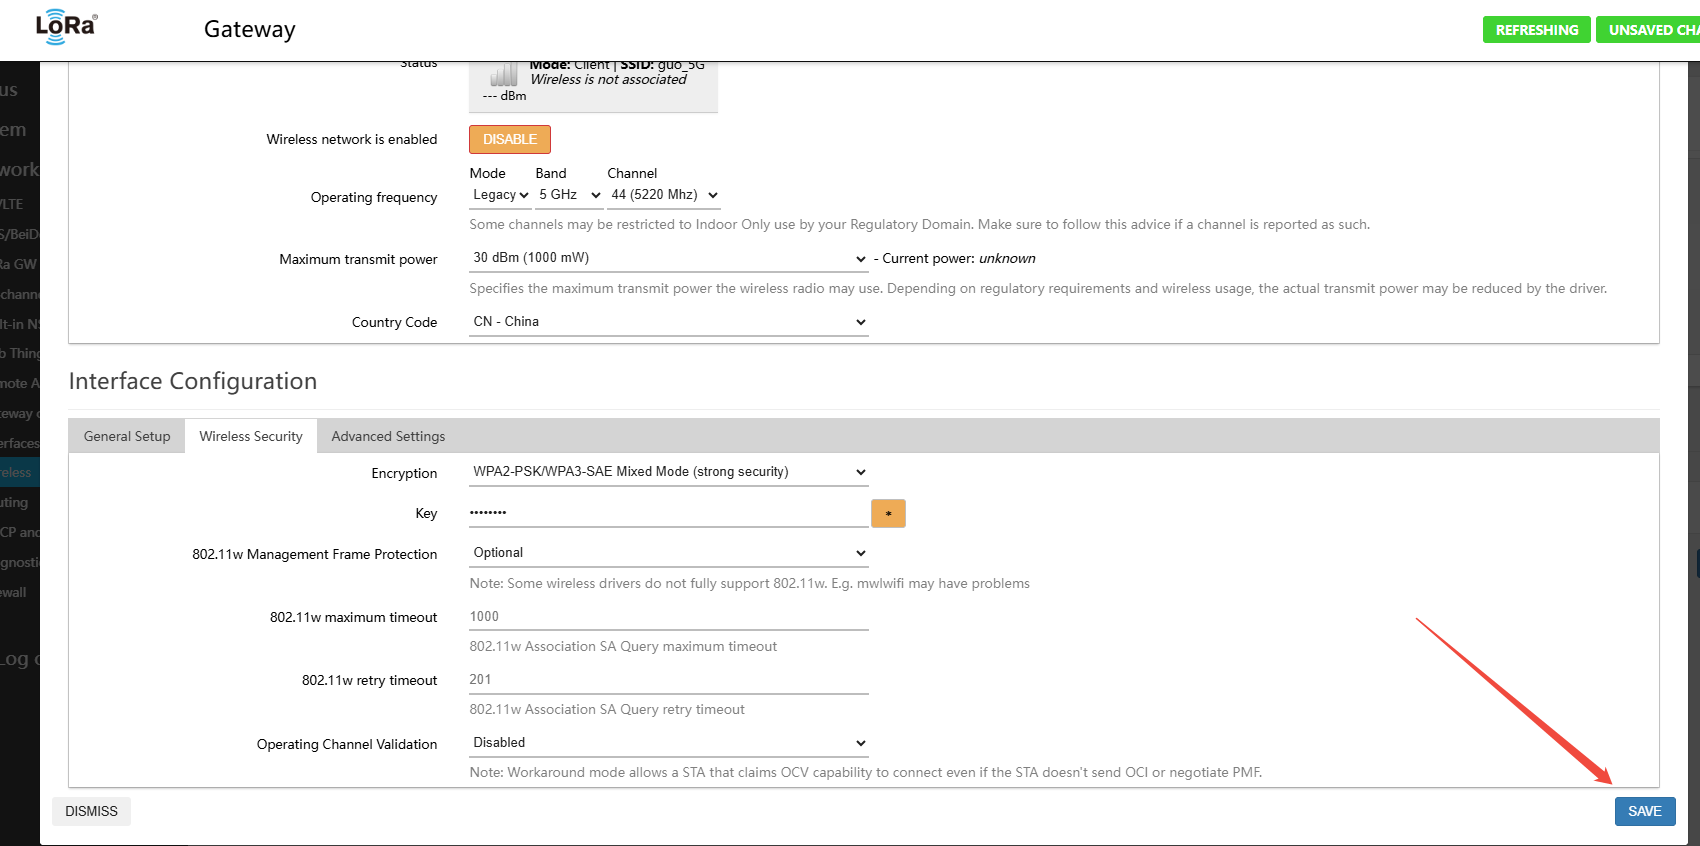
Then select the band information on the page
- Mode: Legacy
- BAND:5GHz
- channel: (5 GHz WiFi channel range: 36–165) select the channel from the scan, e.g. 44
Then select the WiFi authentication and encryption method (options: WPA2-PSK, WPA3-SAE, WPA2-PSK/WPA3-SAE mixed mode, WPA-PSK/WPA2-SAE mixed mode, WPA-PSK)
- Encryption: Select the encryption method detected during scanning (e.g., WPA2-PSK/WPA3-SAE mixed mode)
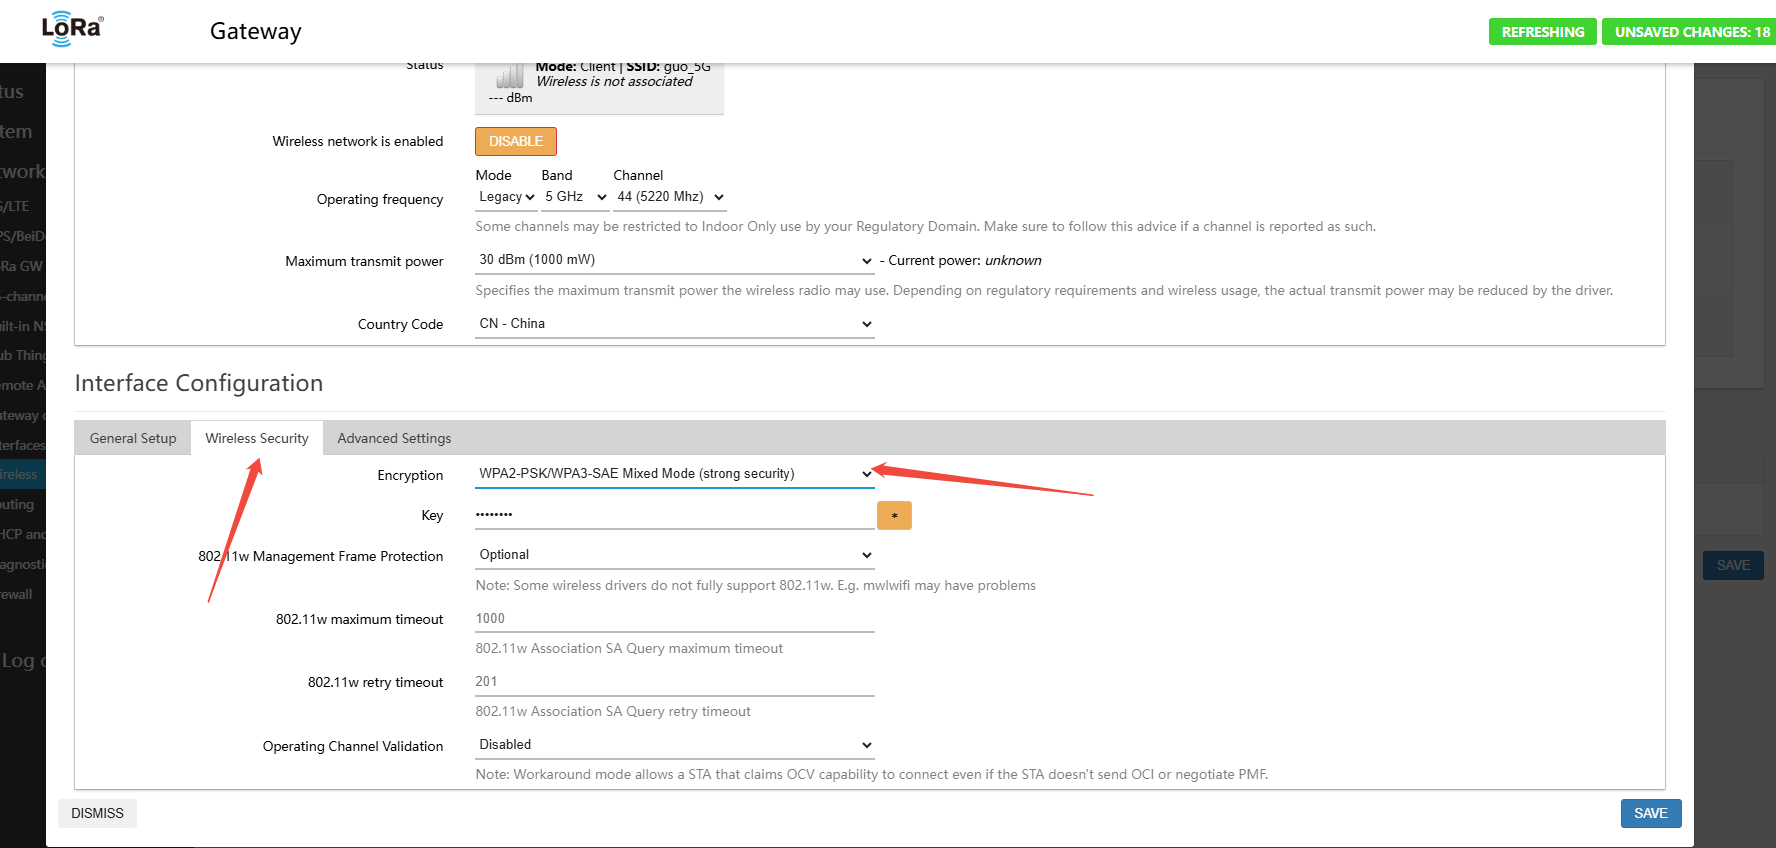
Verify that the channel and encryption method are correct, then click the Save button
Note:
- WiFi can only operate in either AP mode or STA mode at one time — not both
- AP mode means the gateway creates a WiFi hotspot that PCs and phones can connect to
- STA mode means the gateway uses WiFi to connect to the router's WiFi network
The STA interface is now configured to connect to the router. Disable the AP Master interface by clicking the disabled button
After a successful connection, the AP hotspot is disabled and the STA connects to the WiFi router — connection is complete
Navigate to Network → Interfaces
Note the WiFi IP address and MAC address. You can bind the gateway's WiFi MAC to a static IP in your router, so you can always access the gateway management page via that IP.
