2 Firmware Flashing
This section describes gateway firmware flashing methods, including factory flashing and user upgrade modes.
Note:For everyday use, flashing through the Web interface is recommended. Factory mode is primarily for production and repair.
2.1 USB TTL Serial Cable 1.8V (Recommended: FTDI 232RL 1.8V) Debug Port
Connecting the debug serial port is optional — it is only used to monitor the flashing progress. If connected, only GND, RX, and TX are needed; the PCB silkscreen indicates the pin order.
Warning: The gateway CPU I/O level is 1.8 V. The serial cable MUST be 1.8 V logic level. Never use 3.3 V or 5.0 V serial cables — the high voltage will damage the CPU.
2.2 USB Flashing (Factory Mode)
Use Case:Factory batch flashing or device repair; all existing data will be erased
Required Tools:
- Micro USB cable
- USB flashing firmware package
- Windows 10/11 PC
Steps:
- Obtain the dedicated USB flashing firmware package (different from the Web-interface upgrade firmware). Latest version:
- Connect the gateway to the PC via Micro USB
- The gateway enters flash mode (two-pin jumper on J11, power cycle or press the system reset button once)
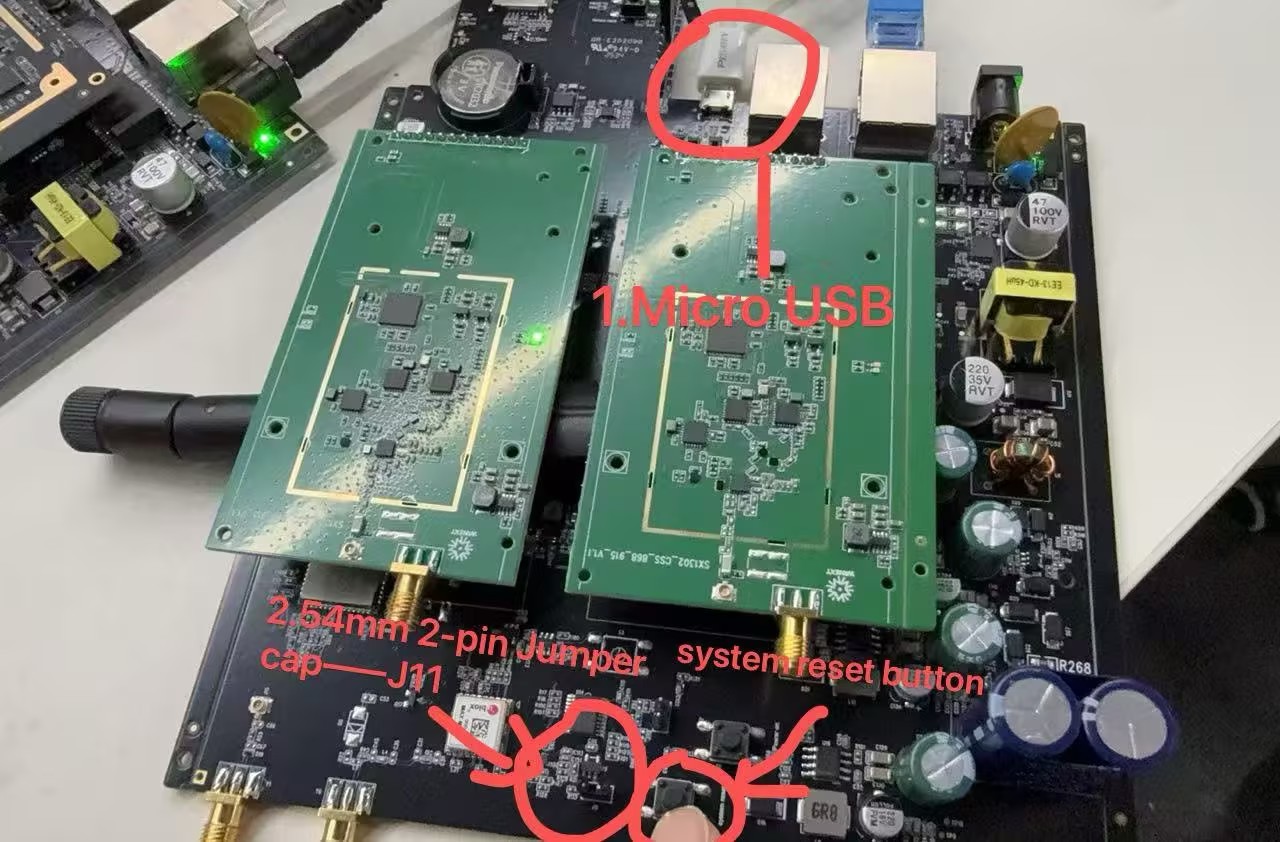
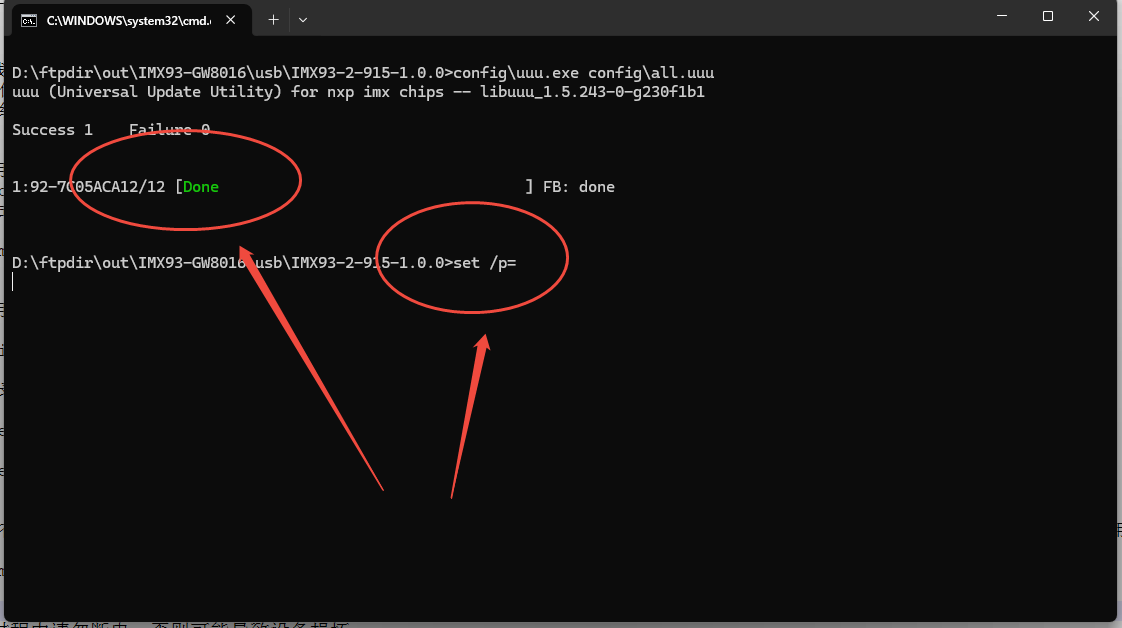
- In the USB flash firmware package, find and double-click
flash.batto start flashing

- The gateway starts flashing. If there is no progress, verify that the Micro USB cable supports data transfer and that it is connected to a Windows 10/11 PC. Wait for completion (~2–5 minutes).
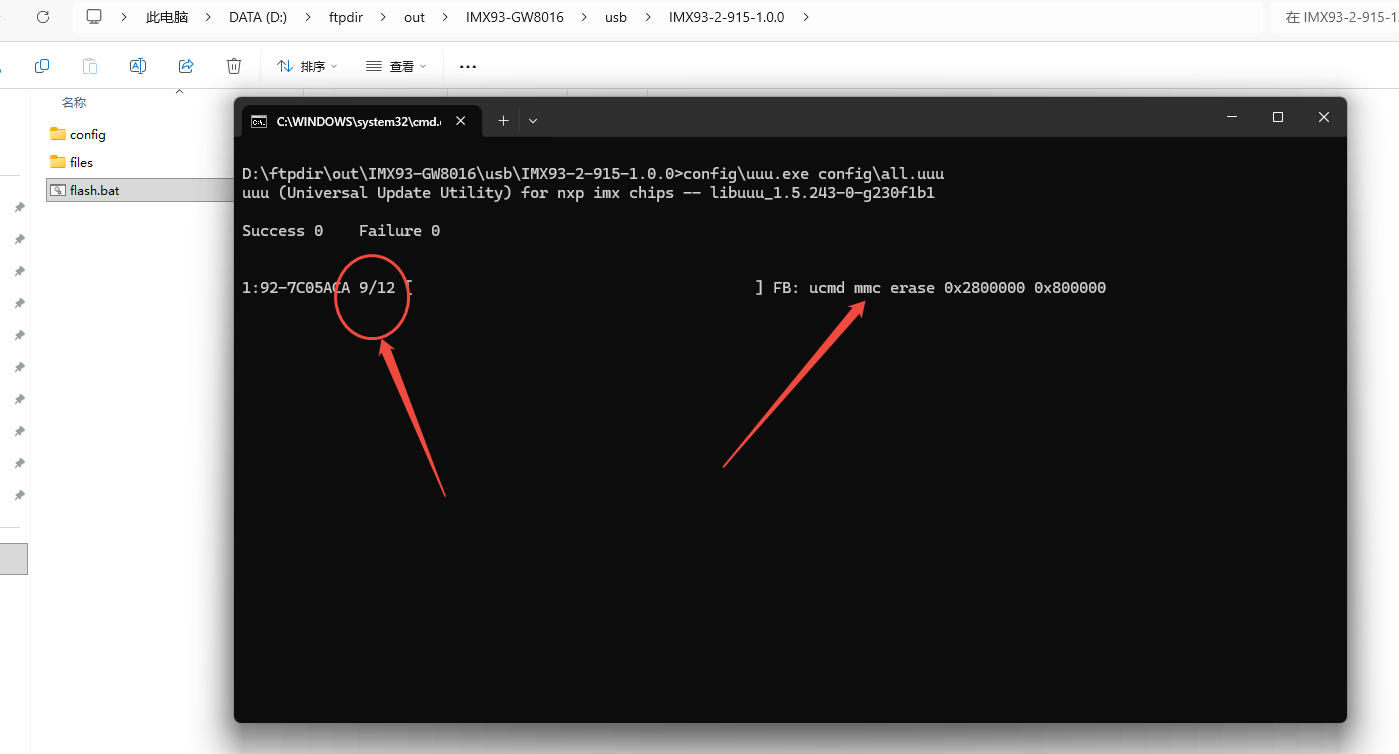
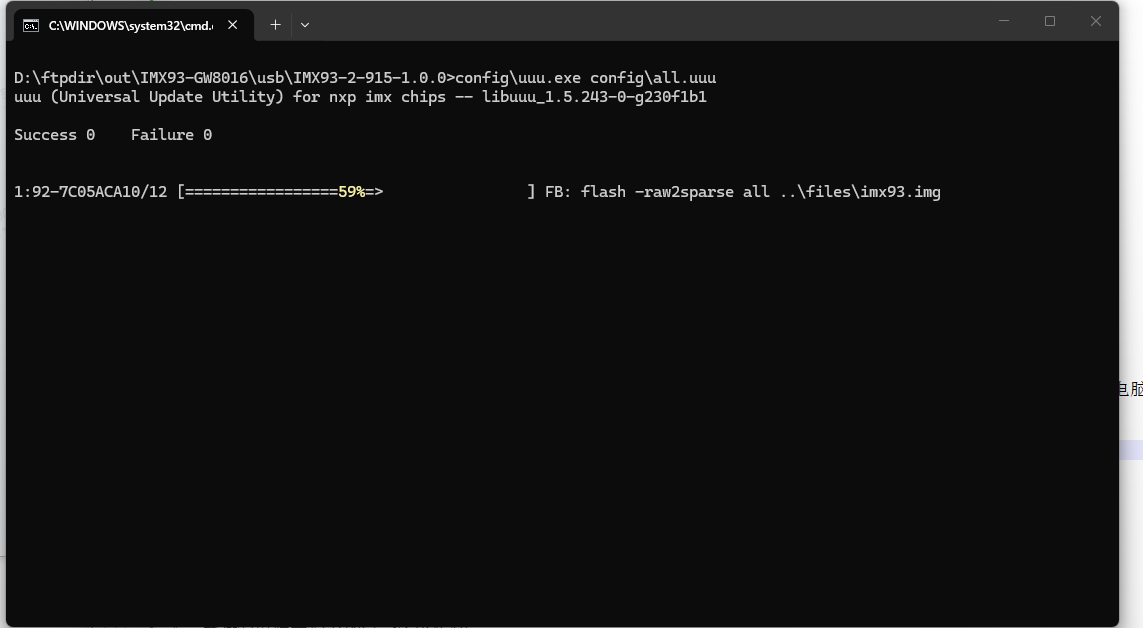
- When flashing is complete, a 100 % progress bar appears. Press Enter in the command window to close the flashing window. Flashing is done.
At this point remove or disconnect the J11 jumper, then press and release the system reset button once. The gateway will restart with the newly flashed firmware (the system LED will blink green after ~10 seconds).
Warning: Because the gateway has an external hardware watchdog, operate as promptly as possible. If flashing fails (watchdog timeout resets the chip) or a power outage occurs, simply repeat the flashing steps — the process can be resumed.
2.3 TF Card Flashing (Factory Mode)
Use Case: Factory batch flashing, quick on-site flashing without a PC
Required Tools:
- TF card (Micro SD card, at least 8 GB, Class 10)
- Gateway Firmware file (prepared as a TF card boot image)
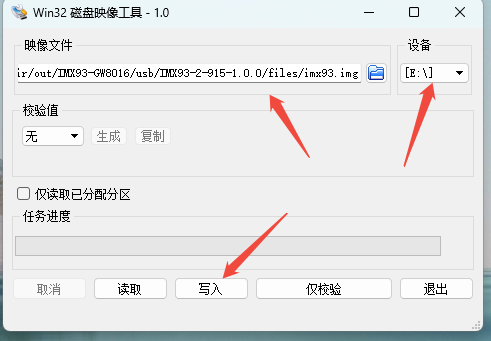
- Win32DiskImager tool required
Steps:
- Use the appropriate tool to write the boot firmware image to the TF card (on Windows, use Win32DiskImager)
- Insert the TF card into a card reader on your PC. A BOOT drive will appear. Copy the USB-flash firmware file imx93.img to this drive.
A BOOT drive appears on the PC

Copy the latest USB-flash firmware image (imx93.img) to the drive. Do not delete the other files in the directory: Image, oftree.

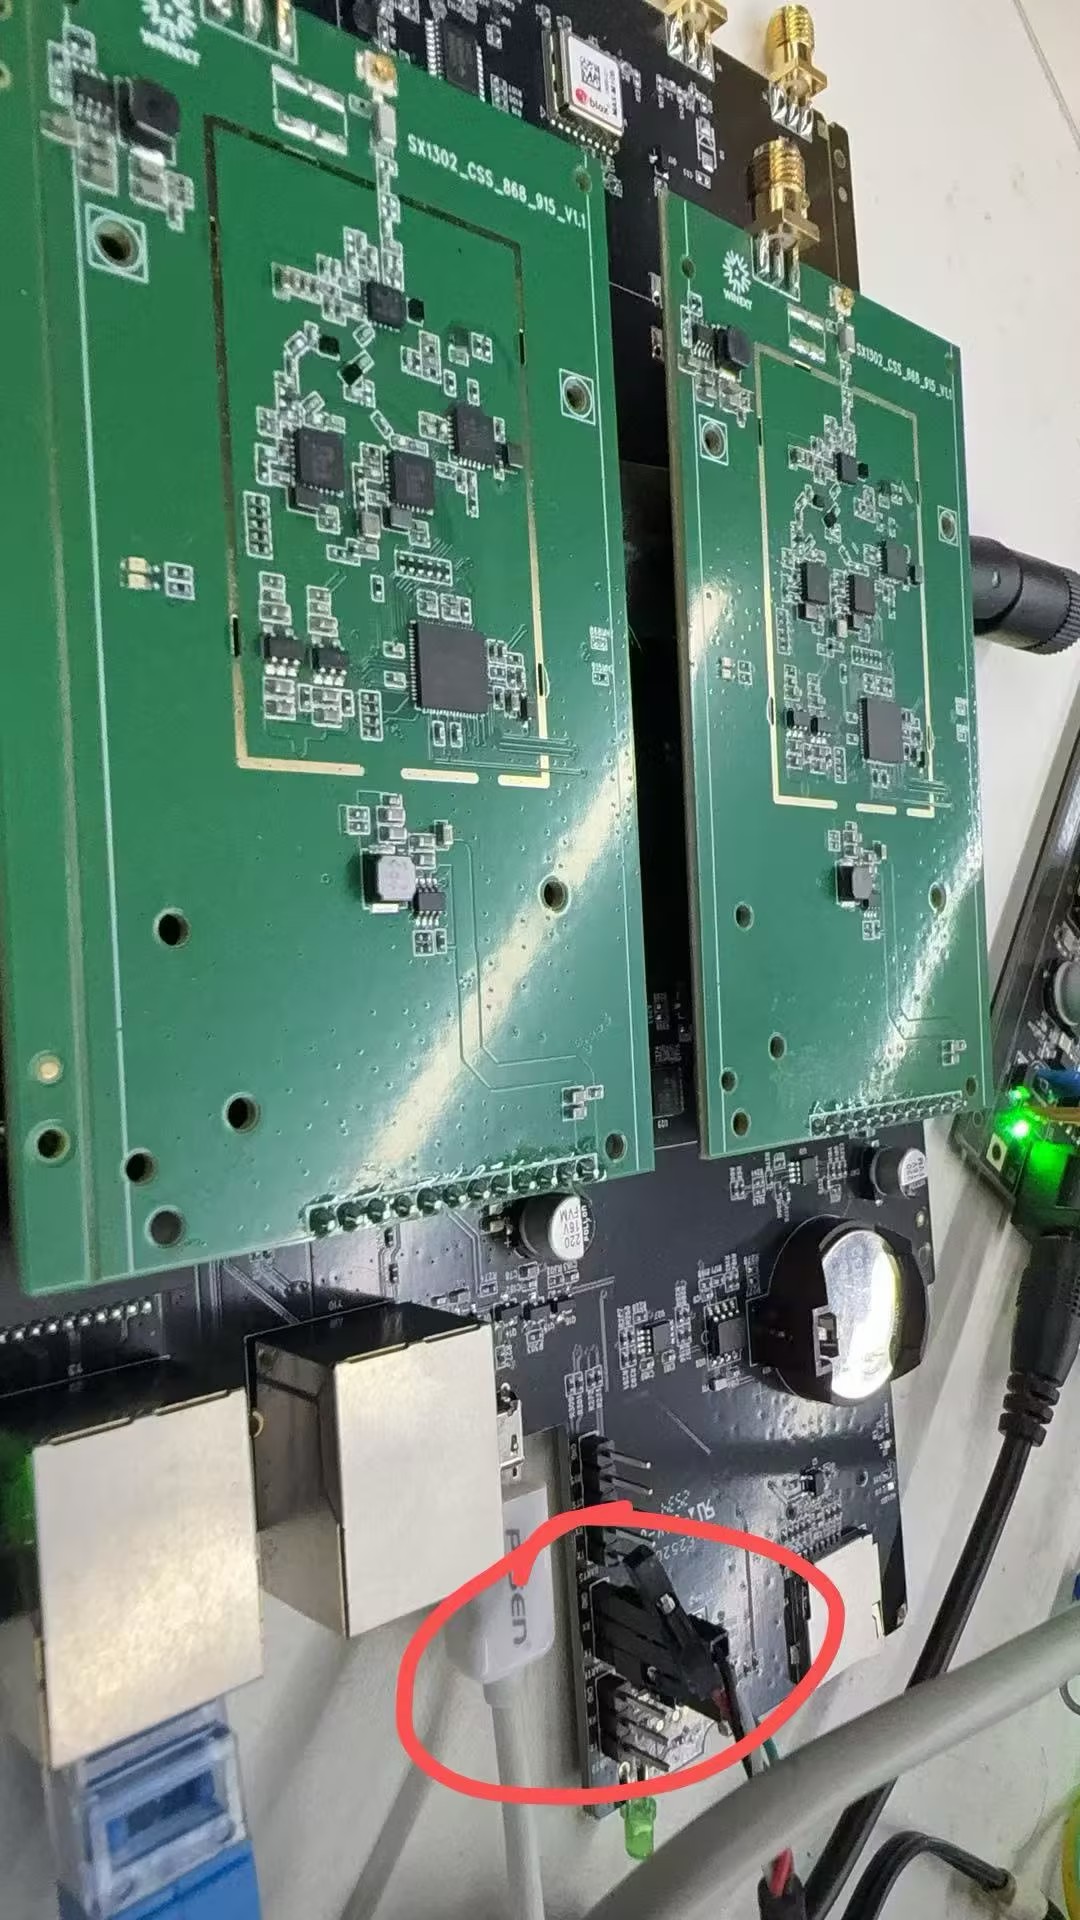
- Power off the gateway. Short J11 and the adjacent header using two 2.54 mm jumpers (as shown in the photo) to configure the gateway to boot from the TF card. Insert the TF card into the gateway's TF card slot.

- Power on the gateway; it will automatically boot from the TF card and flash the firmware
- During boot, the gateway green LED blinks. After about one minute the green LED stays solid, then automatic firmware flashing begins (~2–3 minutes). When the system LED blinks continuously, flashing is complete.
- Remove the TF card, remove both jumpers (added in step 3), press the hardware reset button (system reset), and the gateway will boot normally from eMMC.
Note:
- The TF card flashing method requires no PC connection and is ideal for quick on-site firmware recovery
- If the TF card is inserted but the gateway does not boot from it automatically, verify that the correct boot image was written to the TF card.
- The flashing process may take 2–4 minutes; please be patient
2.4 Web Interface Flashing (User Upgrade)
Use Case:User firmware upgrade or remote update
Prerequisites:
- Gateway is running normally
- You are logged into the gateway management page
- You have downloaded the latest firmware file (.bin format)
Steps:
- Log in to the gateway management page at
http://192.168.60.1, or access via the WAN port IP address - Navigate to System → Backup/Upgrade
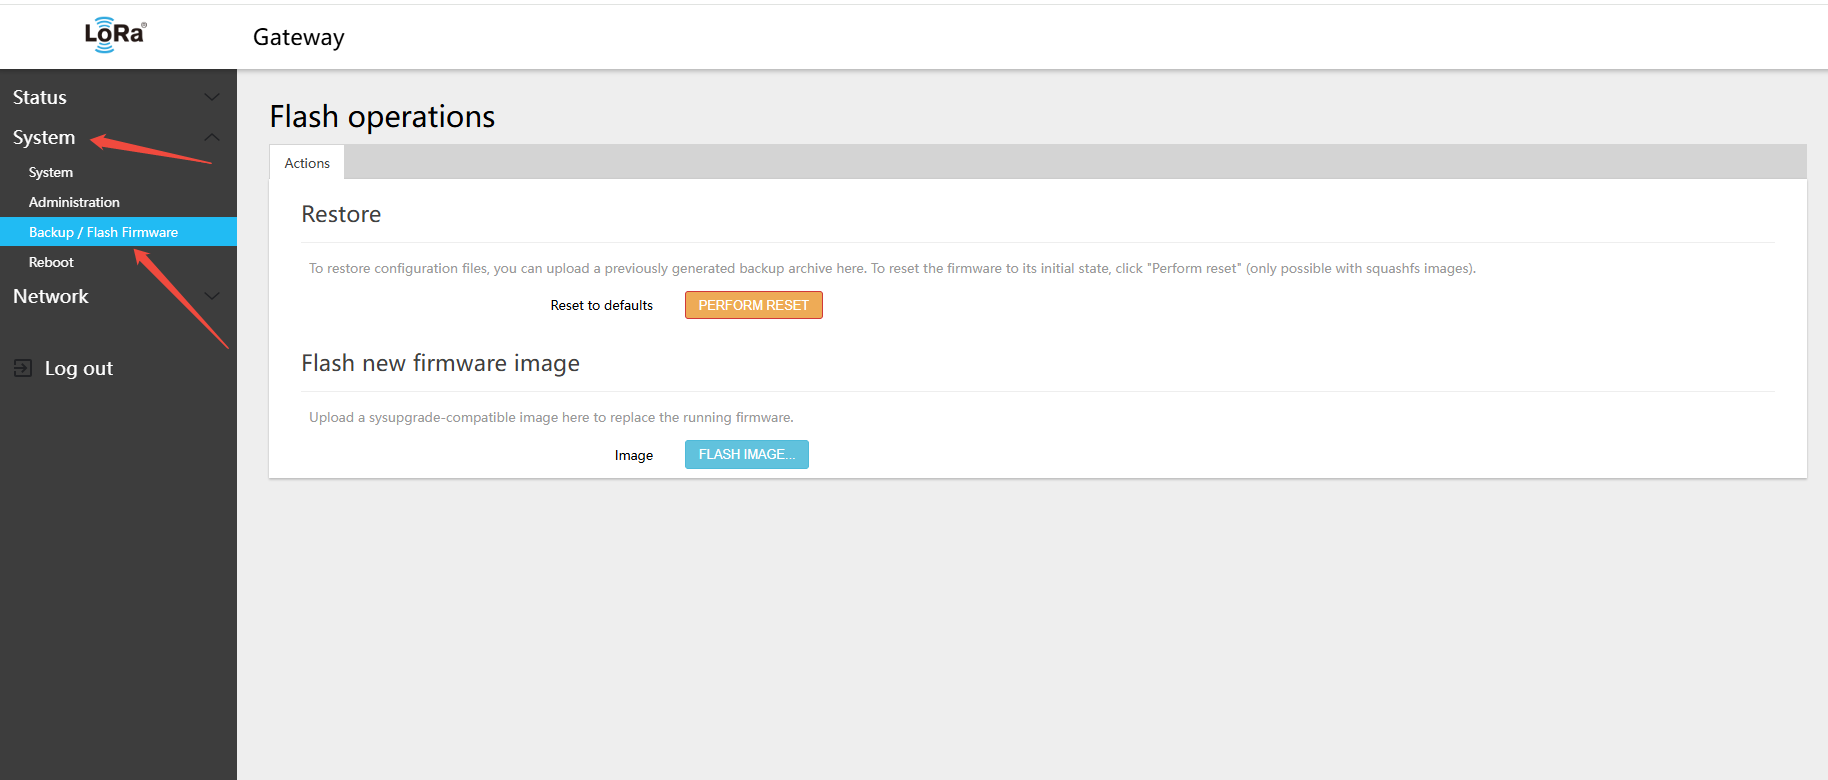
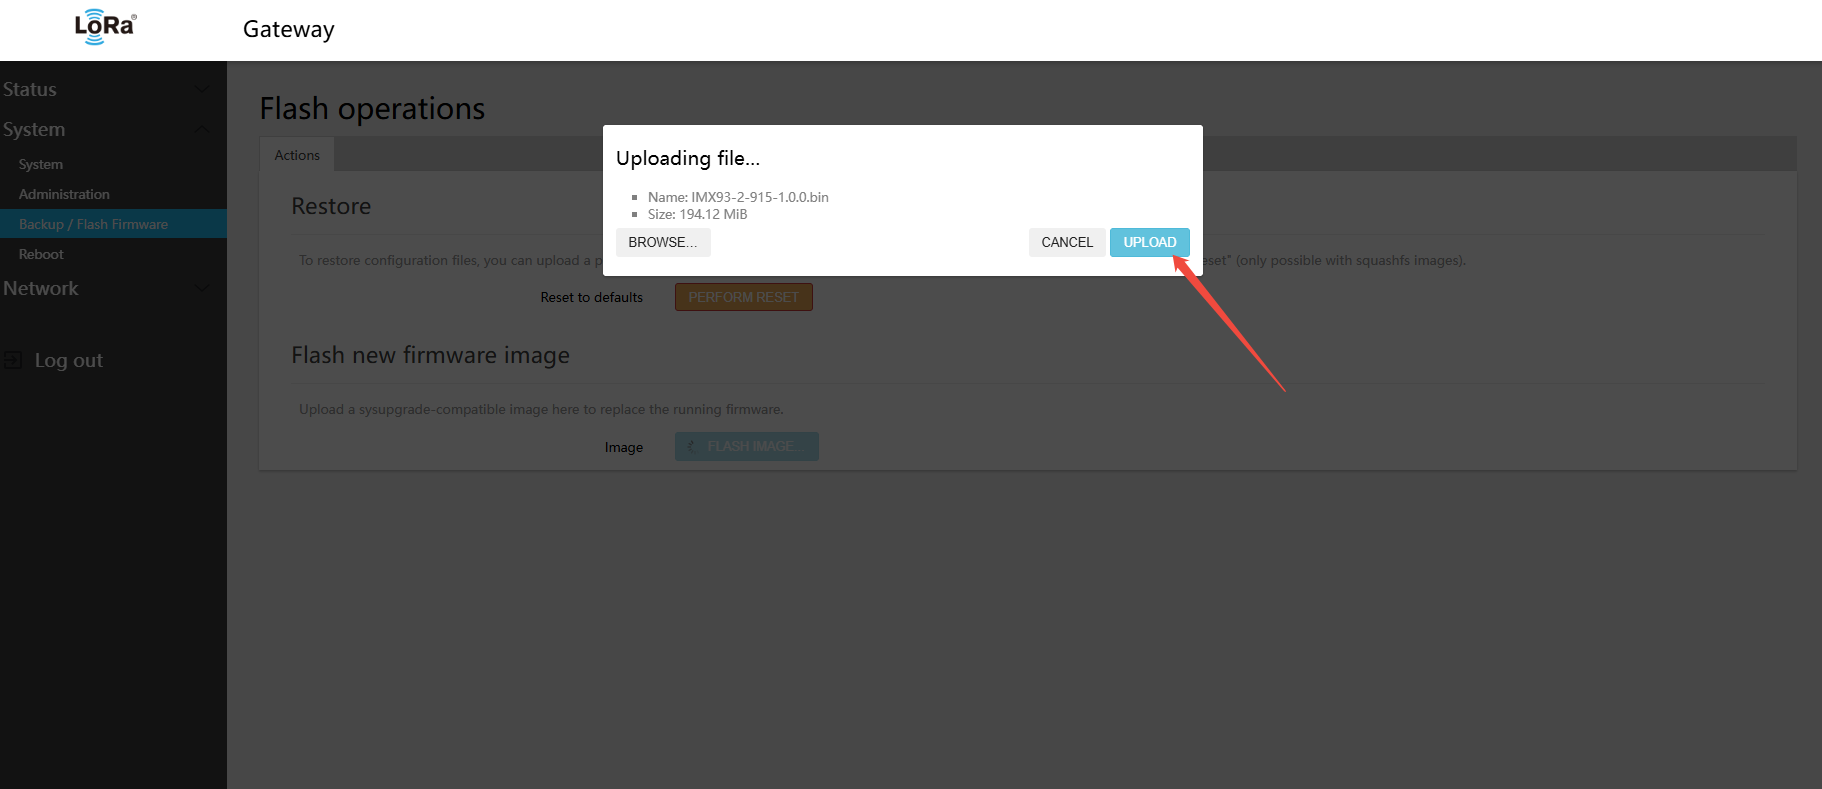
- In the Firmware Upgrade section, click the Select File button
- Select the downloaded firmware file
Select the firmware file for flashing — the format is a .bin file 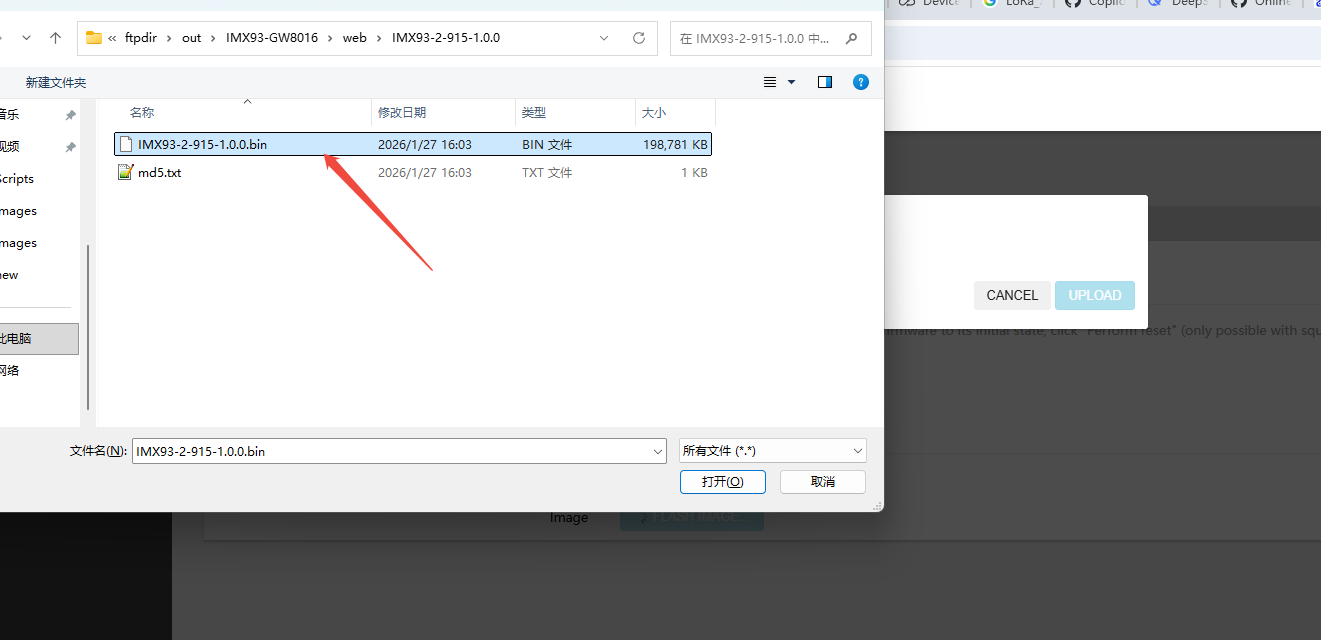
- Click the Upload button and wait for the upload to complete
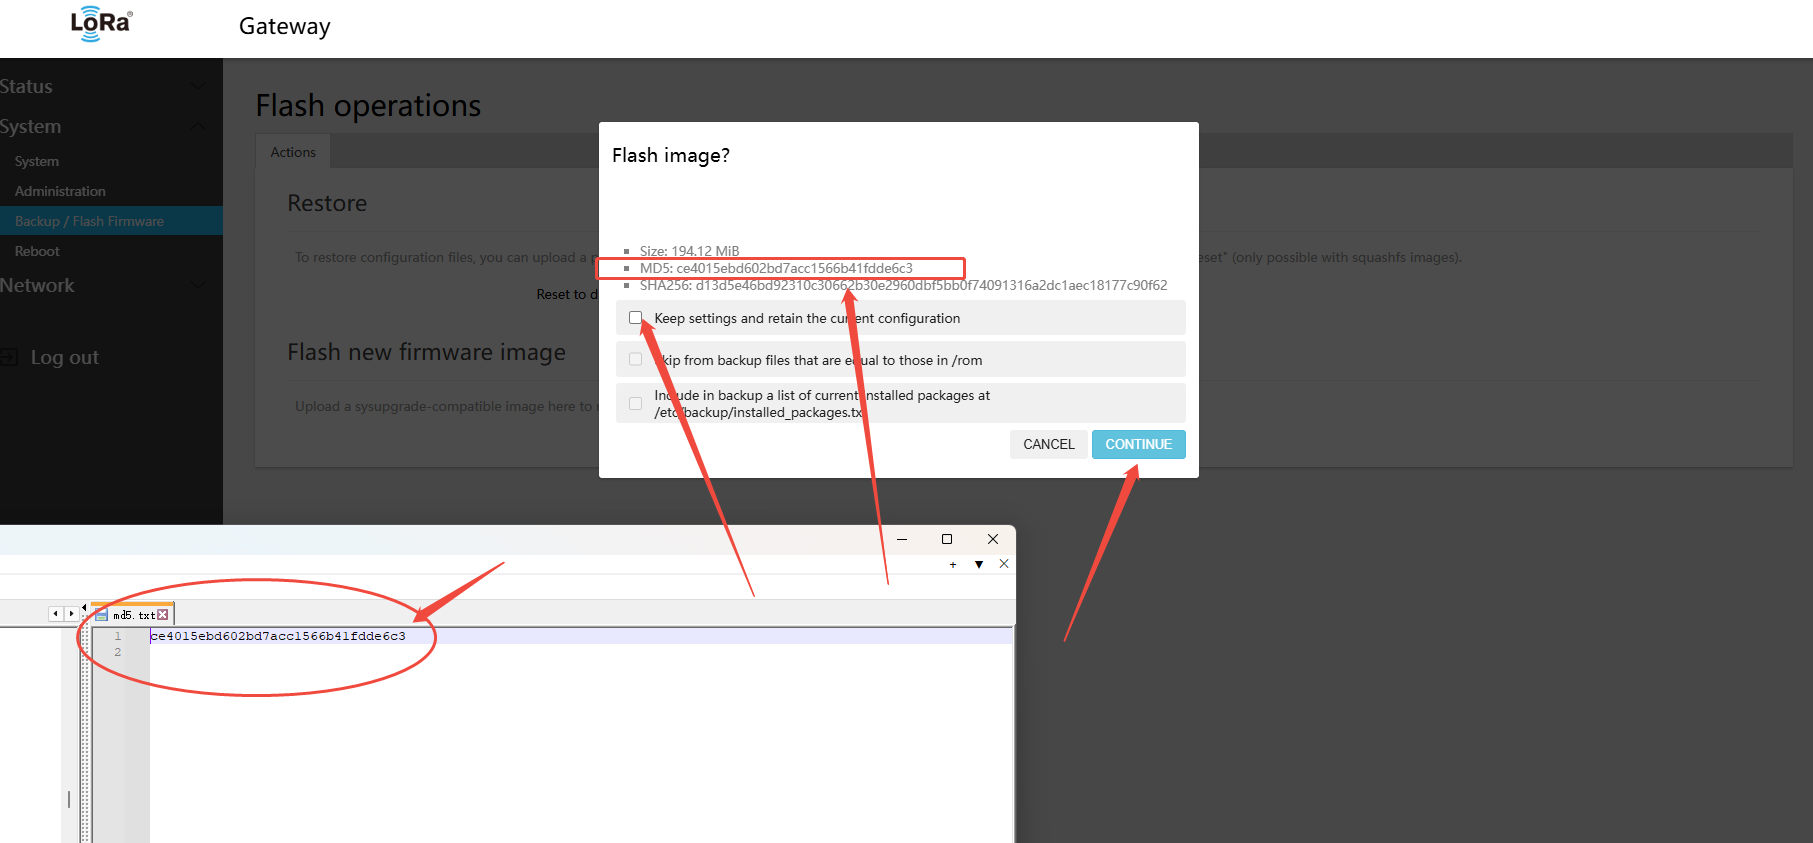
- After the upload completes, the firmware checksum information is shown. Verify that the MD5 matches the firmware's published MD5. If they differ, repeat the steps or contact technical support.
If the MD5 checksum matches, confirm and click Continue
If there are major changes in the software version, uncheck the “Preserve configuration” option. Verify that the MD5 checksum matches the published firmware MD5
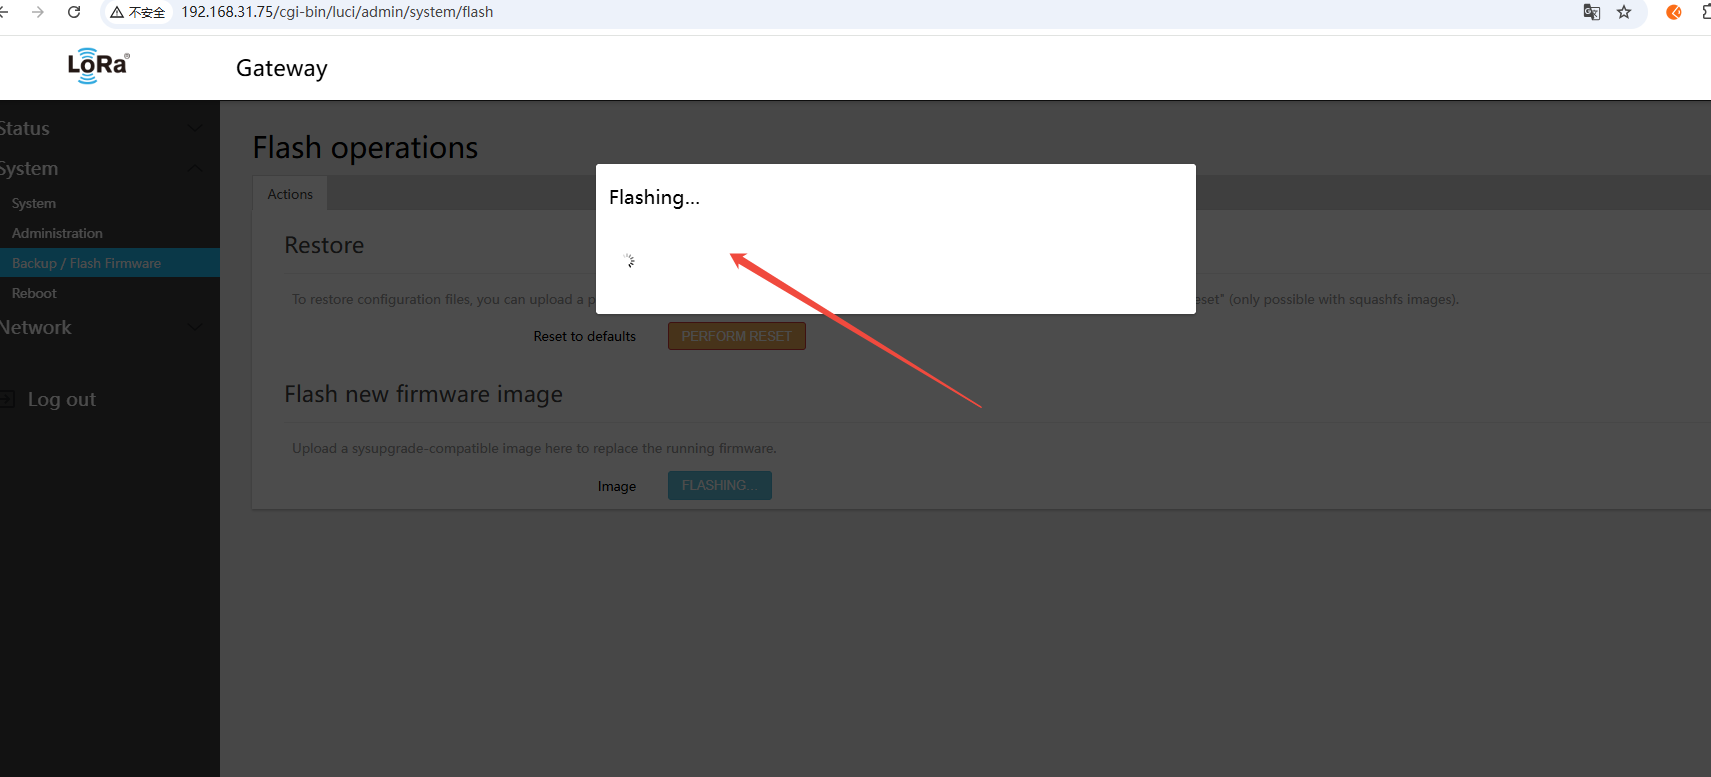
- Wait for the upgrade to complete (approximately 3–5 minutes); the gateway will restart automatically
Note:
- During the upgrade, the system LED will flash
- The flashing process may take 2–5 minutes; please be patient
- If the page does not redirect automatically, wait 5 minutes then manually open the gateway page URL.
- After restart, verify that the gateway firmware version has been updated
Warning:
- Do not power cycle during the upgrade
- Ensure the Firmware file matches the hardware version (470/868/915)
Post-Upgrade Verification:
- Log in to the gateway Web page again
- Navigate to Status > Overview page
- Verify that the firmware version is the latest
Troubleshooting:
| Issue | Possible Cause | Solution |
|---|---|---|
| Upload failed | Corrupted firmware file | Re-download the firmware file |
| Checksum failed | Firmware does not match the hardware | Confirm the hardware version (470/868/915) |
| Upgrade interrupted | Network connection dropped | Re-login and retry the upgrade |
| Cannot boot after upgrade | Firmware flash error | Recover firmware using USB or TF card method |