5 Using an External NS Server
5.1 Configuring the LoRa Gateway to Connect to an External NS
The gateway supports multiple LoRa protocols and forwarding modes, allowing flexible integration with various network servers and IoT platforms. The following sections describe each configuration method.
5.1.1 Using UDP (GWMP)
UDP GWMP (Gateway Message Protocol) is the standard protocol defined by Semtech, widely used to connect TTN, ChirpStack, and other open-source network servers.
Application Scenarios: Connecting to The Things Network (TTN), self-hosted ChirpStack servers, and similar platforms.
5.1.1.1 Connecting to Self-hosted ChirpStack via UDP
If ChirpStack is already installed, skip the installation steps below.
5.1.1.1.1 Installing ChirpStack on Ubuntu 24 — Example: chirpstack-v4.19.0
sudo apt update
sudo apt install  mosquitto mosquitto-clients redis-server redis-tools postgresql
configuration PostgreSQL
sudo -u postgres psqlCreate the ChirpStack database
sudo -u postgres psql-- create role for authentication
create role chirpstack with login password 'chirpstack';
-- create database
create database chirpstack with owner chirpstack;
-- change to chirpstack database
\c chirpstack
-- create pg_trgm extension
create extension pg_trgm;
-- exit psql
\qInstall the ChirpStack Gateway Bridge software
sudo apt install chirpstack-gateway-bridgemodifyChirpStack Gateway Bridge的configuration /etc/chirpstack-gateway-bridge/chirpstack-gateway-bridge.toml
update[backend] 的configuration
[backend]
type="semtech_udp"
region="US915"
frequency_min=902000000
frequency_max=928000000
update[integration.mqtt] 的configuration
Example using US915; both device and gateway use A1B1 (channels 0–7 + 64), frequencies: 902.3–903.7
[integration.mqtt]
event_topic_template="us915_0/gateway/{{ .GatewayID }}/event/{{ .EventType }}"
command_topic_template="us915_0/gateway/{{ .GatewayID }}/command/#"
Restart and enable ChirpStack Gateway Bridge
# restart chirpstack-gateway-bridge
sudo systemctl restart chirpstack-gateway-bridge

# start chirpstack-gateway-bridge on boot
sudo systemctl enable chirpstack-gateway-bridge
5.1.1.1.2 Adding the Gateway ID to the ChirpStack Platform
Note:
- Example public server IP: 62.234.52.46
- ChirpStack default login: usernameadmin, passwordadmin666666
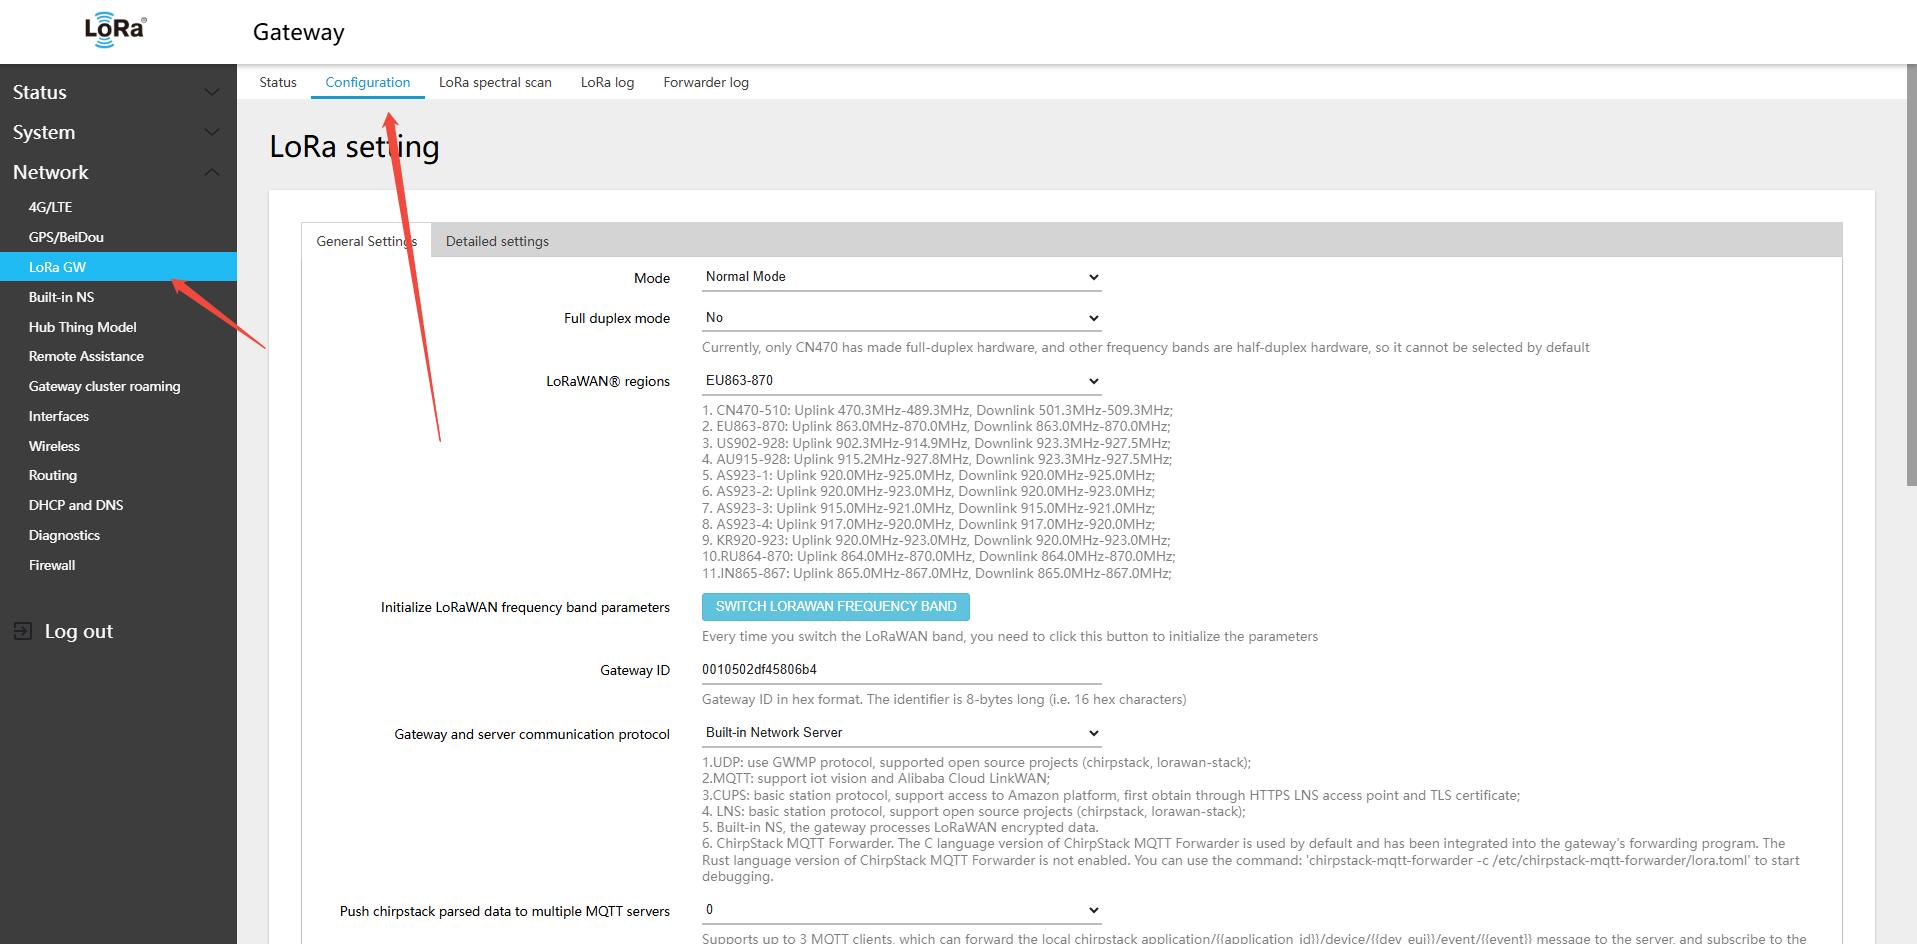
- In the gateway Web UI: Network → LoRa GW → Configuration, copy the Gateway ID:
0010502df45635f8
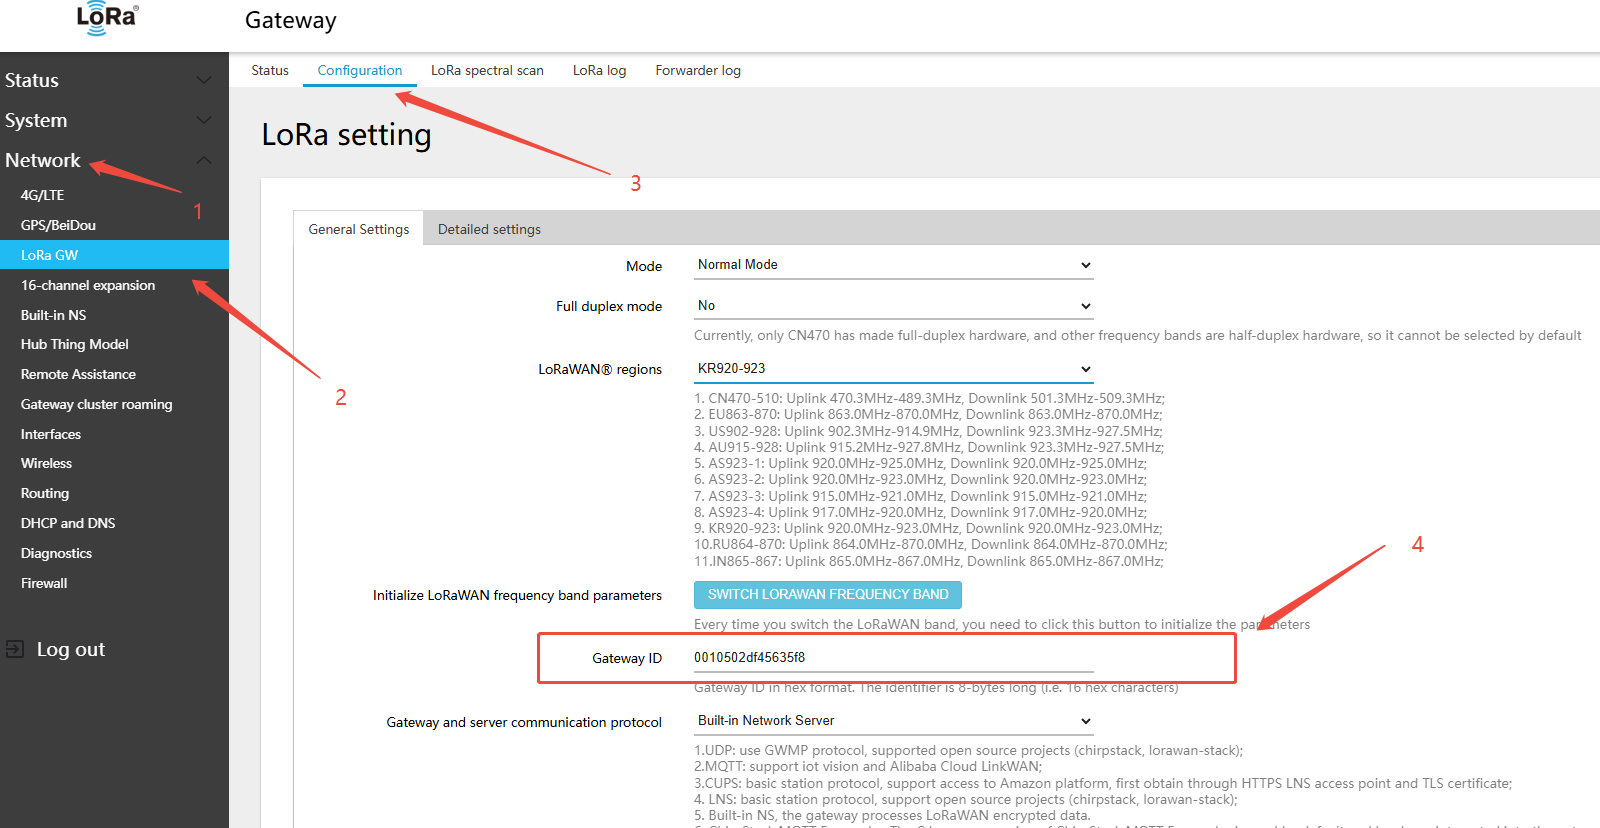
- Log in to the installed ChirpStack platform and add the gateway on the gateway management page
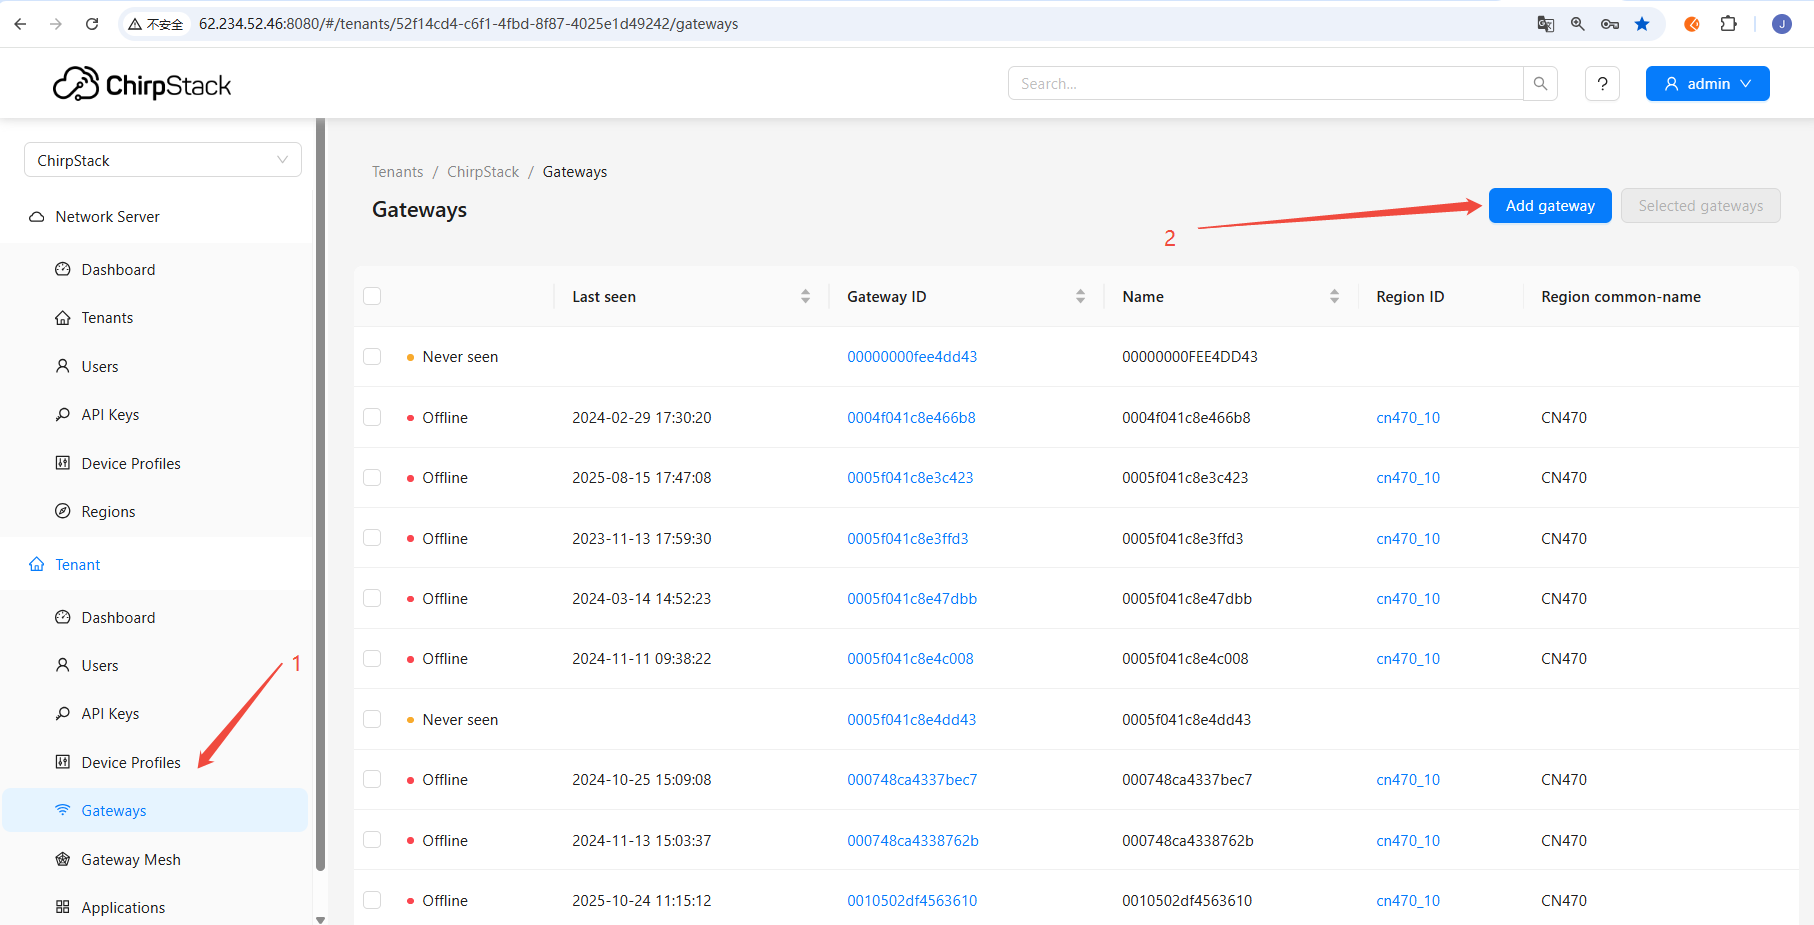
- Paste the copied gateway ID: 0010502df45635f8
- Fill in Name: 0010502df45635f8
- Fill in Gateway ID (EUI64): 0010502df45635f8
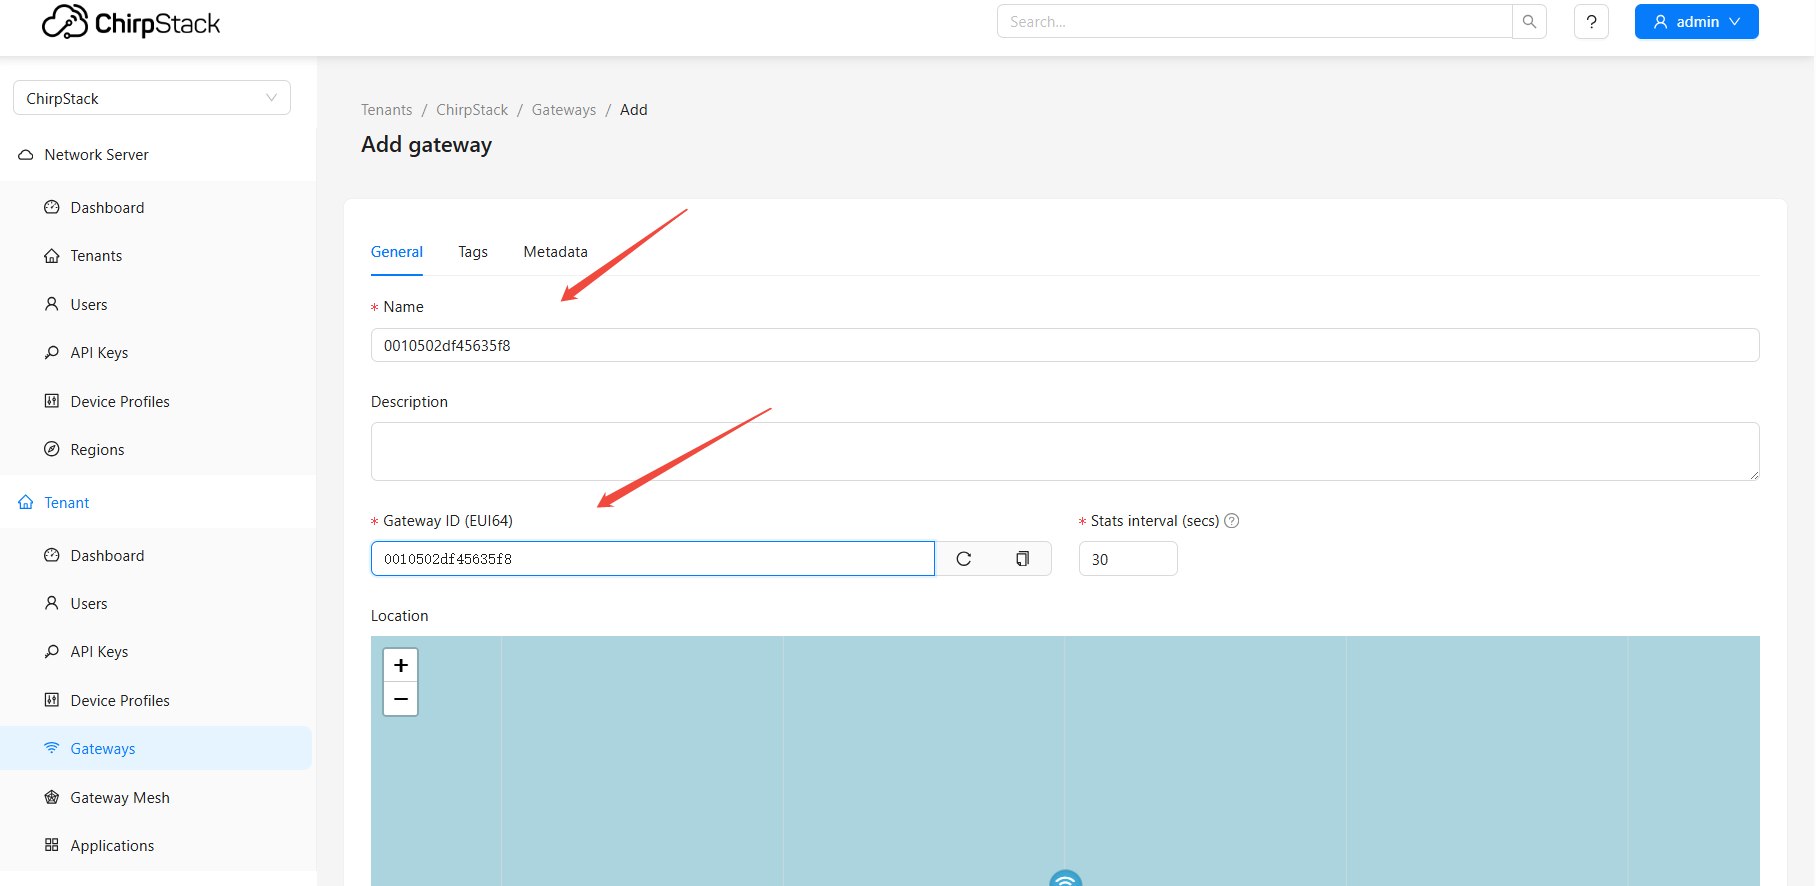
- click "Submit"
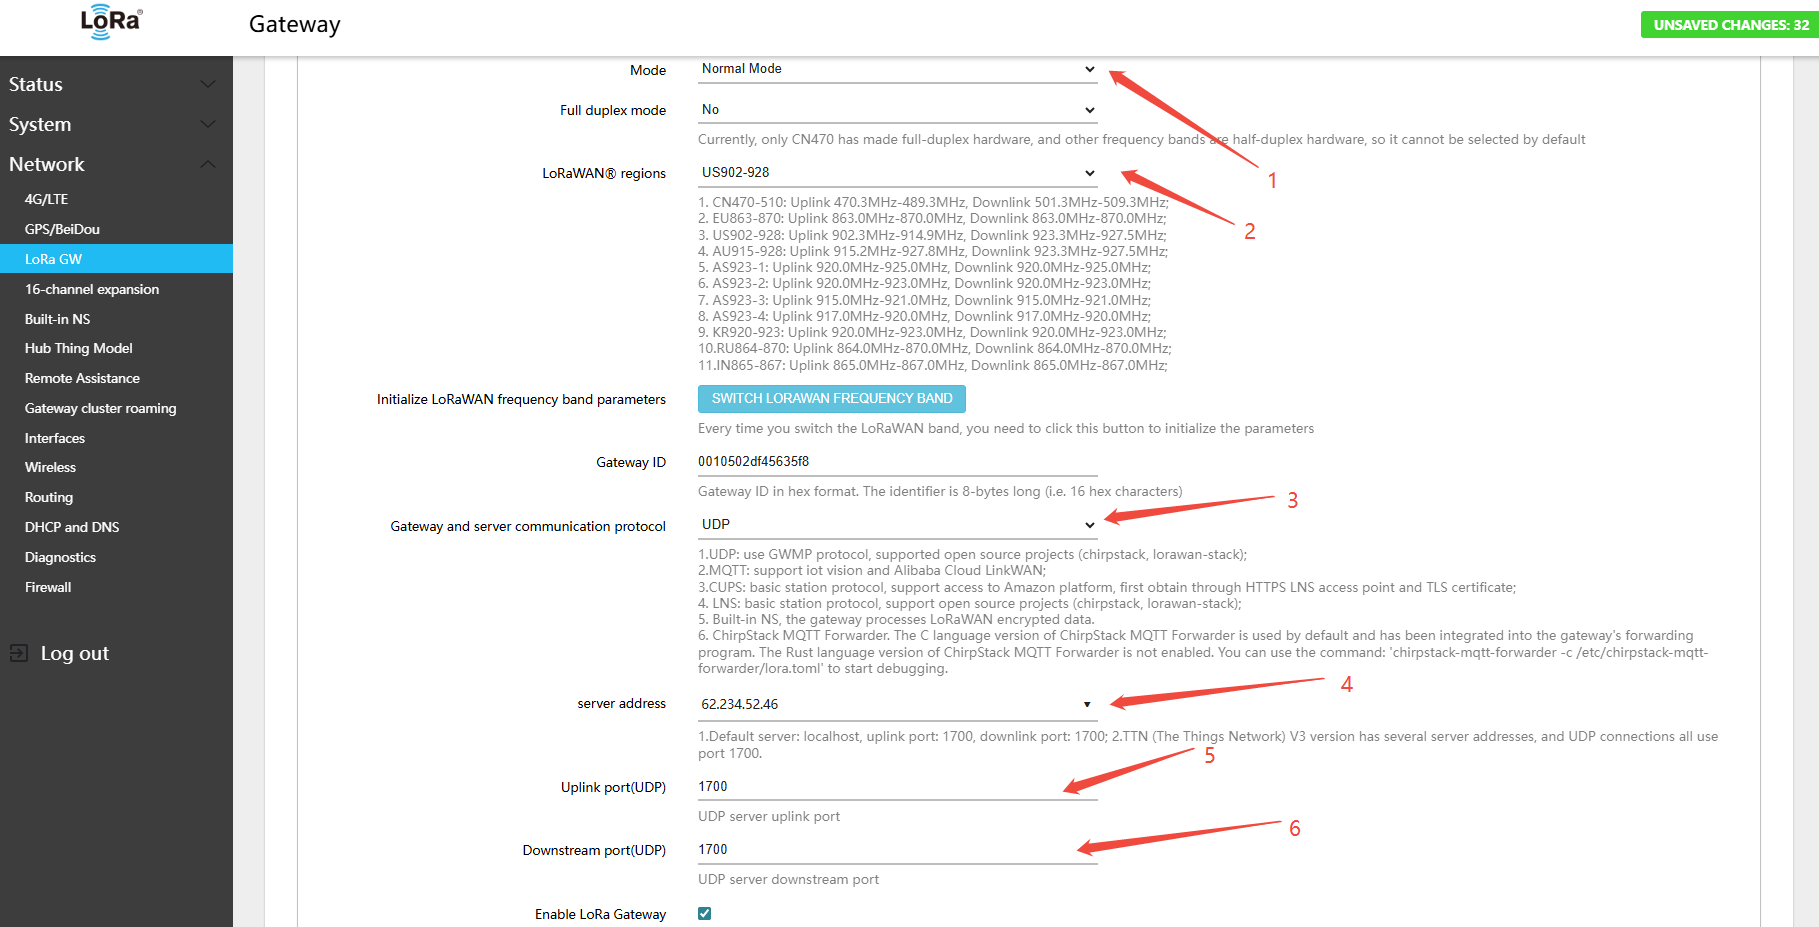
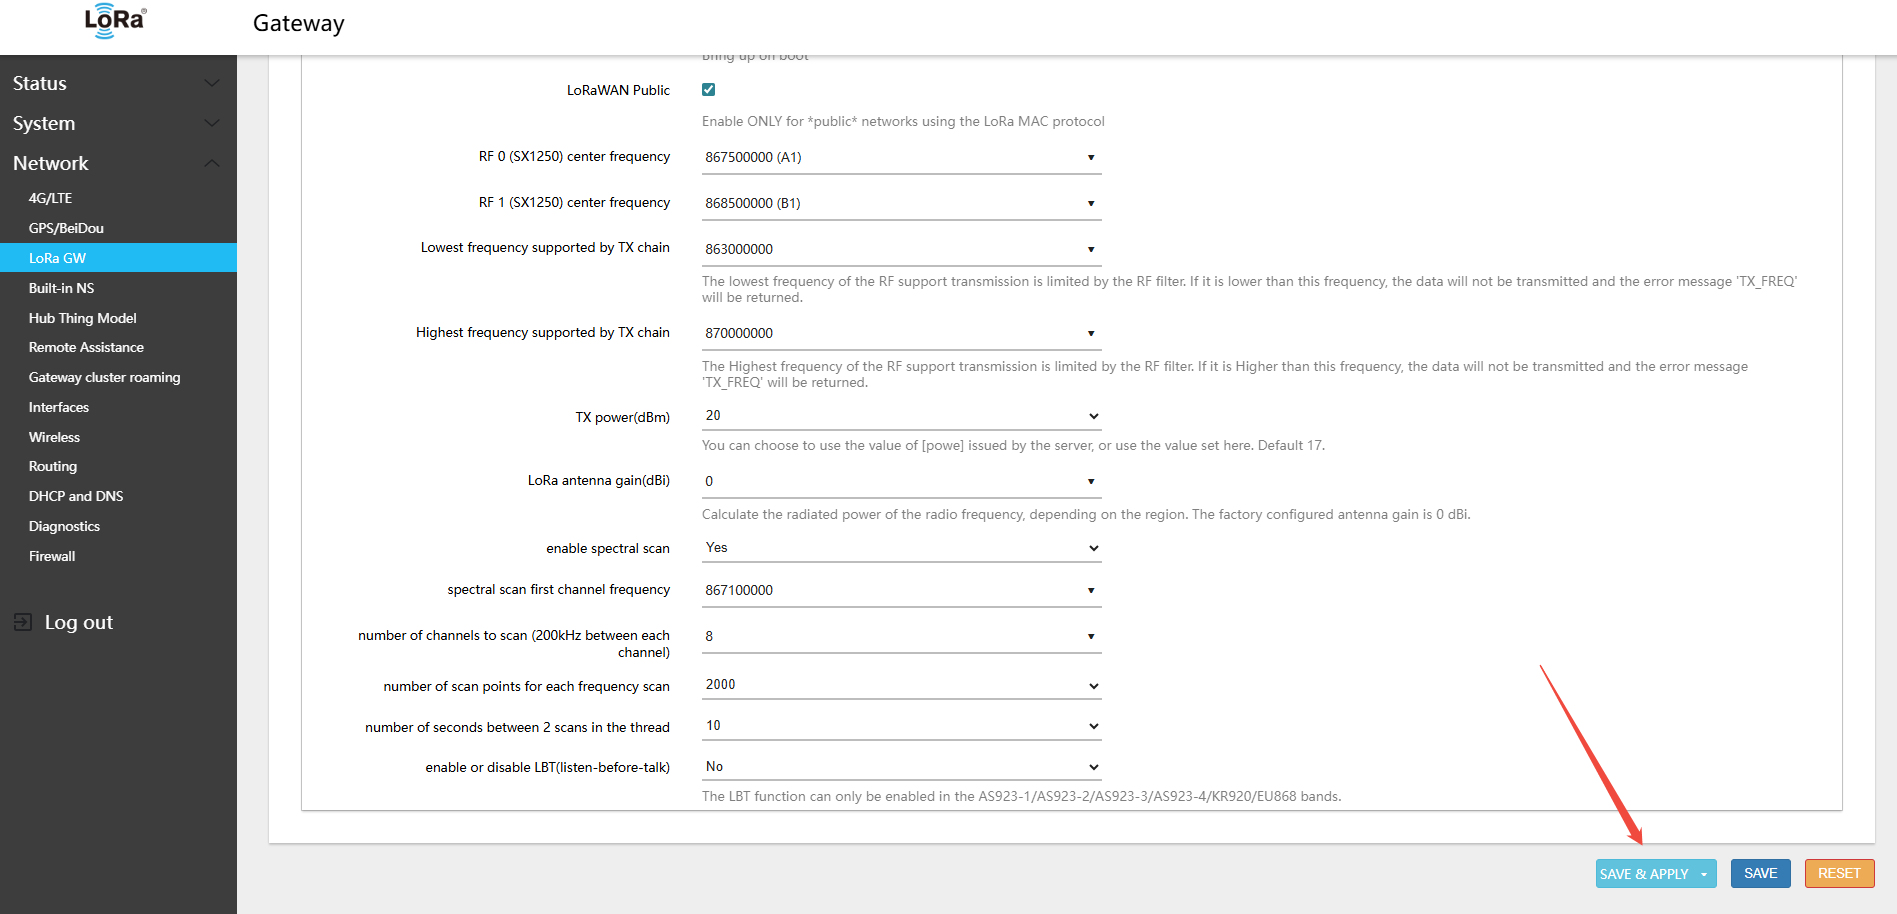
- In the gateway interface Network → LoRa GW → Configuration, configure as follows (example ChirpStack platform IP:
62.234.52.46):
- Mode:Normal Mode
- LoRaWAN® regions(LoRaWAN® band):US902-928
- Gateway and server communication protocol (gateway-to-server communication protocol):UDP
- server address (server address):62.234.52.46
- Uplink port(UDP)(uplinkPort(UDP)):1700
- Downstream port(UDP)(downlinkPort(UDP)):1700
- Click Save & Apply in the lower-right corner of the page
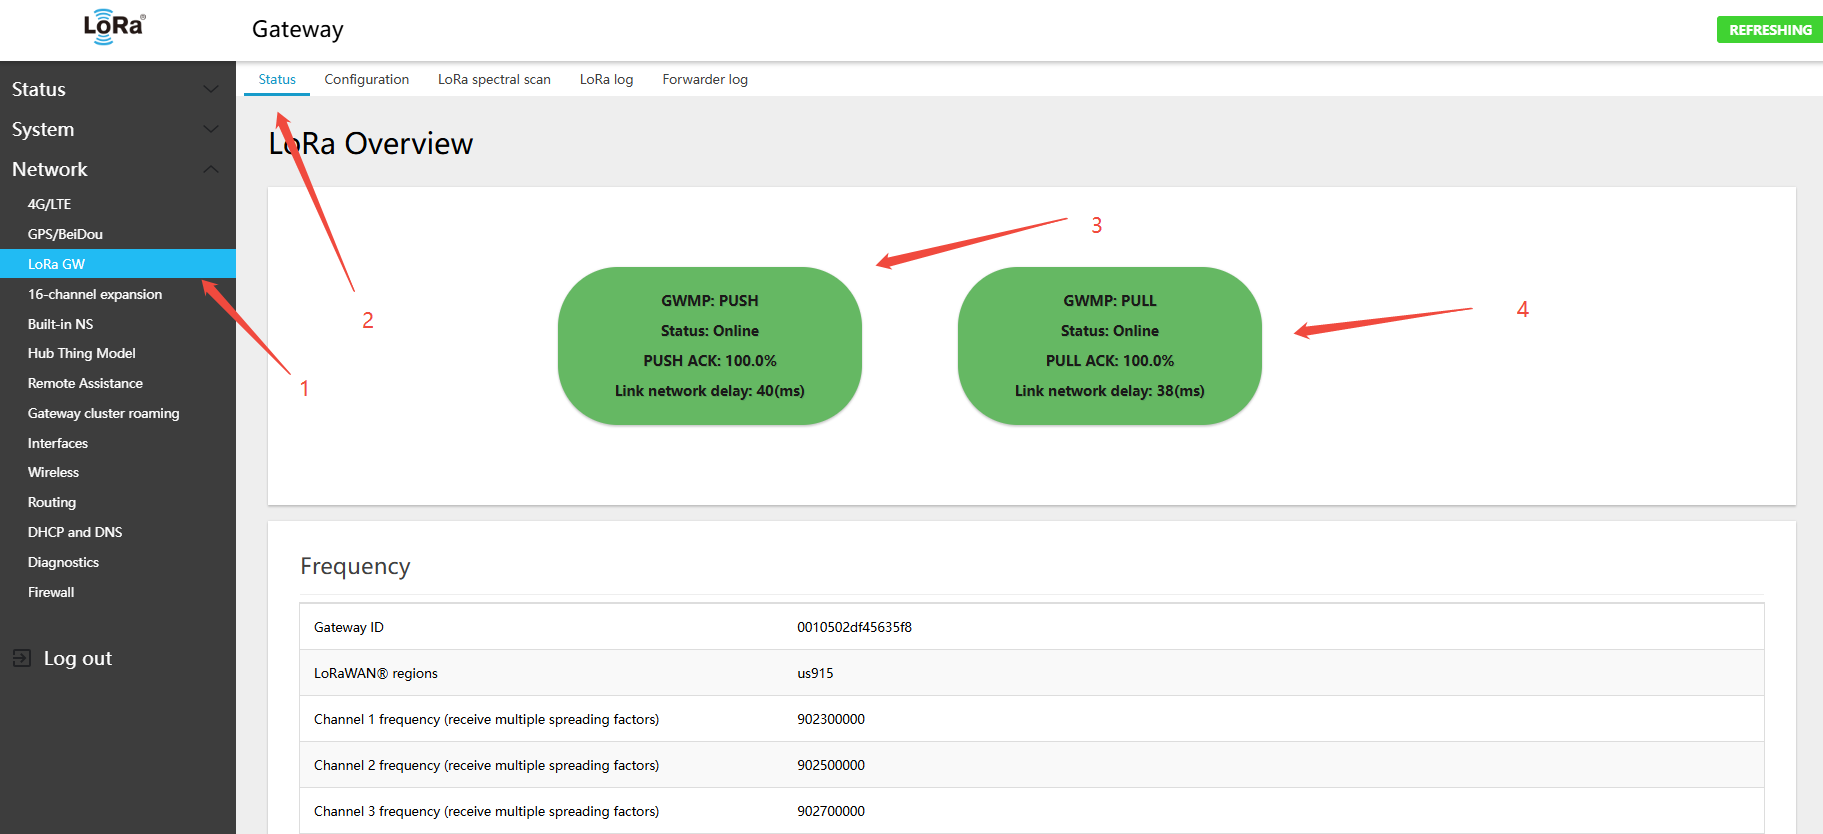
- On the gateway: Network → LoRa GW → Status — view the gateway-to-server connection status. (Because PUSH packets are sent every 30 s, click Save & Apply and wait 1 minute before viewing ): check online status
- gateway (PUSH) ↔ server (PUSH_ACK)
- gateway (PULL) ↔ server (PULL_ACK)
- Check whether ACK is present, which confirms connectivity to the server. You can also see the current UDP round-trip latency. Latency above 150 ms may affect downlink delivery success rates.
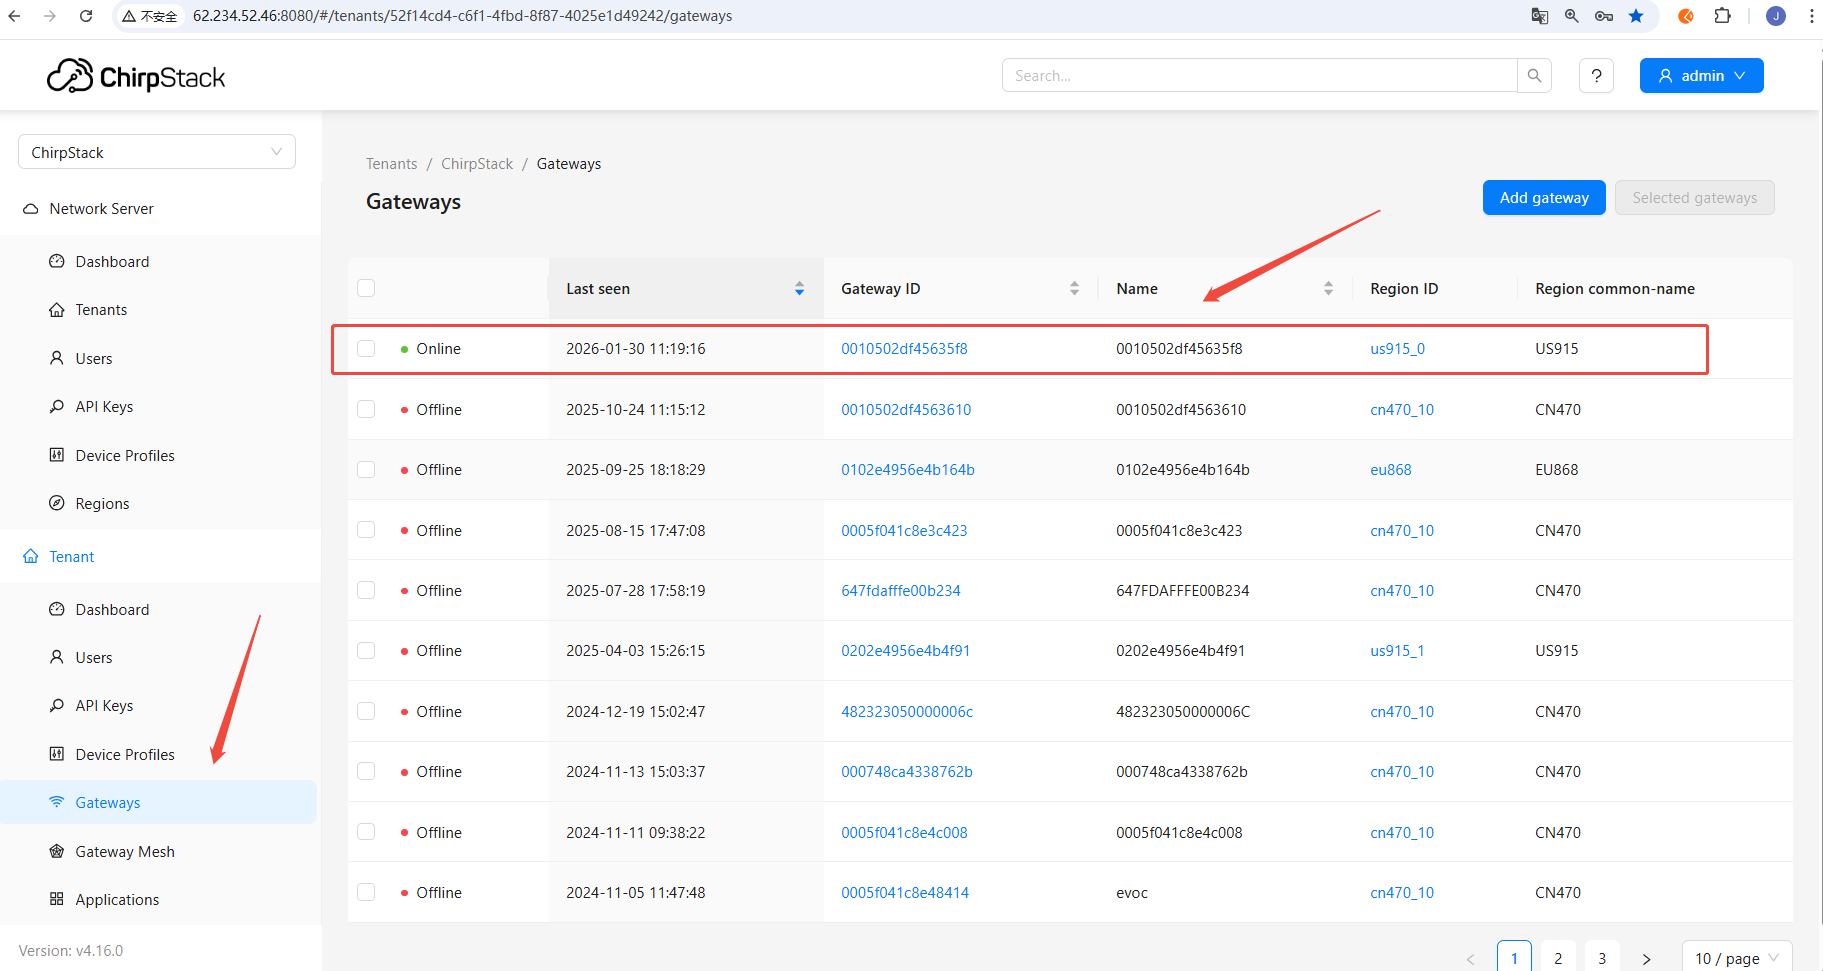
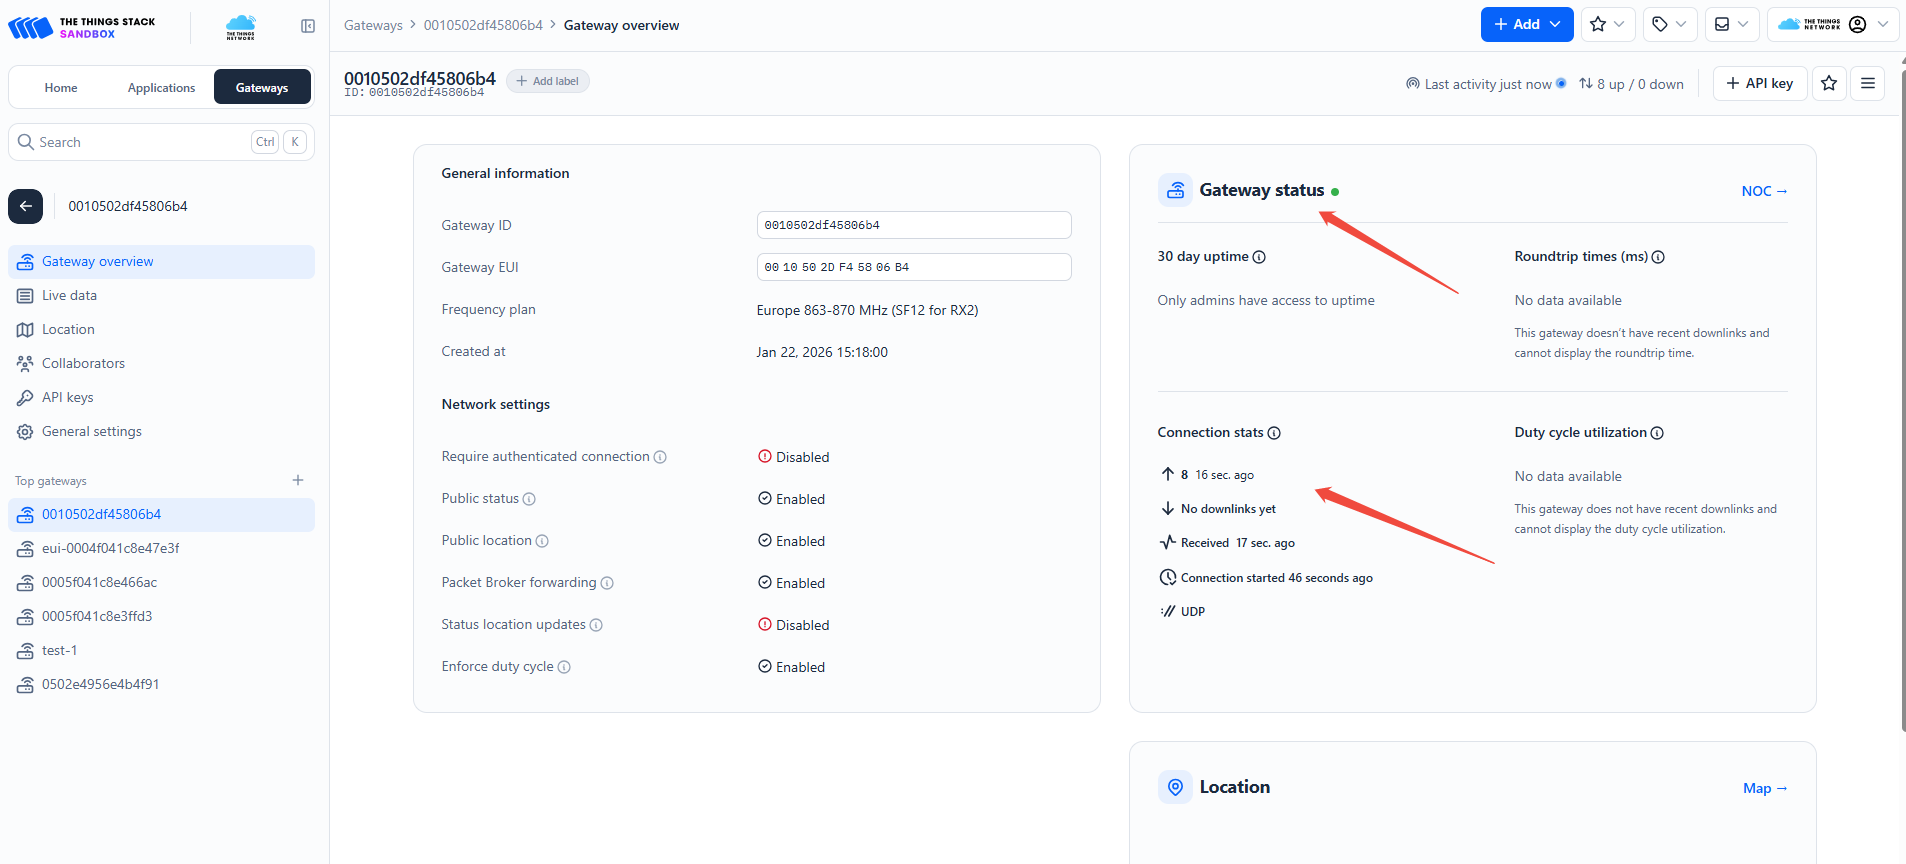
- On the platform side, view the gateway connection status
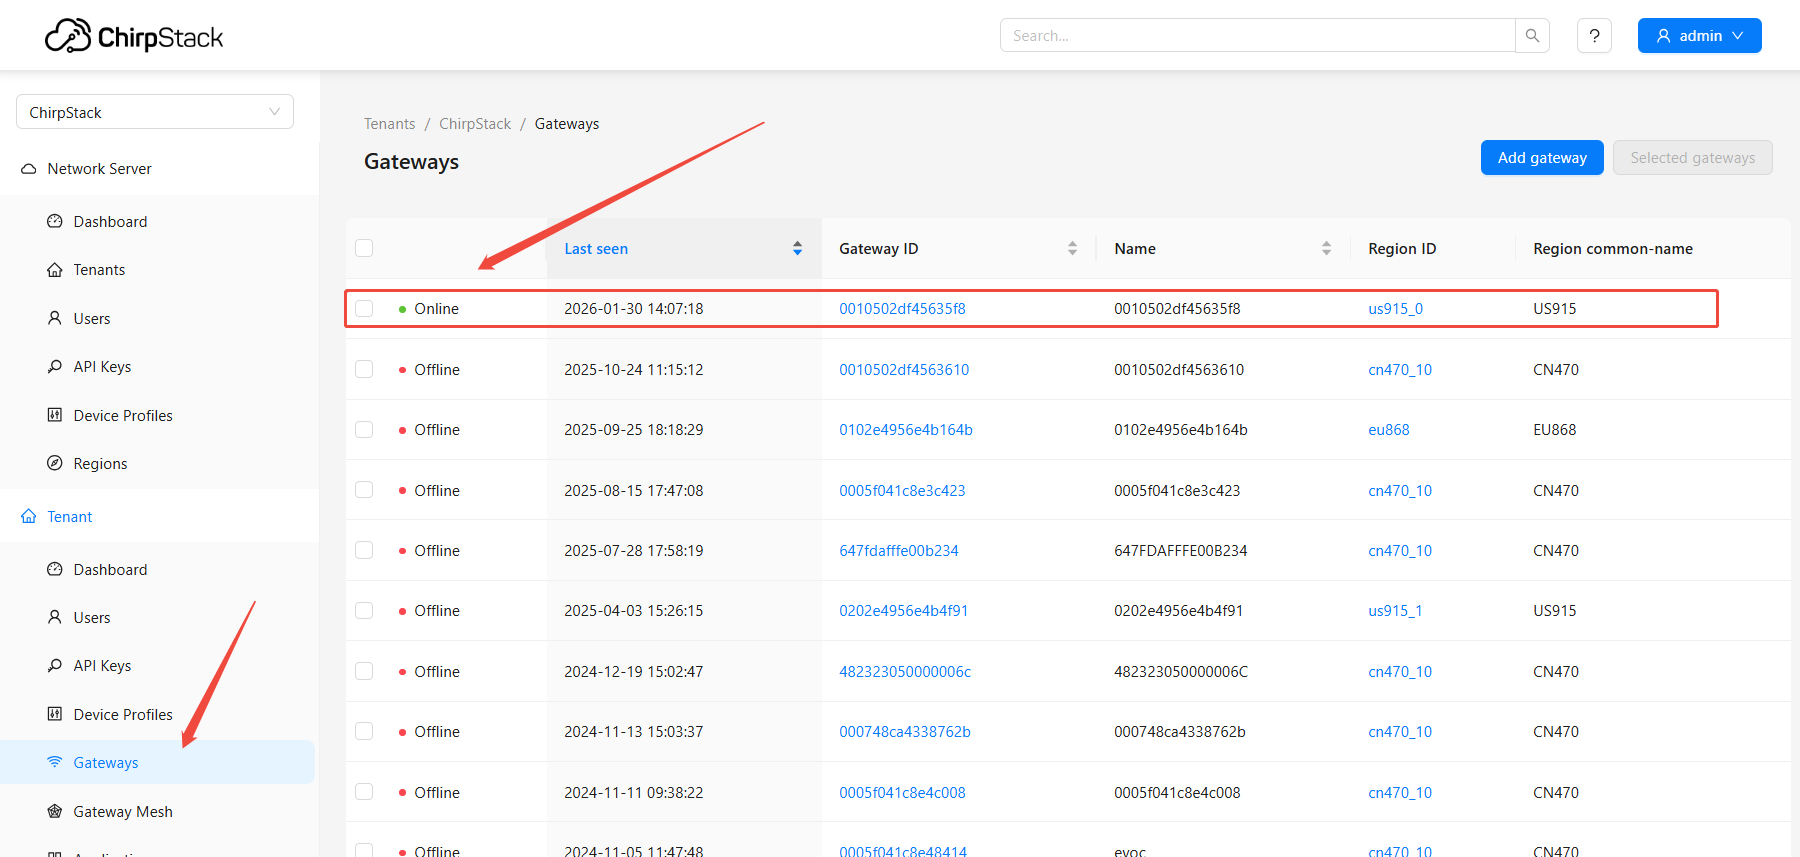
Gateway is now online, displayed as a US915-band gateway
5.1.1.2 Connecting to TTN via UDP
Note:
- The example requires a pre-registered TTN account
- The examples use a single-band gateway; other band configurations follow the same procedure
Steps:
- Log in to the gateway interface. Navigate to Network → LoRa GW → Configuration. To configure the second LoRa module (16-channel version), go to Network → 16-channel expansion

For the 16-channel version, you also need to configure the second LoRa page: 16-channel expansion
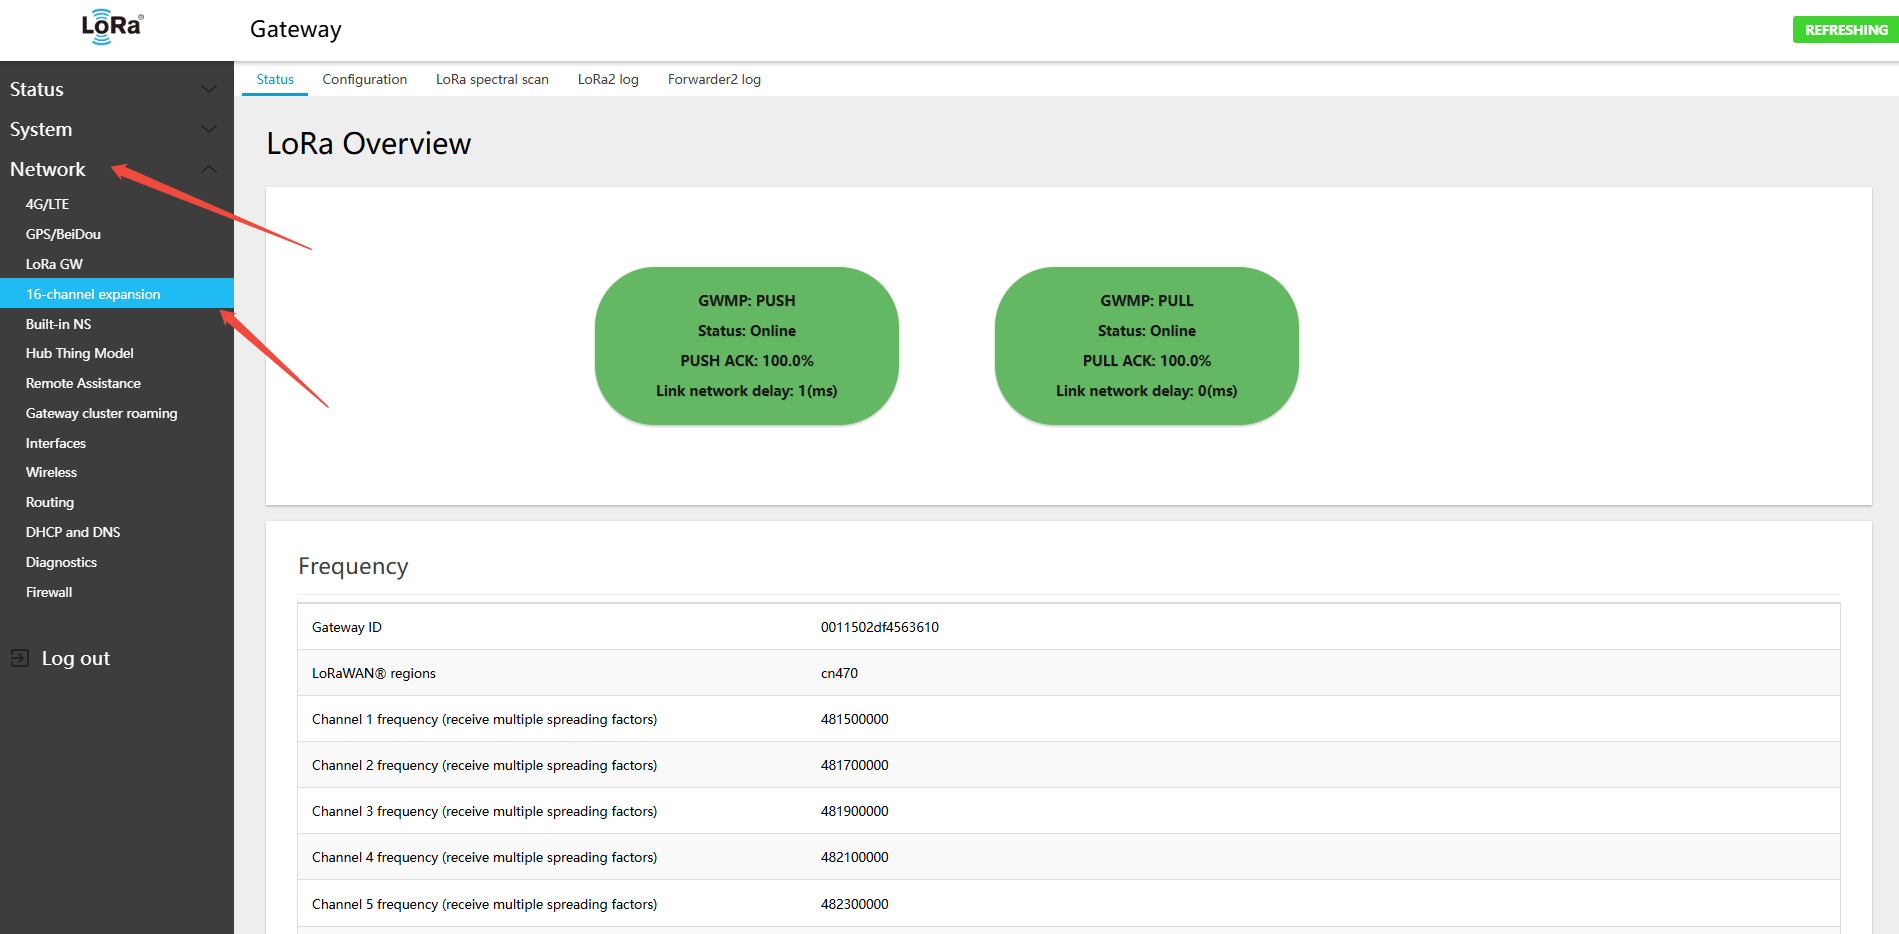
- Navigate to LoRa GW (LoRa gateway) → Configuration
- Switch to the required LoRaWAN band
Switching bands does not change the gateway's default EUI. If the Configuration page parameters were incorrectly set, you can switch to another band and back to re-initialize the band parameters.
- The 470 version only supports CN470; the 470 hardware does not require band switching
- The 868 hardware version supports switching between EU868, RU864, and IN865
- 915 version supports US902-928, AU915-928, AS923-1, AS923-2, AS923-3, AS923-4, KR920
- For instructions on switching bands, refer to:
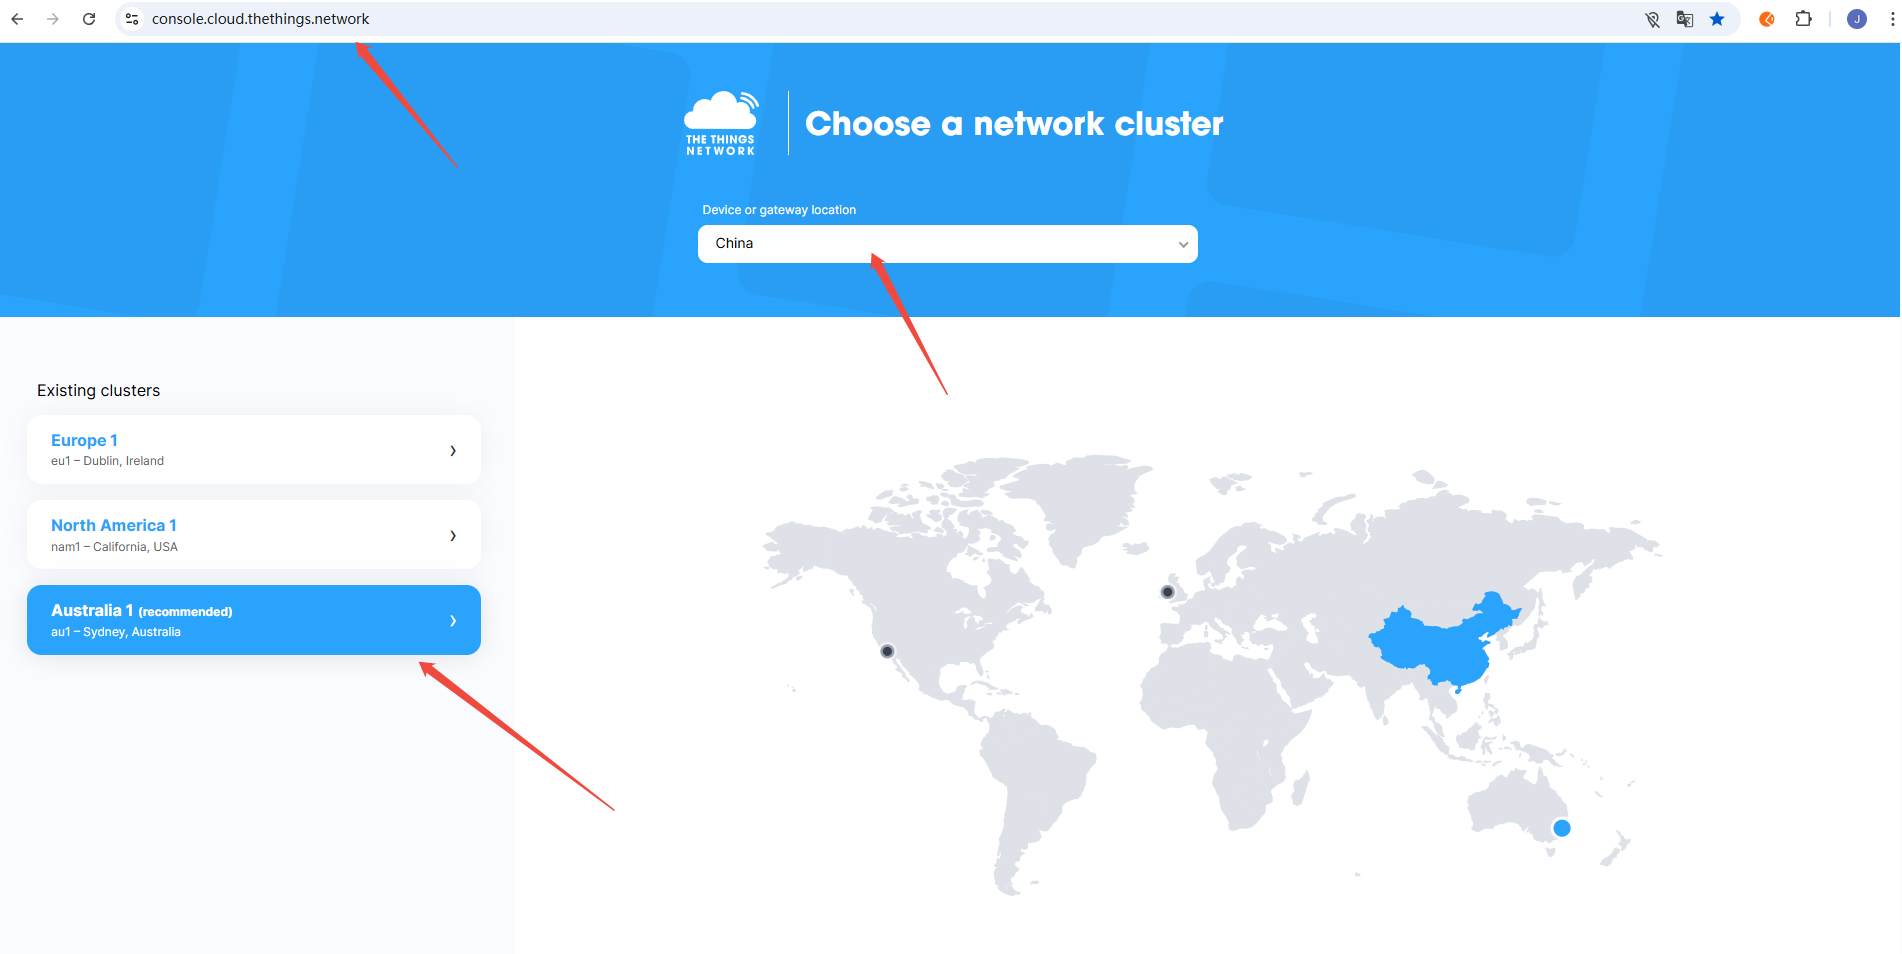
- Example: connecting to TTN (console.cloud.thethings.network) — you must register an account on the platform
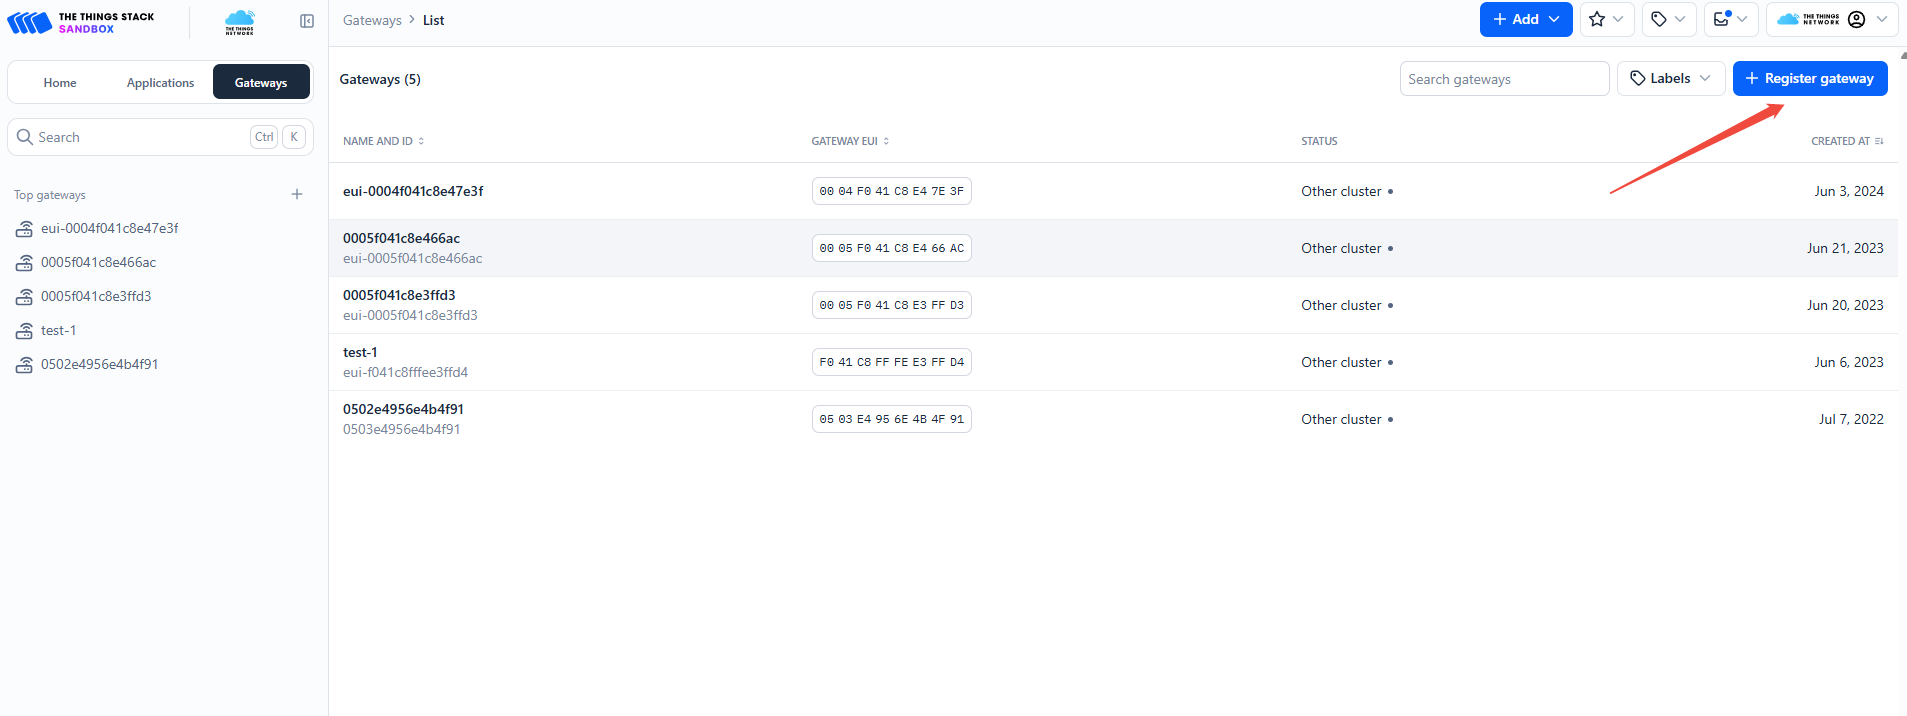
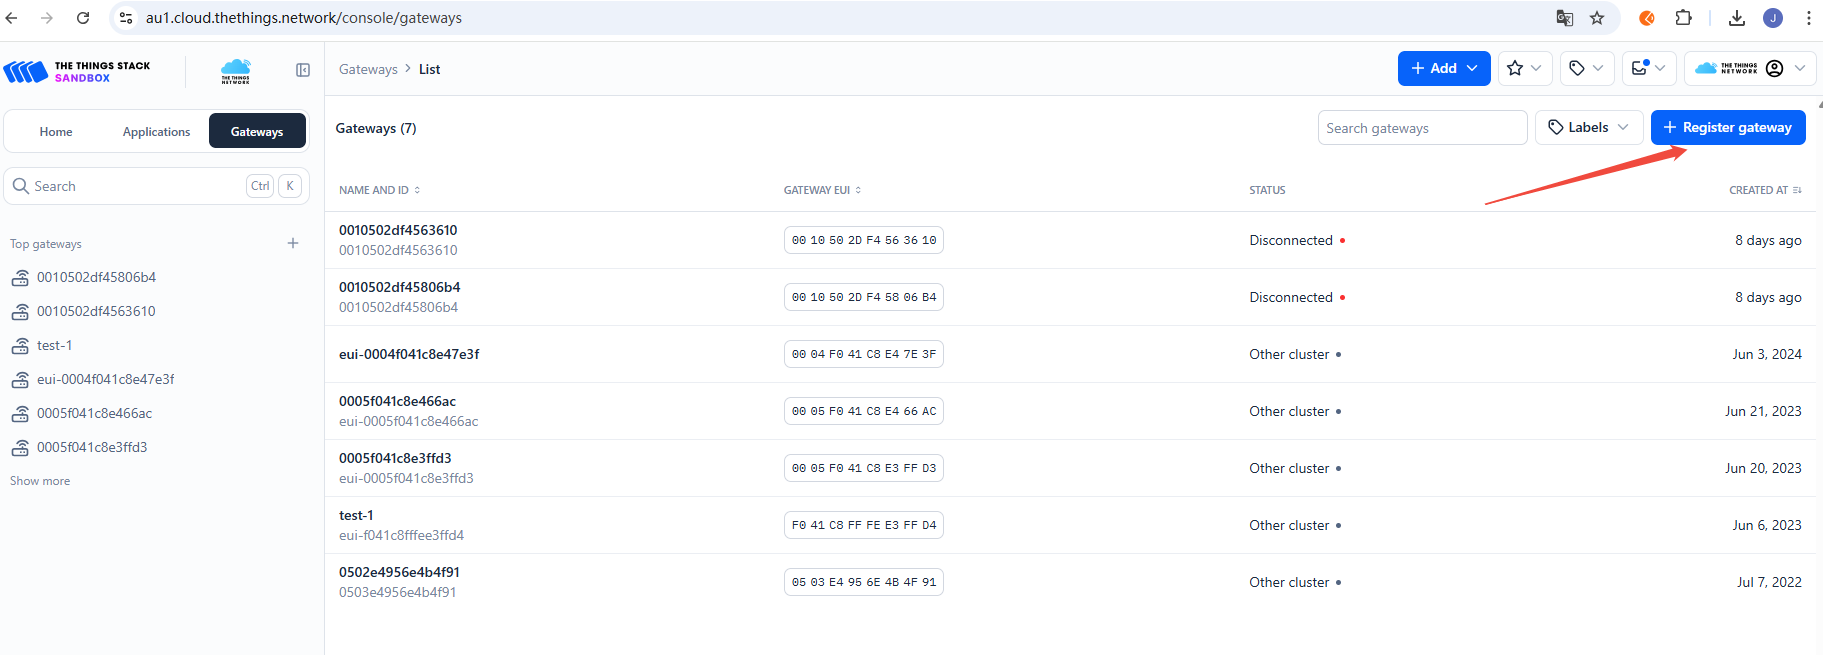
Find "Register gateway" on the TTN platform
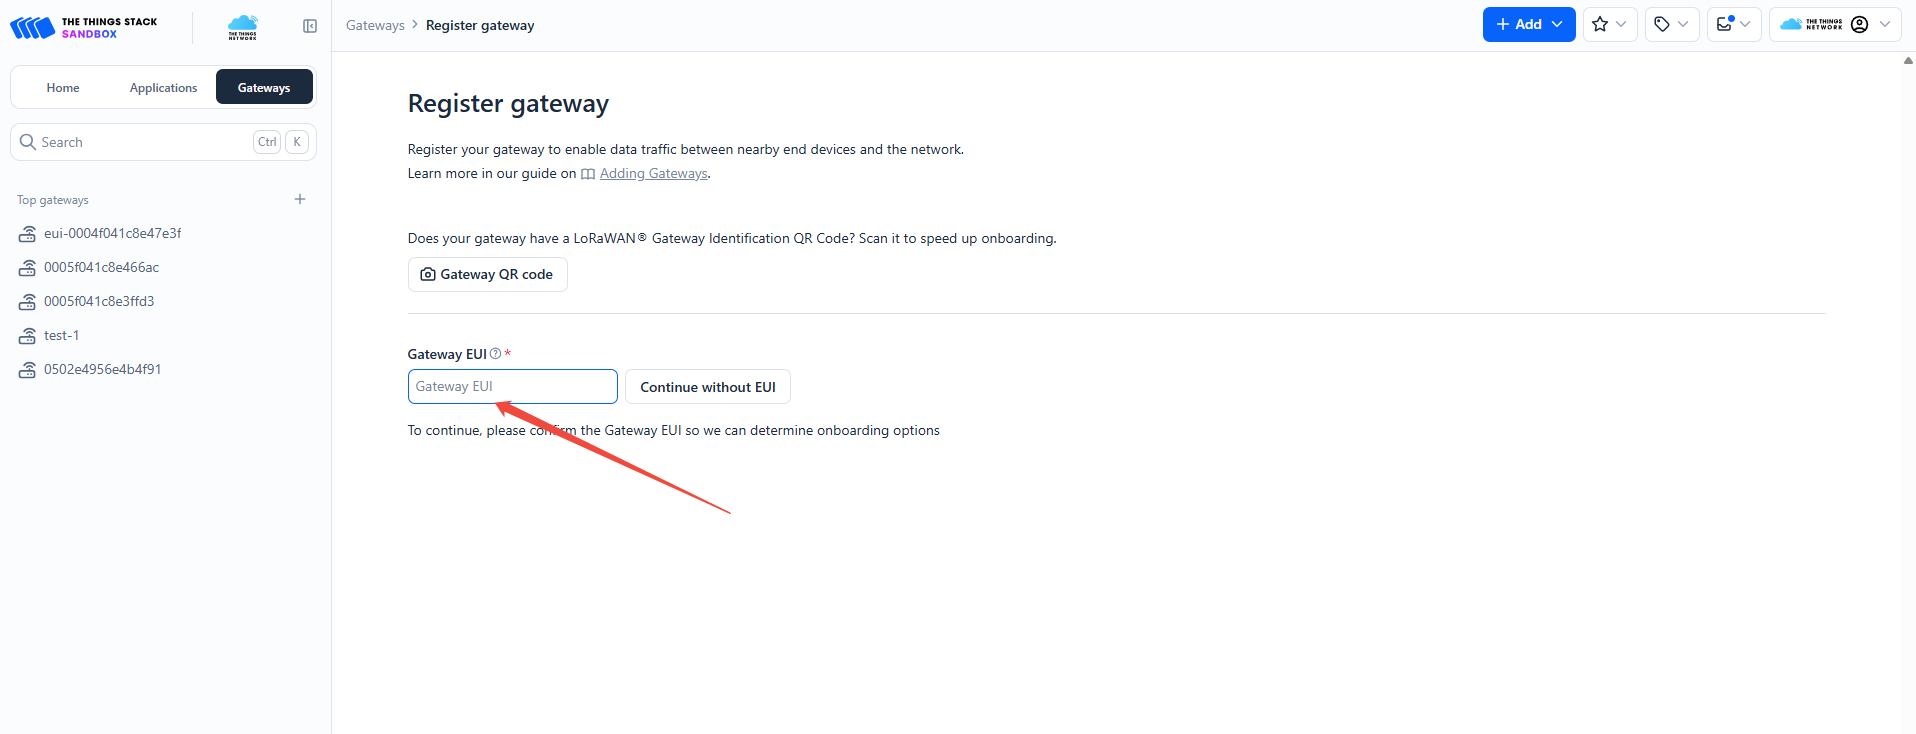
The TTN platform shows the gateway ID input field
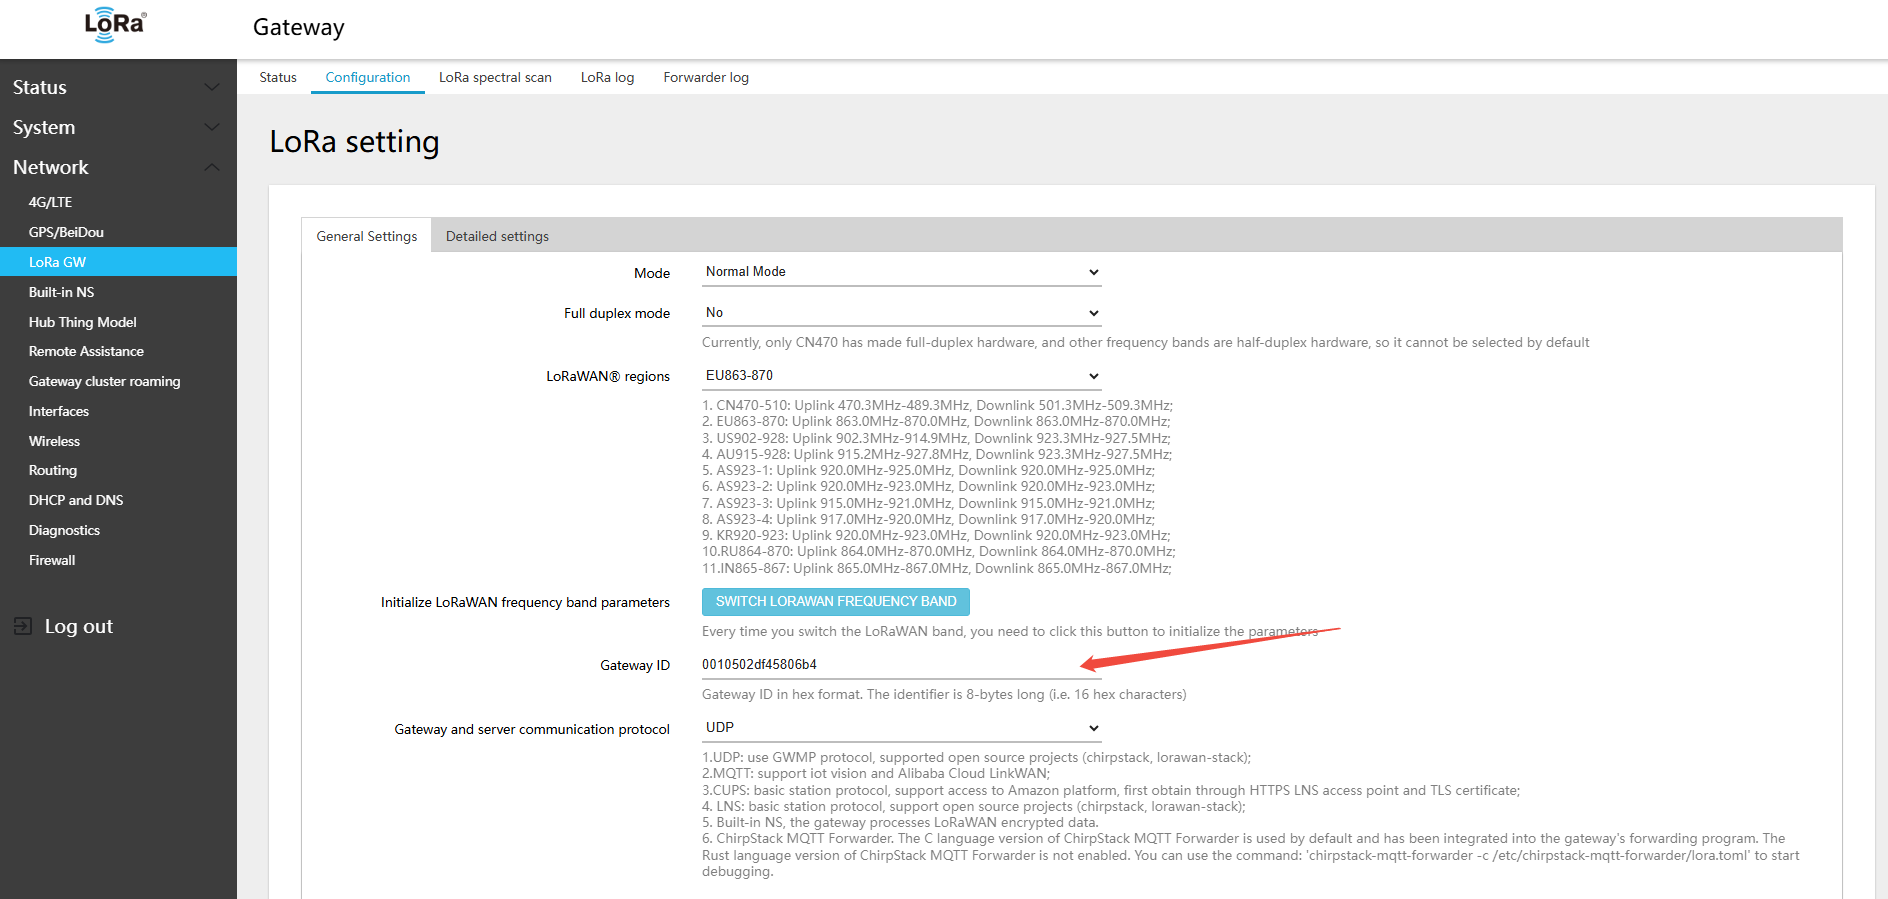
In another browser window, log in to the gateway page, find the LoRa gateway ID, and copy it
Paste the gateway ID on the TTN platform and click "Confirm" 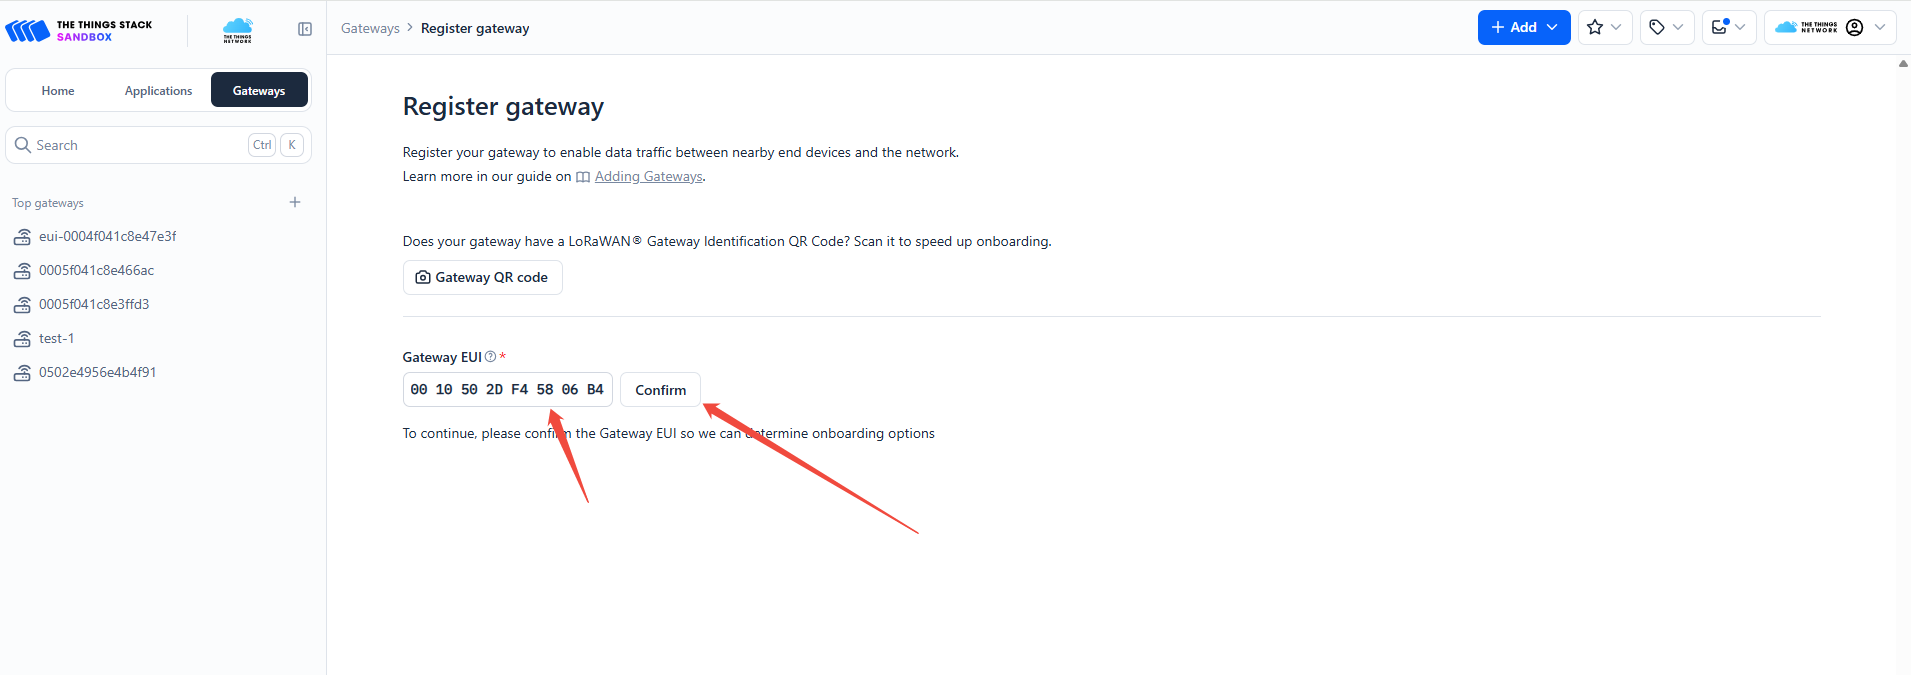
On the TTN platform, paste the copied Gateway ID into "Gateway ID" and "Gateway name", select the "frequency plan", fill in the details, then click "Register gateway" 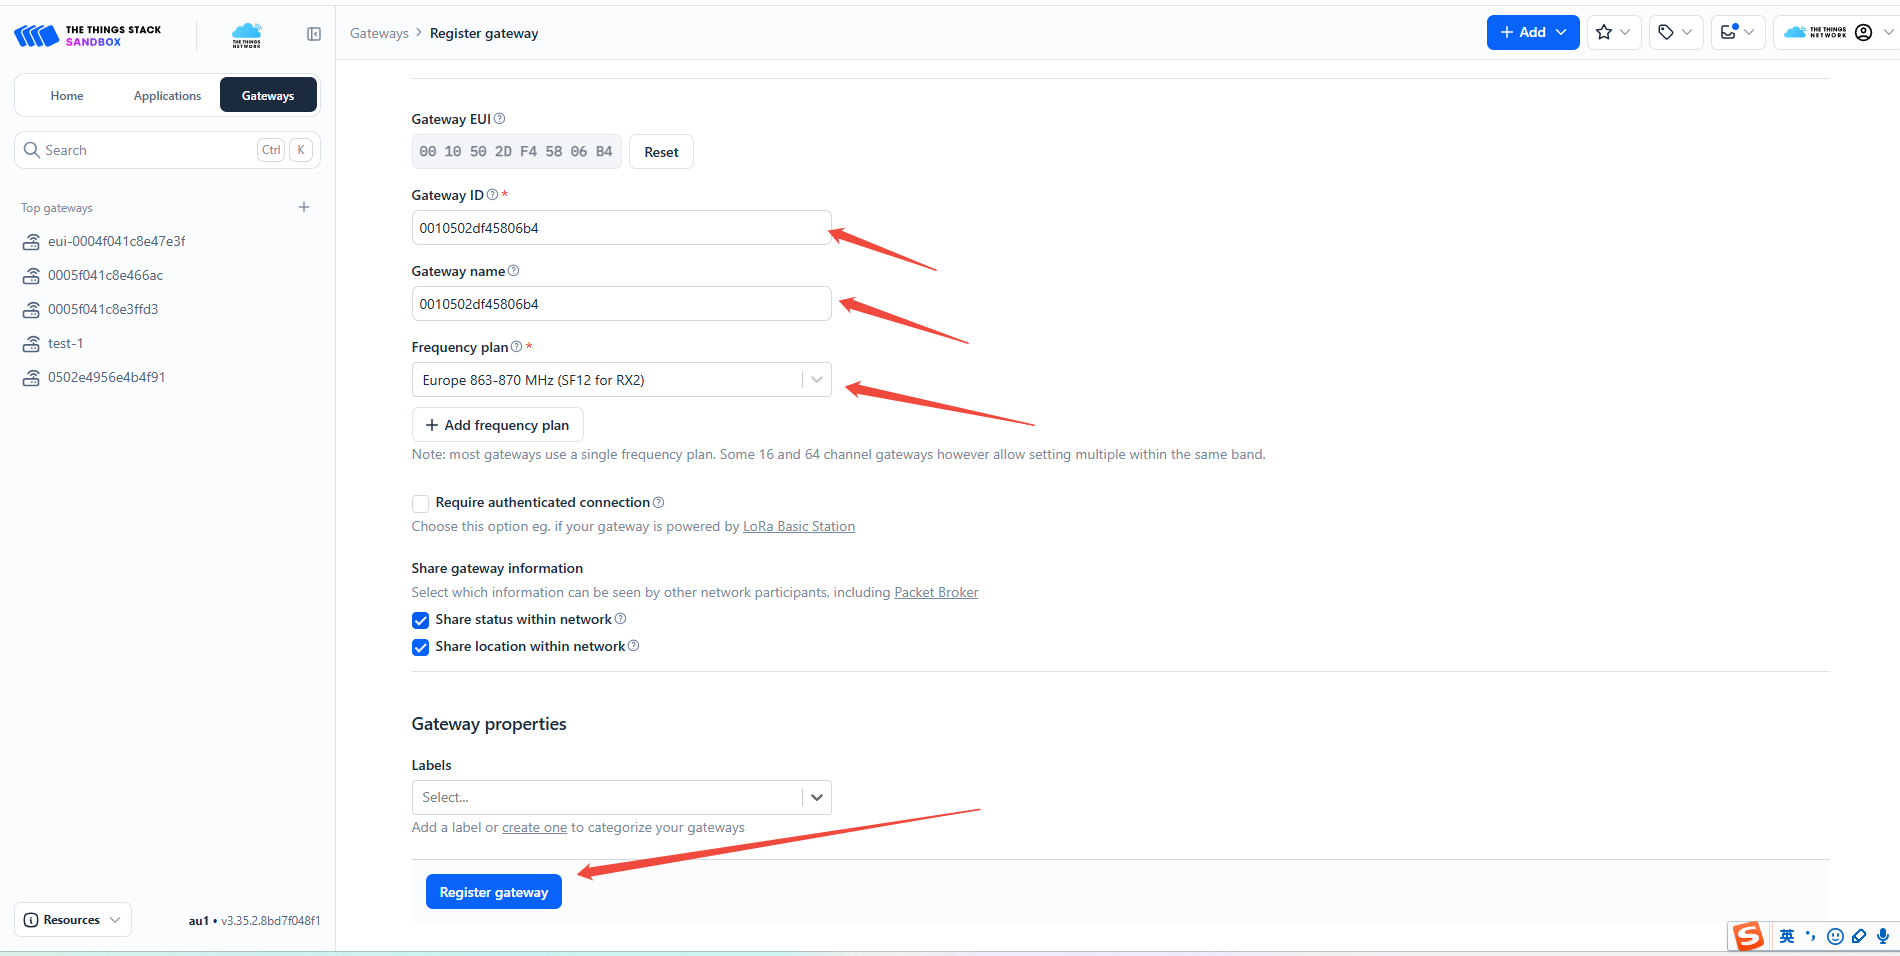
Once registered on the TTN platform, enter the server address in the gateway settings
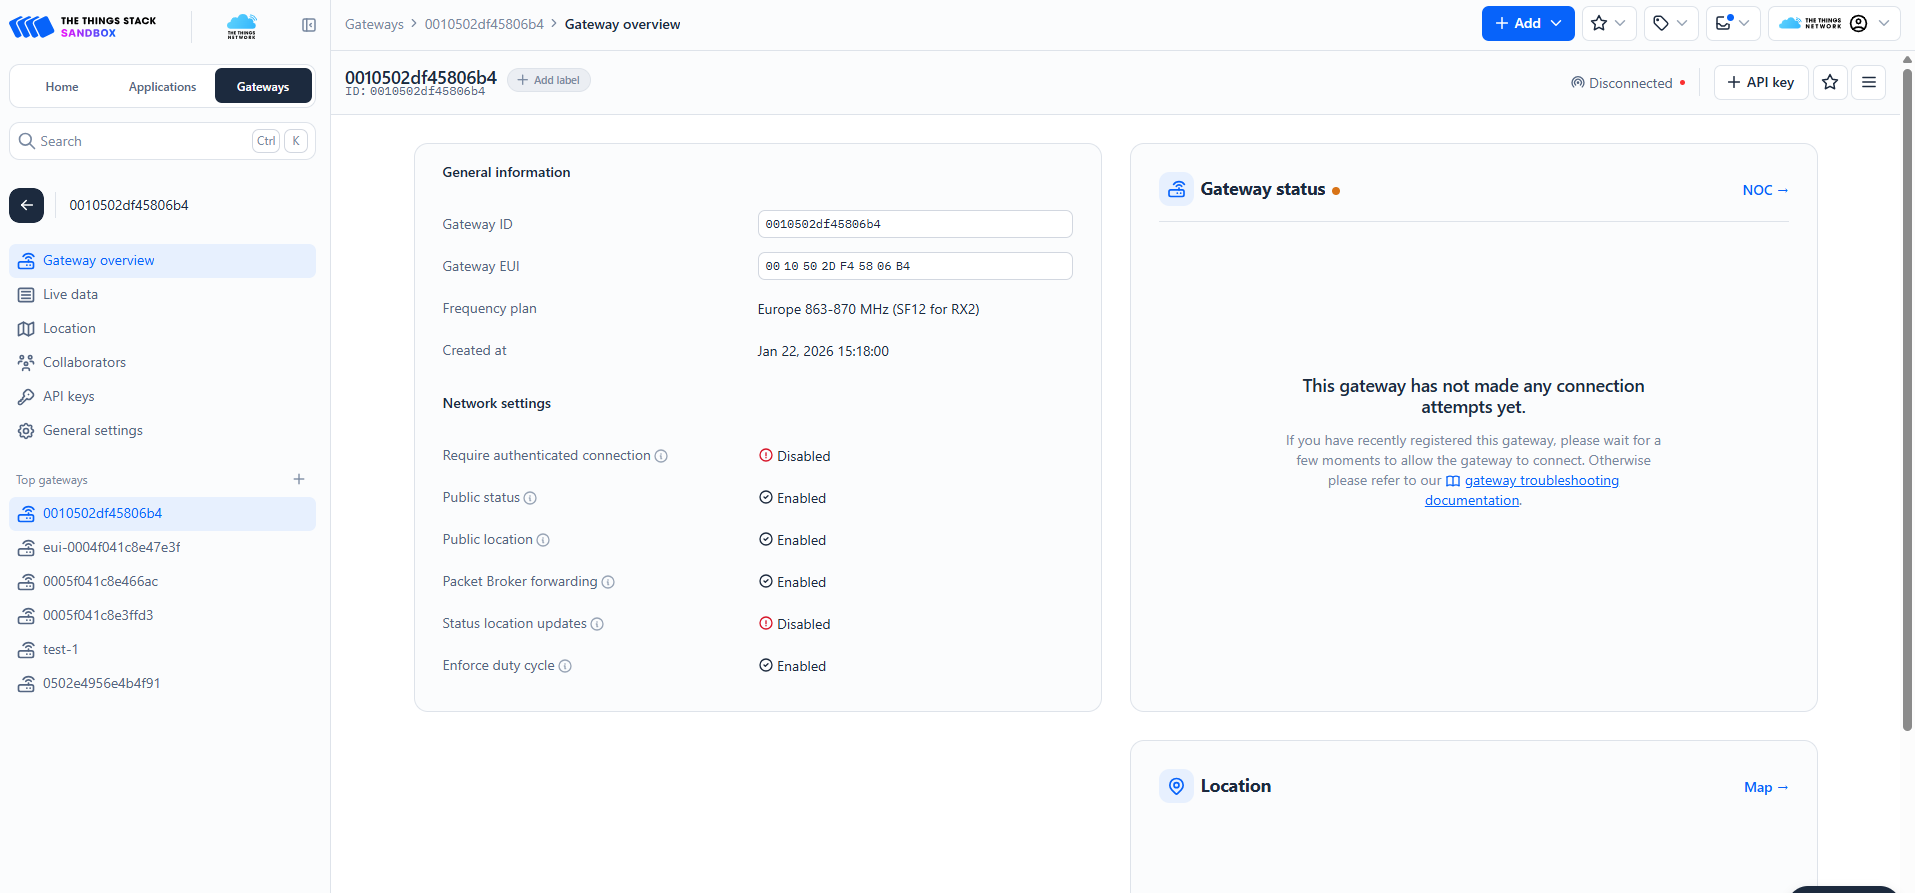
Note:
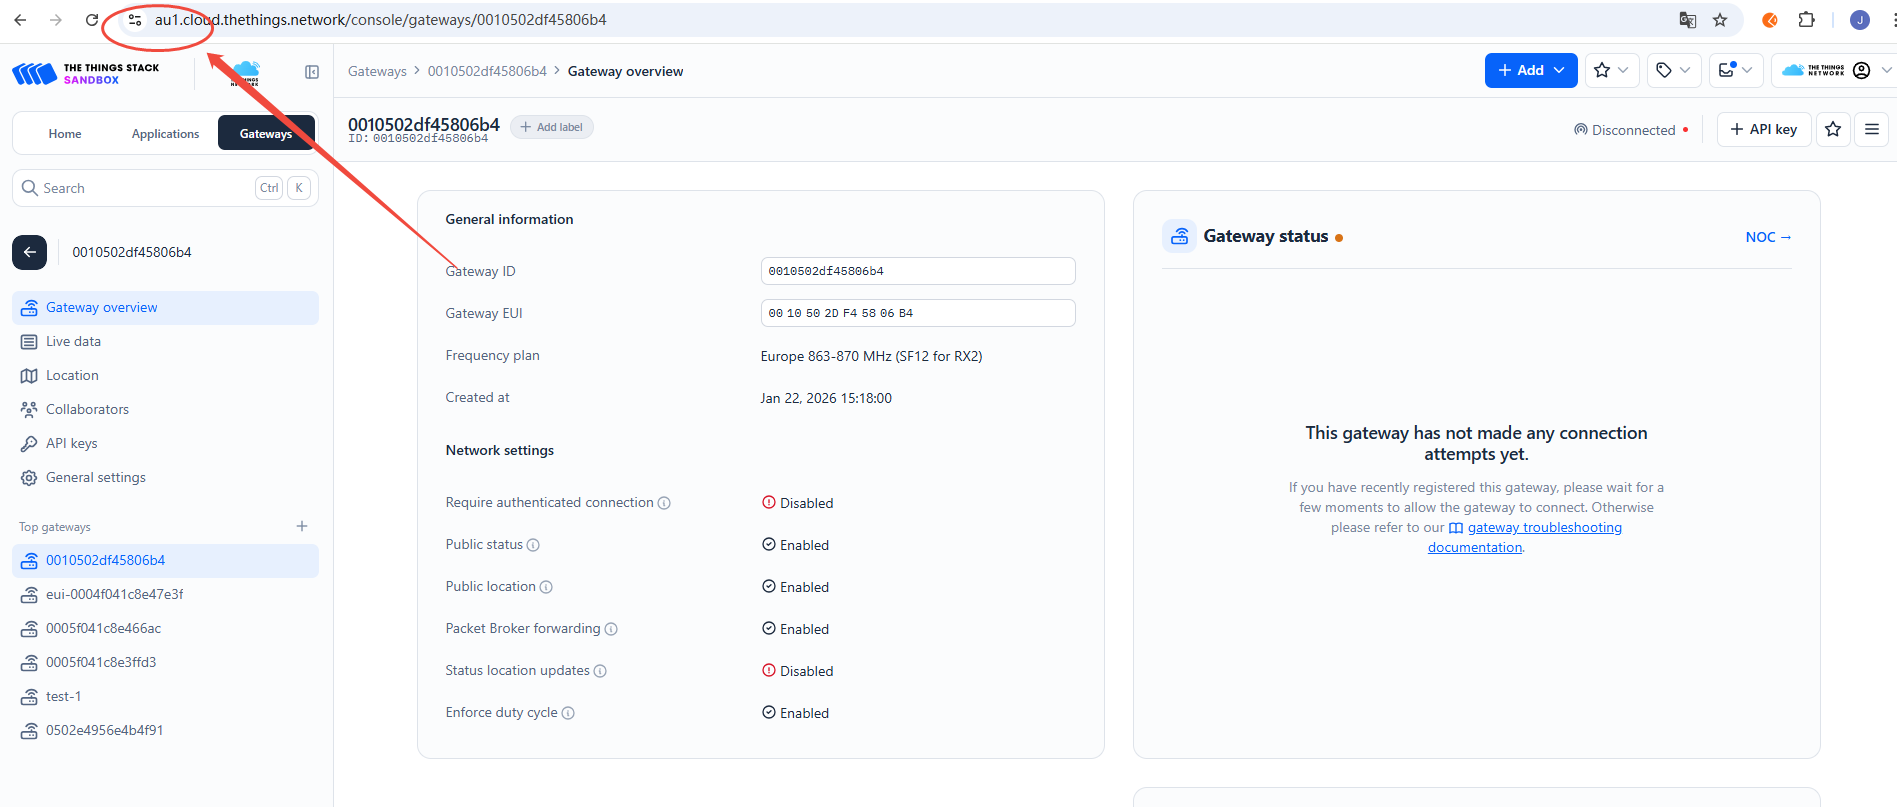
- Before configuring the UDP server address, confirm the domain assigned by TTN. The example TTN domain prefix for this gateway is: au1
Therefore, in the gateway settings, select the UDP protocol and set the server to the TTN au1 domain node
- Mode:Normal Mode
- Gateway and server communication protocol (gateway-to-server communication protocol):UDP
- Server address: Target NS domain name or IP address (e.g.,
au1.cloud.thethings.network) - Uplink port(UDP)(uplinkPort(UDP)):1700
- Downstream port(UDP)(downlinkPort(UDP)):1700
Configure the gateway to connect to TTN via UDP

Click Save & Apply in the lower-right corner of the page
Wait 30–60 seconds, then check the gateway status on the TTN platform — it should show as online
5.1.2 Using MQTT-GWMP
The MQTT protocol is suitable for scenarios requiring a more flexible messaging mechanism. It supports connection to Winext's IoT Vision public cloud and private deployments of IoT Vision.
Application Scenarios: IoT Vision public cloud, IoT Vision private deployment.
5.1.2.1 Connecting to IoT Vision Cloud via MQTT GWMP
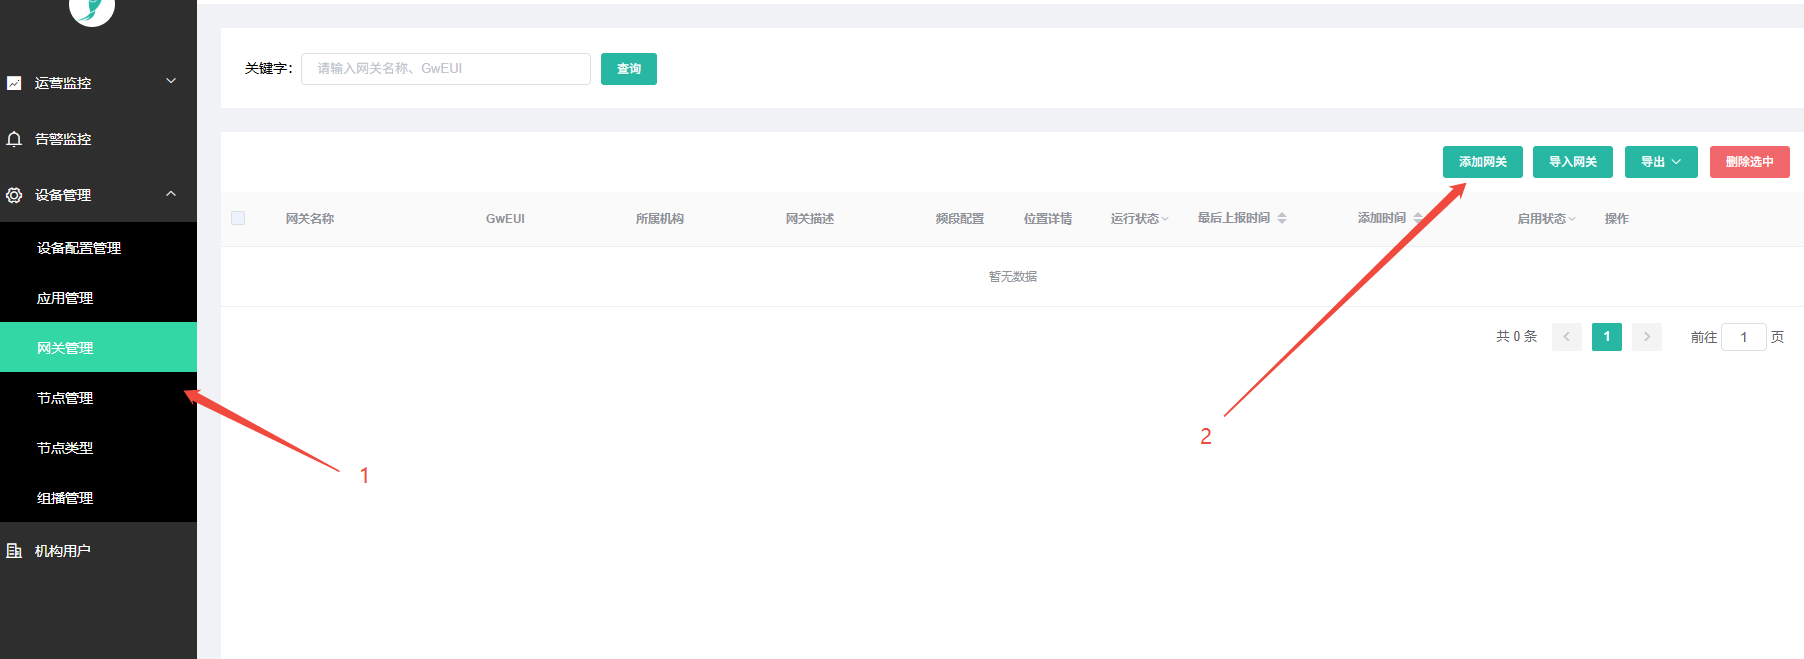
- IoT Vision Platform: lora.smartkit.io
- Using a CN470-band gateway as an example
- After logging in with your account, find Gateway Management in the menu and click Add Gateway
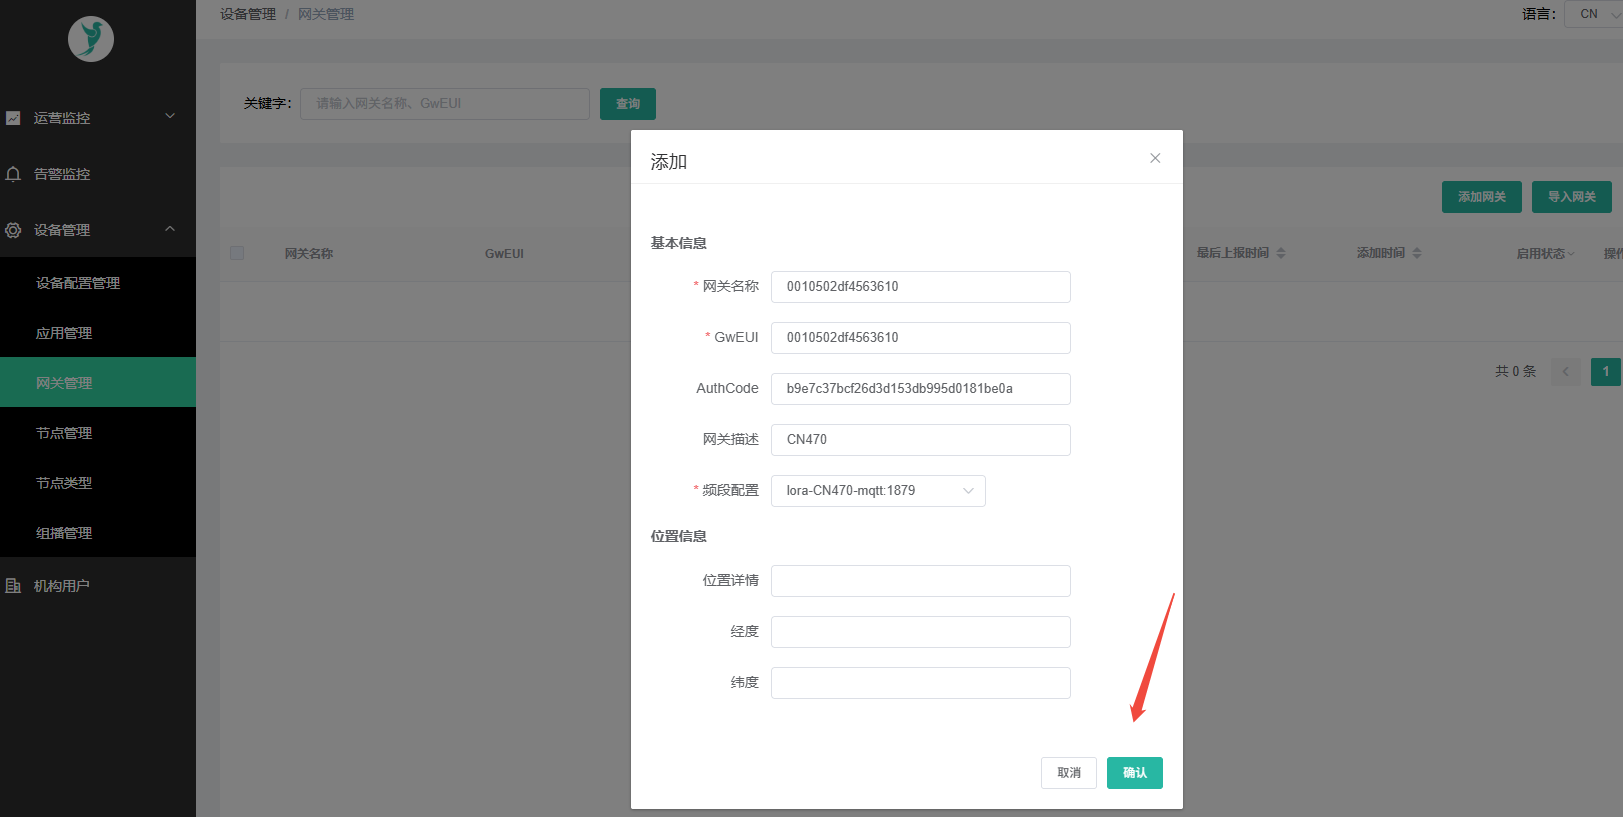
- Enter the gateway information; the authorization code must be obtained by contacting technical support
- Log in to the gateway interface: Network → LoRa GW → Configuration
- Mode: Normal Mode
- Gateway and server communication protocol (gateway-to-server communication protocol):MQTT(GWMP)
- External NS MQTT Server: Target NS domain name or IP address (e.g.,
39.108.64.113) - External NS MQTT port (External NS MQTT Server Port):1879
- External NS MQTT Username(NS MQTT Username):wangw
- External NS MQTT password (External NS MQTT password):ww1030
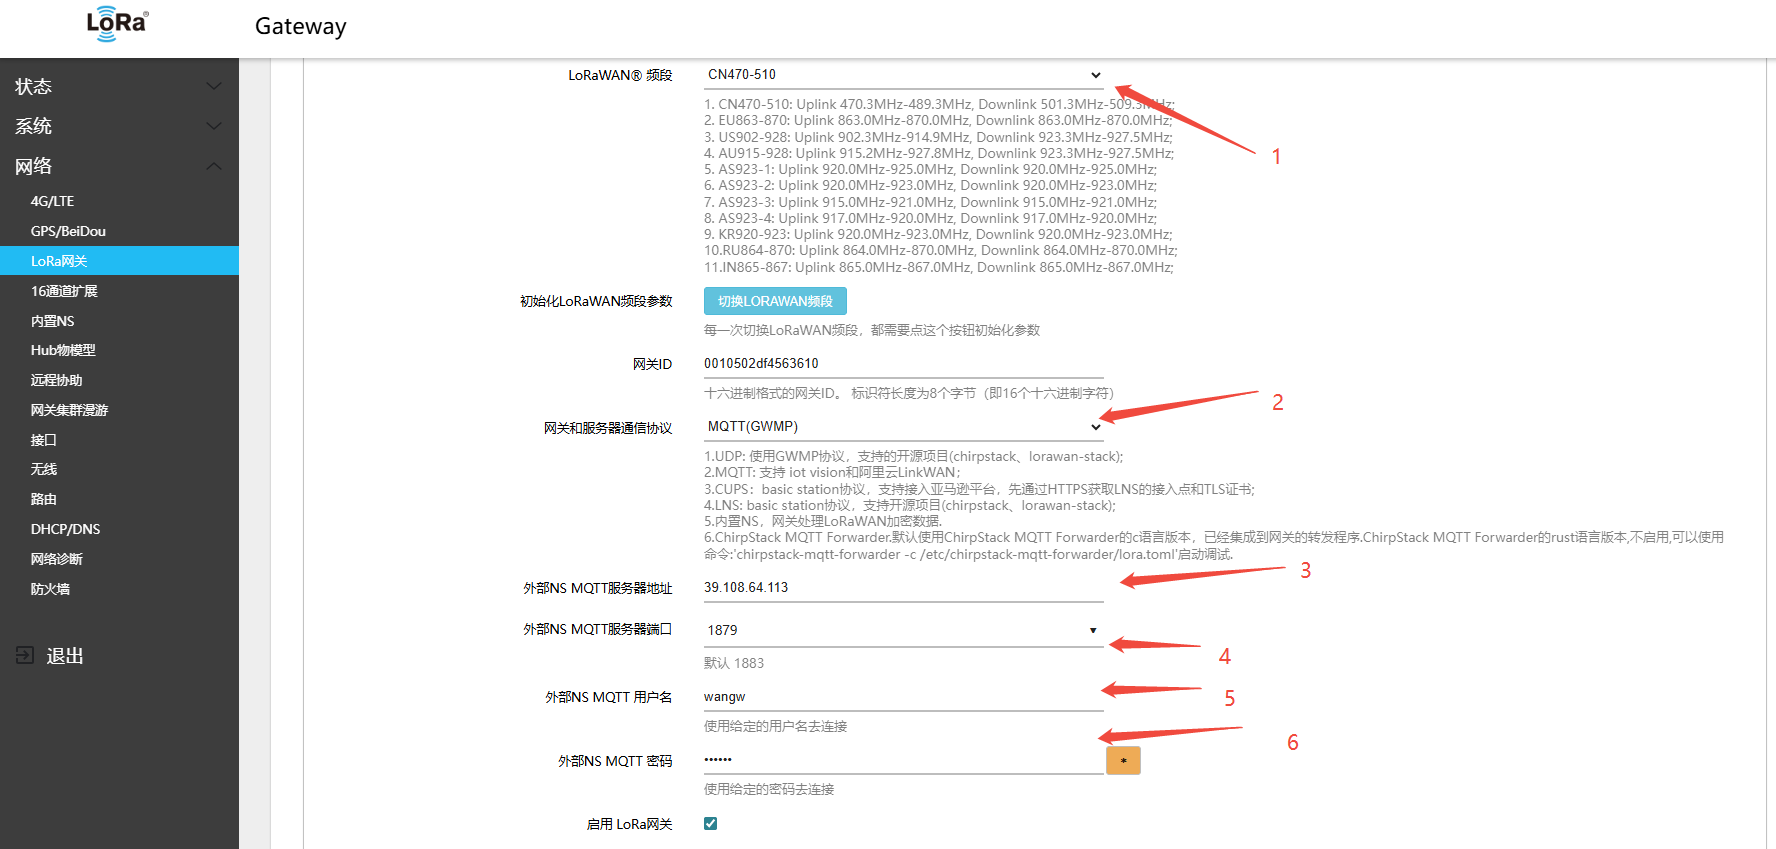
- Click Save & Apply in the lower-right corner of the page
- On the gateway side: Network → LoRa GW → Status — view the gateway\'s online connection status on the platform
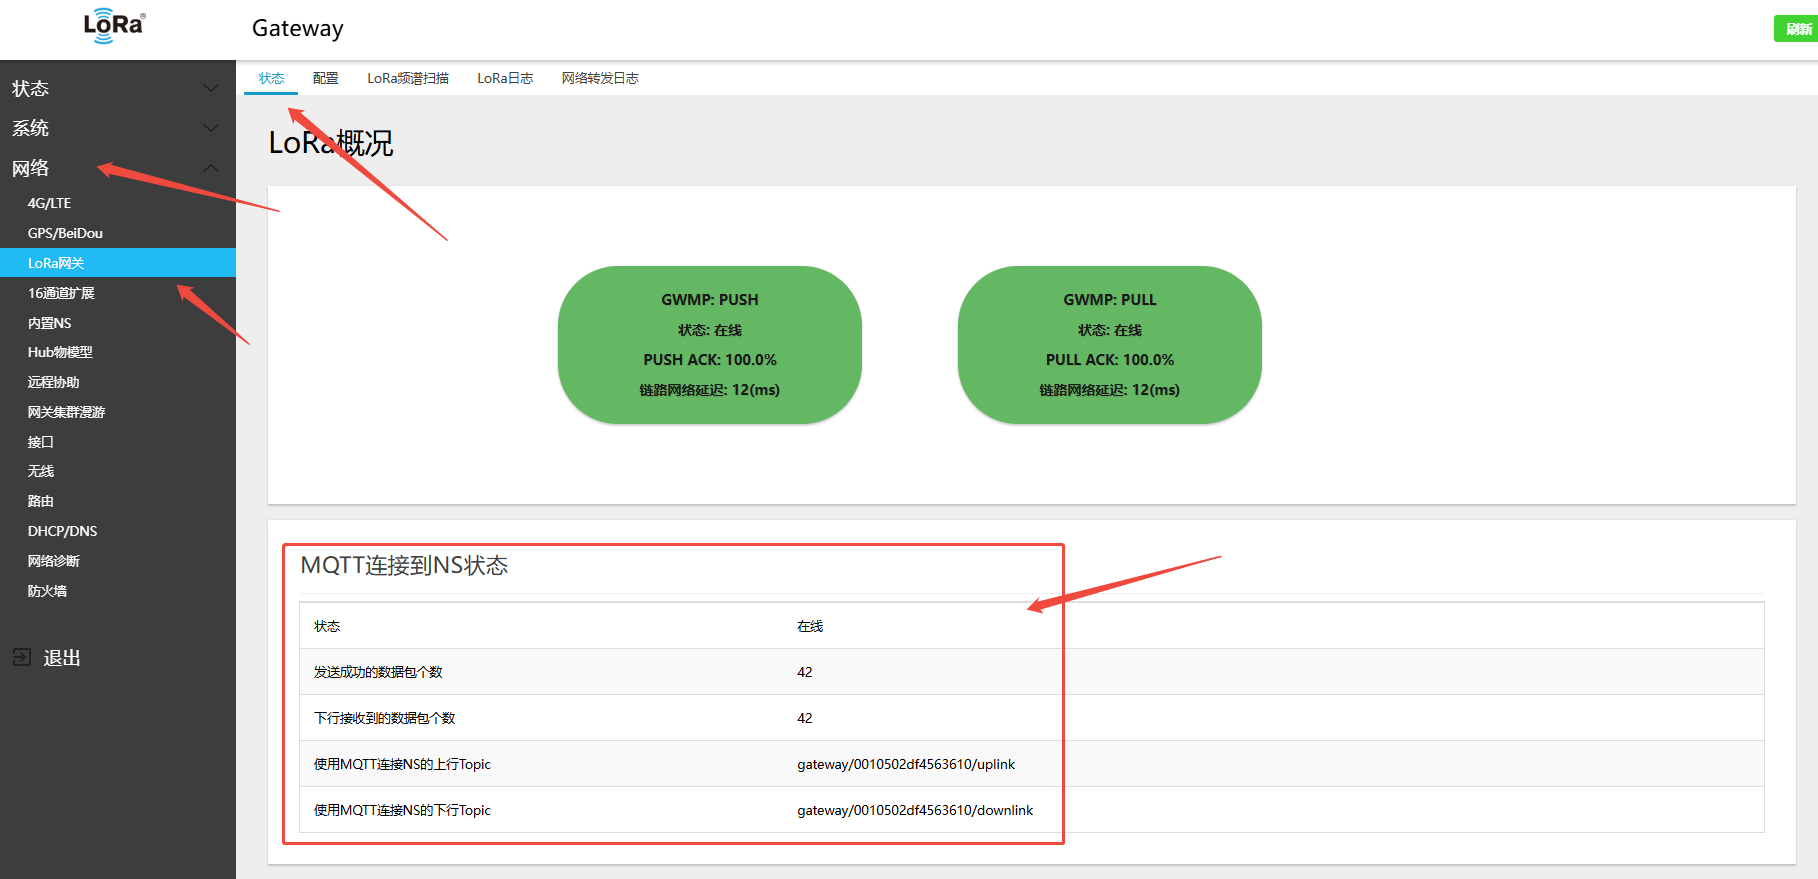
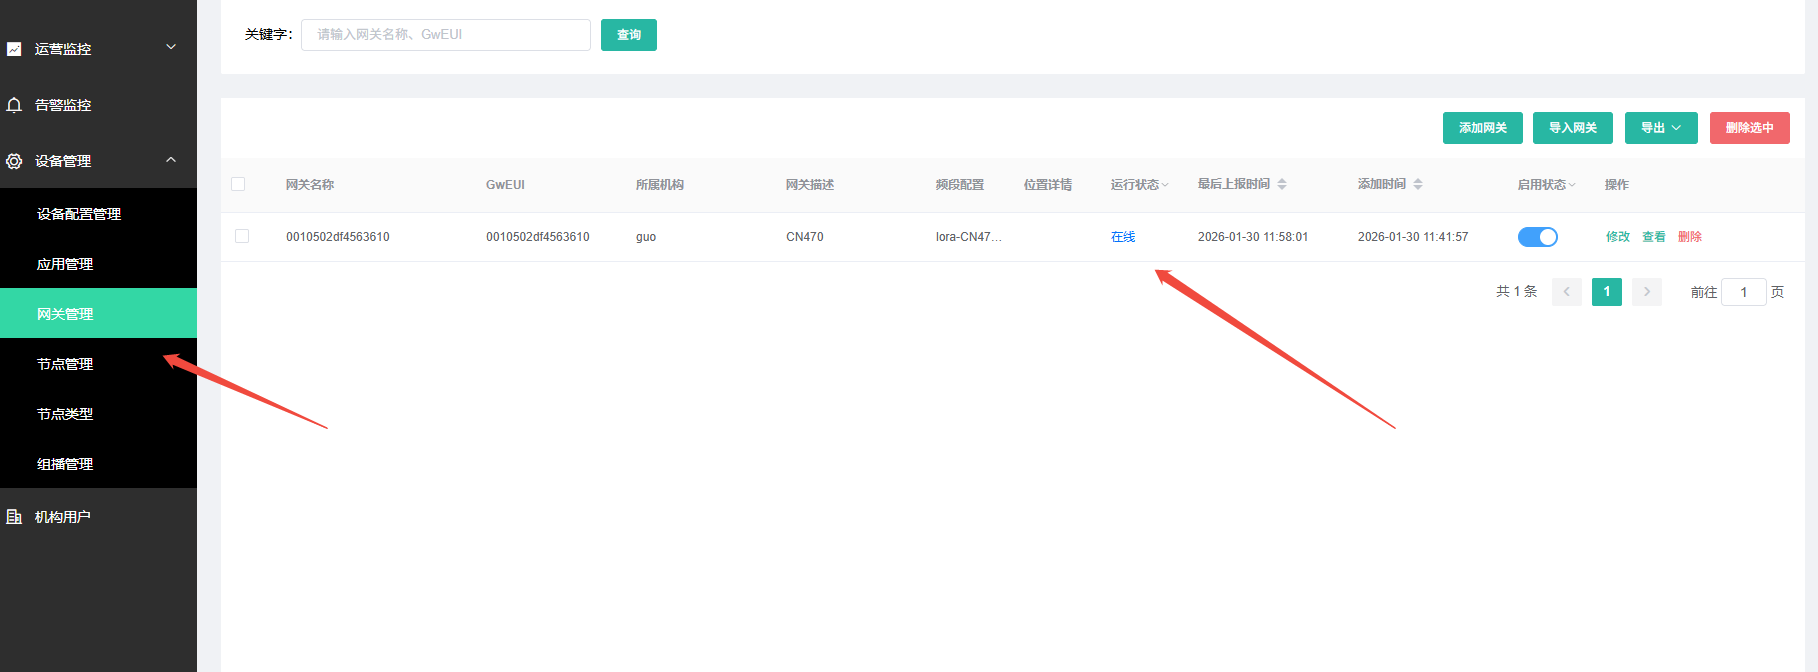
- Refresh the platform page to view the gateway online status
5.1.2.2 Connecting to Self-deployed IoT Vision via MQTT GWMP
Refer to the public cloud connection steps:
5.1.3 Using ChirpStack MQTT Forwarder
chirpstack-mqtt-forwarder is the MQTT forwarding protocol provided by the ChirpStack open-source project; it uses Protobuf encoding for higher efficiency.
Application Scenario: Connecting to ChirpStack V4.x network server.
5.1.3.1 Connecting to Self-hosted ChirpStack via ChirpStack MQTT Forwarder
Steps:
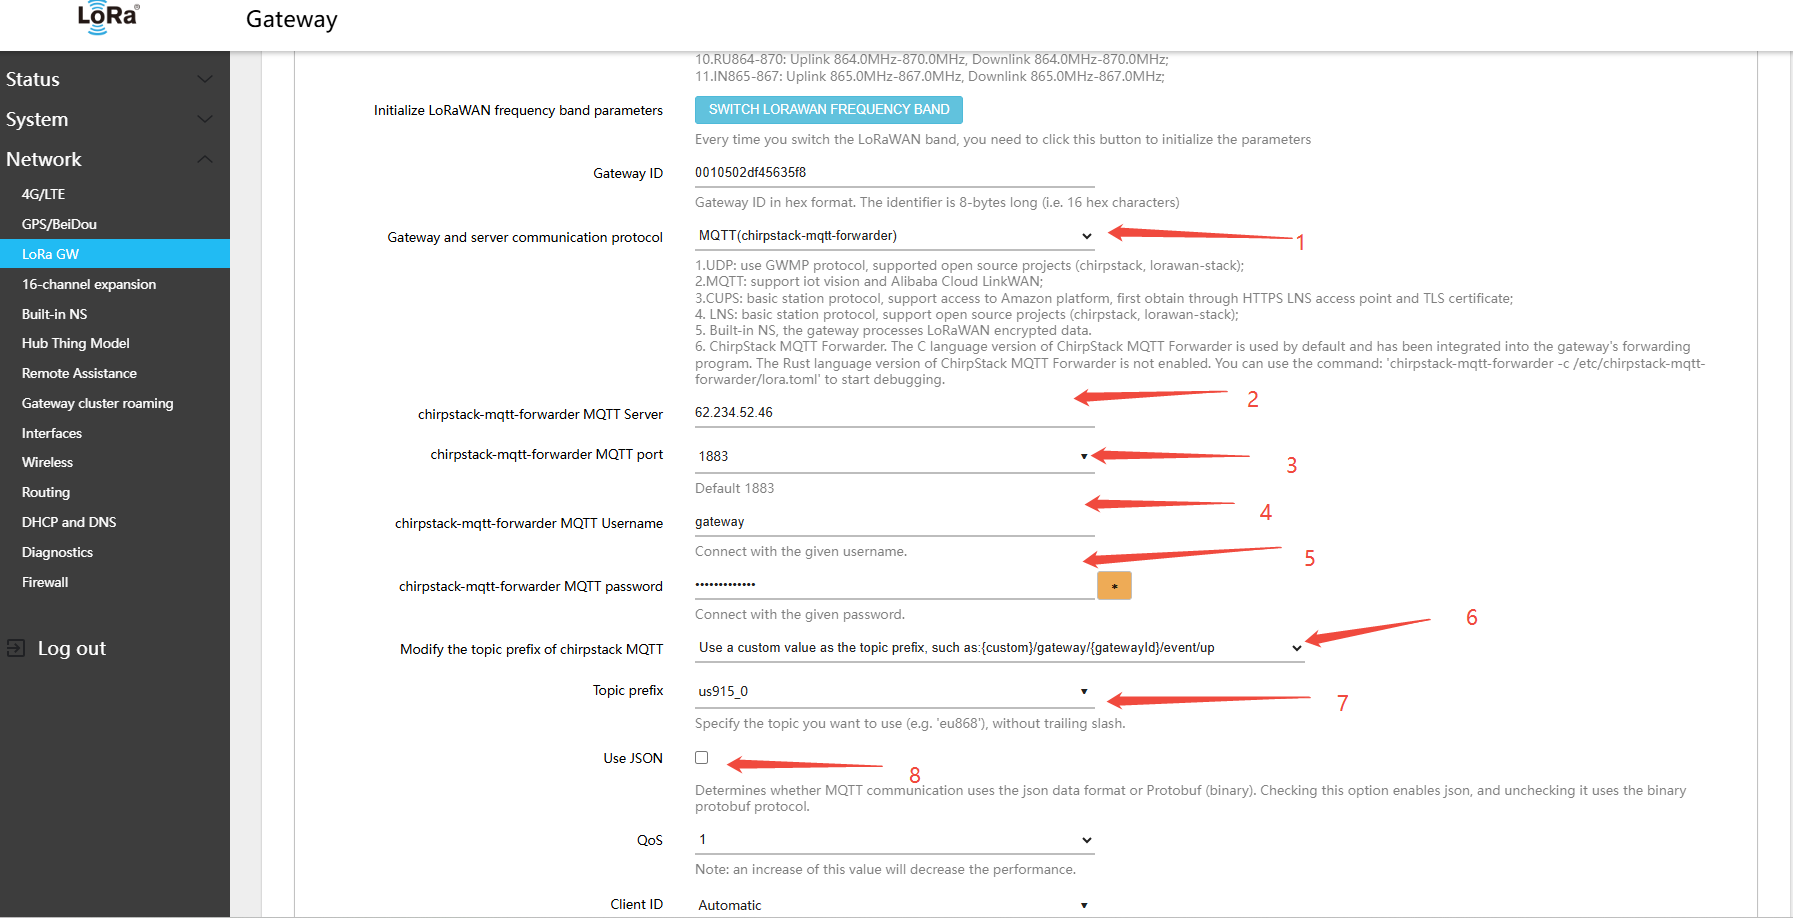
- In the gateway Web UI, navigate to Network → LoRa GW → Configuration
- configuration MQTT connectparameters:
- Gateway and server communication protocol (gateway-to-server communication protocol):MQTT(chirpstack-mqtt-forwarder)
- chirpstack-mqtt-forwarder MQTT Server: Target NS domain name or IP address (e.g.,
62.234.52.46) - chirpstack-mqtt-forwarder MQTT port (chirpstack-mqtt-forwarder MQTT Server Port):1883 8883
- chirpstack-mqtt-forwarder MQTT Username: Enter the username configured in your MQTT Broker (Mosquitto, EMQX, etc.)
- chirpstack-mqtt-forwarder MQTT password: Enter the password configured in your MQTT Broker (Mosquitto, EMQX, etc.)
- Modify the topic prefix of chirpstack MQTT: Change the topic prefix for your deployment; defaults to the band value:
cn470/eu868/ru864/in865/us915/au915/as923_1/as923_2/as923_3/as923_4/kr920 - Use JSON: Check this to use JSON encoding; leave unchecked to use Protobuf (recommended)
In the deployed ChirpStack configuration file /etc/chirpstack/chirpstack.toml, find the enabled_regions setting
[network]
  enabled_regions = [
    "as923",
    "as923_2",
    "as923_3",
    "as923_4",
    "au915_0",
    "cn470_10",
    "cn779",
    "eu433",
    "eu868",
    "in865",
    "ism2400",
    "kr920",
    "ru864",
    "us915_0",
    "us915_1",
  ]
Example using US915; both device and gateway use A1B1 (channels 0–7 + 64), frequencies: 902.3–903.7,
Then I need to change the chirpstack MQTT topic prefix to: us915_0
- Modify the topic prefix of chirpstack MQTT: Use a custom
- Topic prefix(MQTT topic):us915_0
- Click Save & Apply in the lower-right corner of the page
- On the gateway side: Network → LoRa GW → Status — view the gateway\'s online connection status on the platform
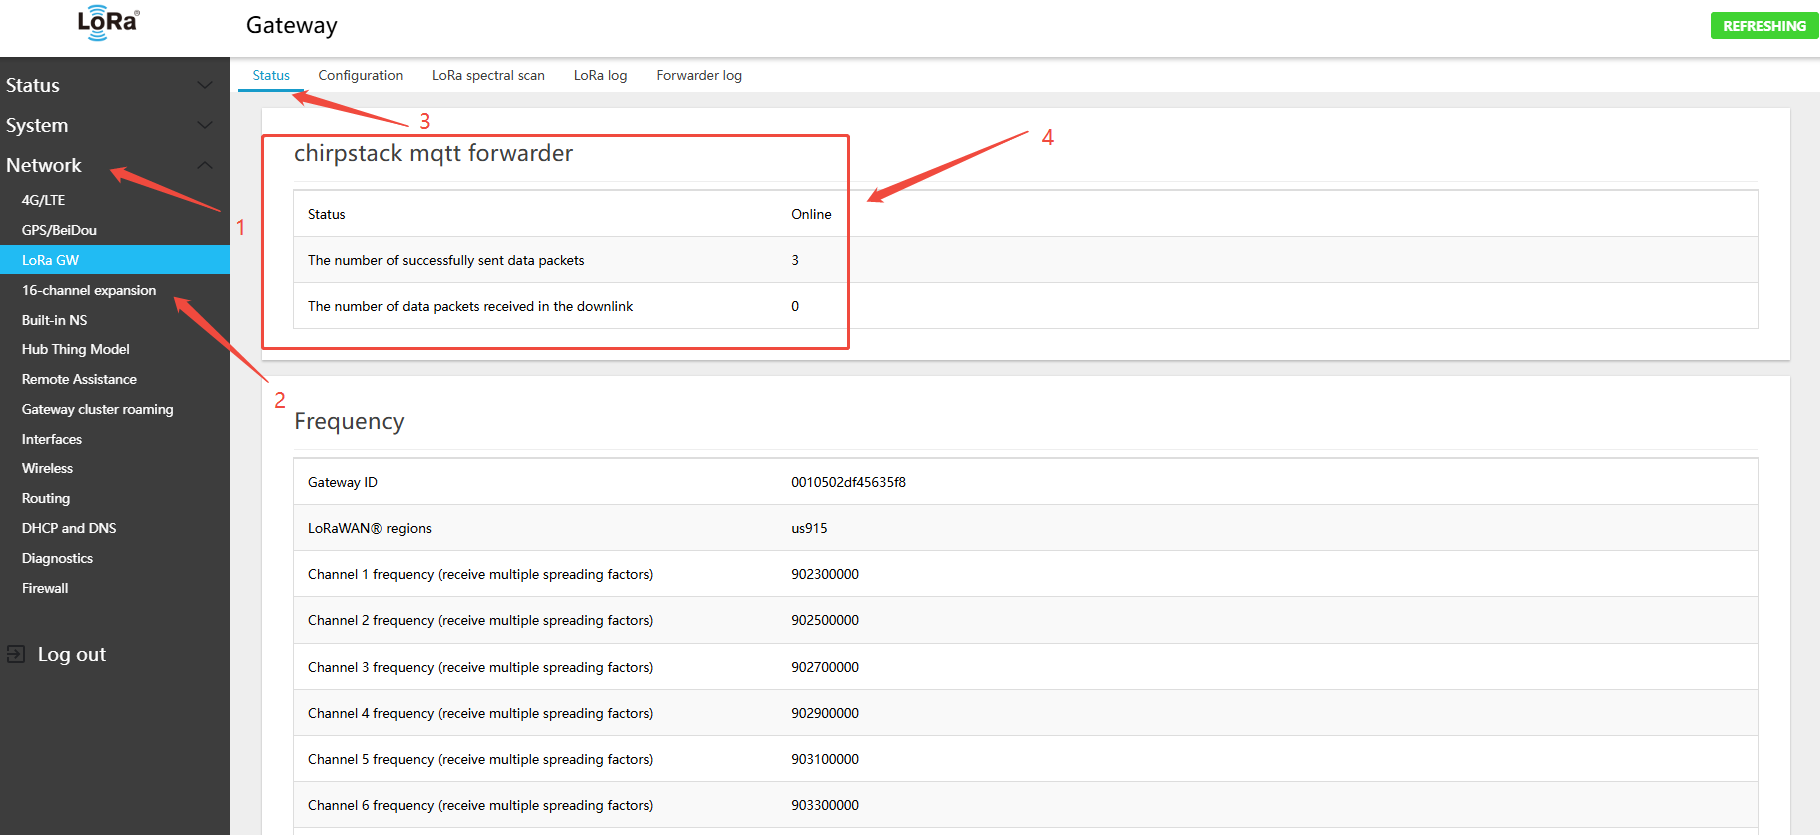
- On the ChirpStack platform page, view the gateway online status
5.1.4 Using Basic Station CUPS
CUPS (Configuration and Update Server) protocol is used to automatically retrieve the LNS configuration and certificate, commonly used with AWS IoT Core.
Application Scenario: AWS IoT Core for LoRaWAN.
5.1.4.1 Connecting to AWS IoT Core Using Basic Station CUPS
Note:
- You must register an account on the AWS platform in advance
- Using the us-west-2 region as an example: https://us-west-2.console.aws.amazon.com/iot/home?region=us-west-2#/wireless/gateways
- After account registration, because the gateway connects to AWS IoT Core using CUPS certificates, refer to the AWS IoT documentation to add the required IAM role permissions.
- IoTWirelessGatewayCertManagerRole can be viewed at https://us-east-1.console.aws.amazon.com/iam/home?region=us-east-1&redirectFrom=iamv2#/roles
- AWSIoTWirelessGatewayCertManager
- Connecting the gateway to AWS incurs data charges; a credit card must be linked to your AWS account.
Steps:
- In the gateway Web UI, navigate to Network → LoRa GW → Configuration and copy the Gateway ID. Example:
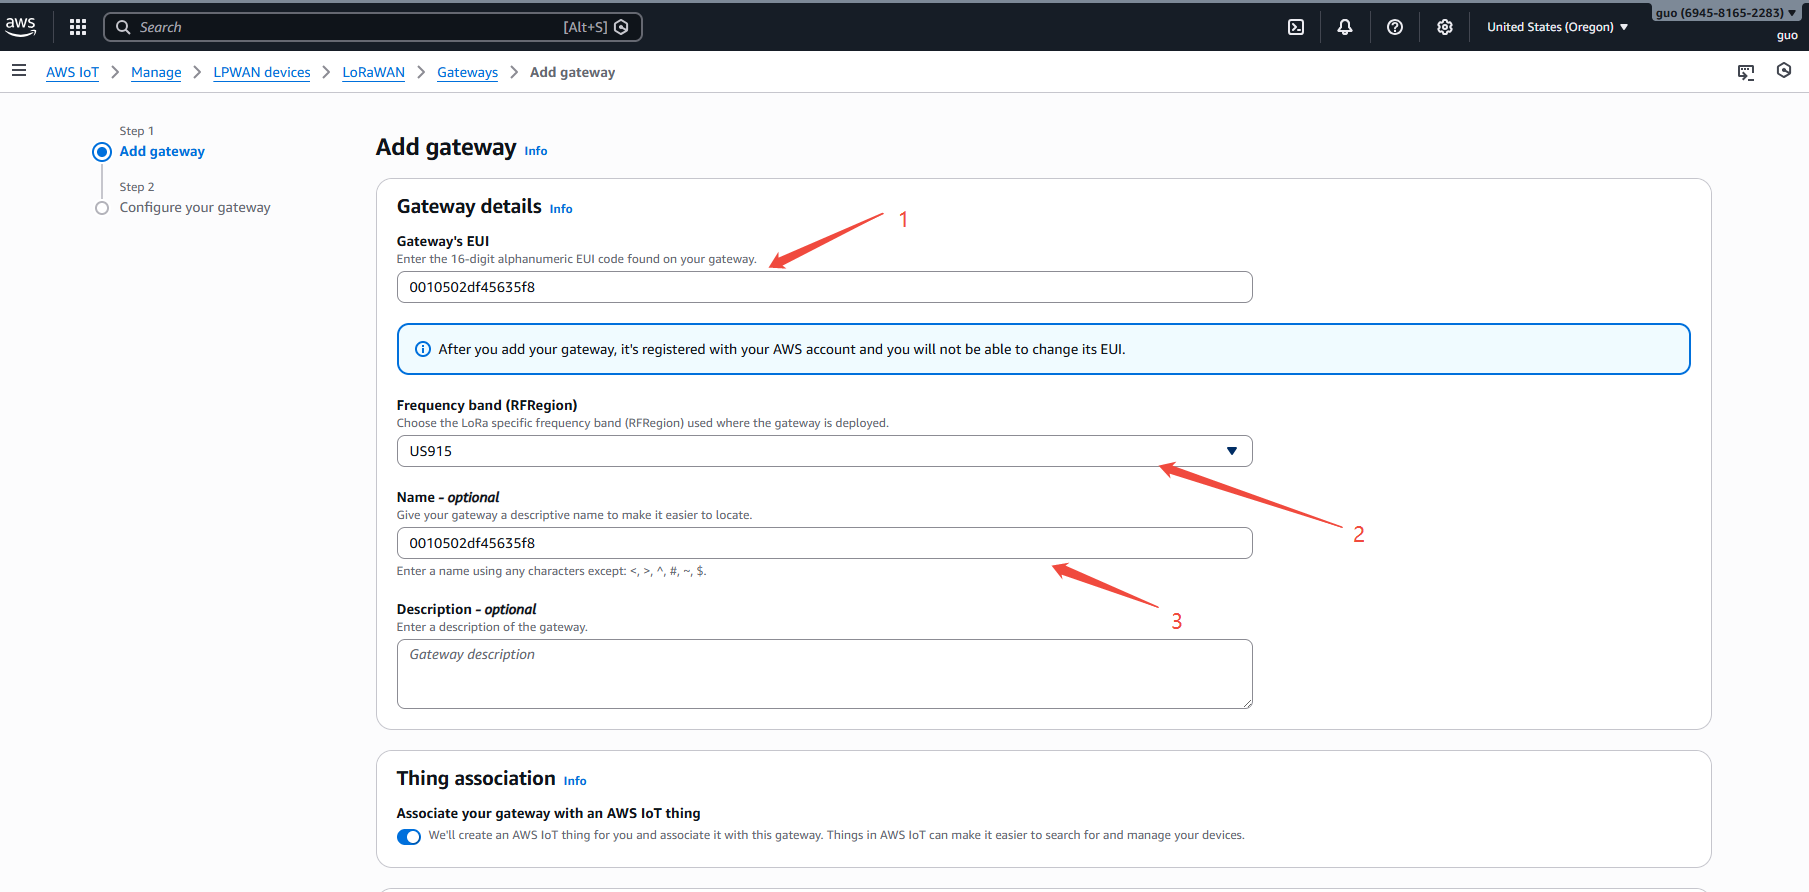
0010502df45635f8 - Add the gateway on the AWS IoT console: https://us-west-2.console.aws.amazon.com/iot/home?region=us-west-2#/wireless/gateways
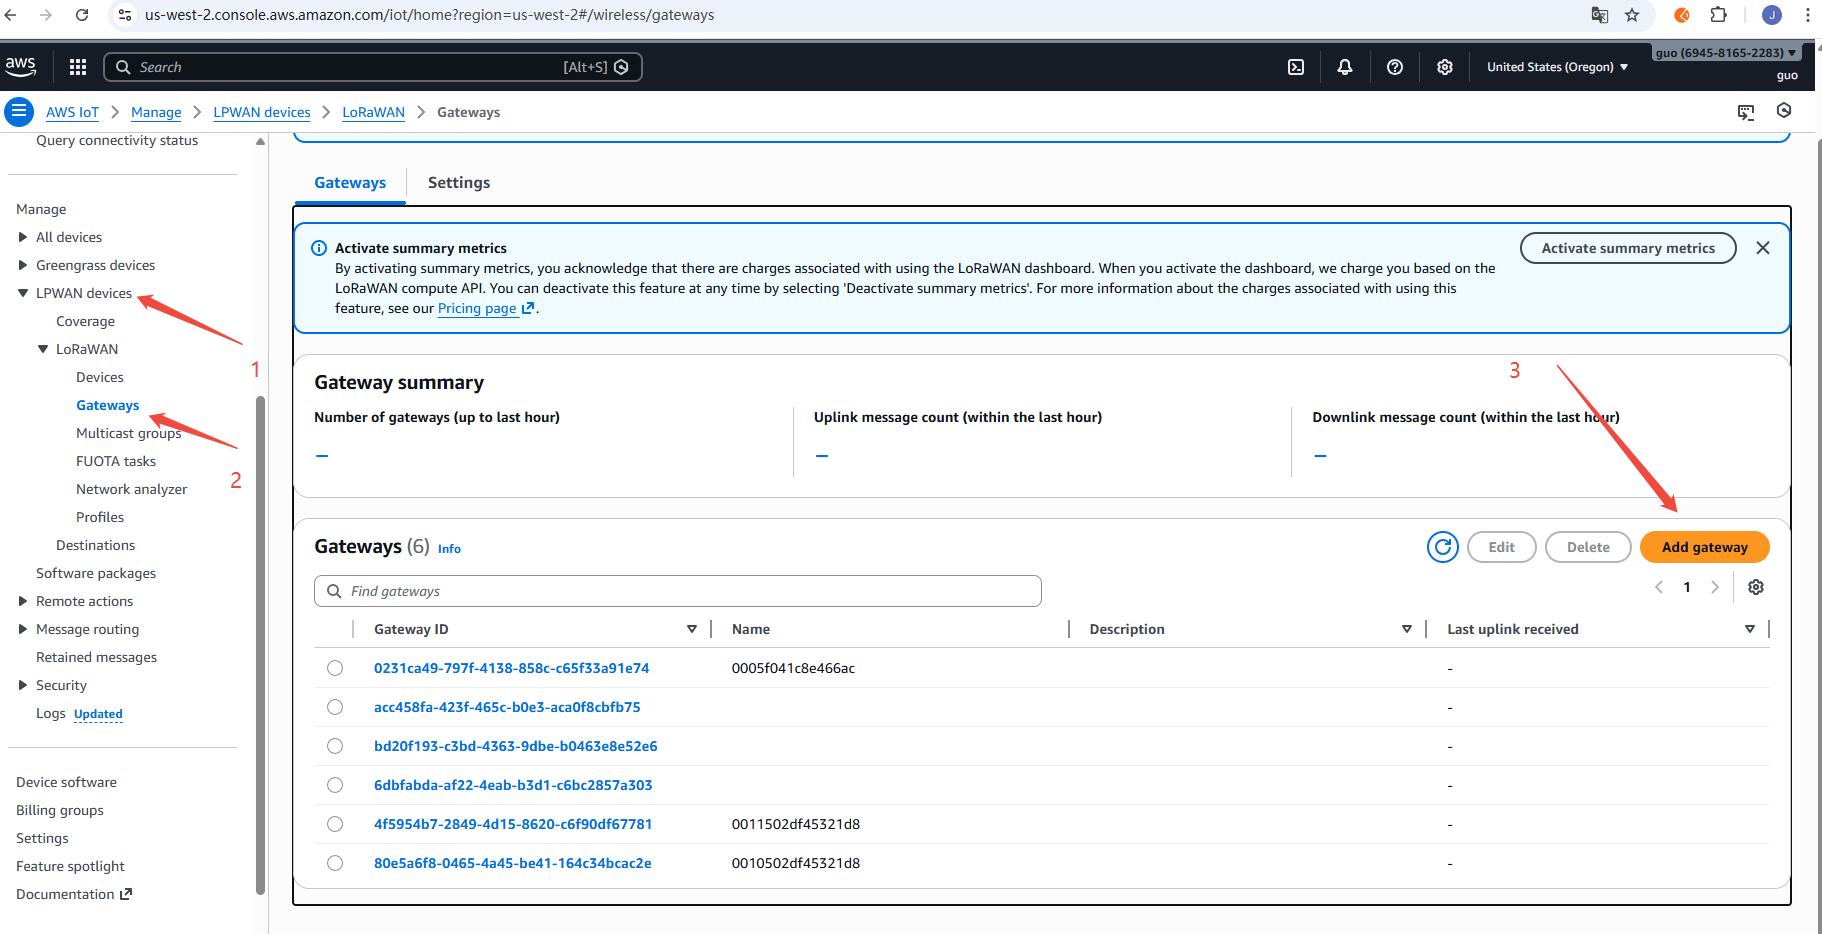
- pastegatewayID
- Select band, example: US915
- Click the
Add gatewaybutton in the lower-right corner
- Create the gateway CUPS access certificate, copy the CUPS endpoint URL to the gateway page, then click to download the certificate
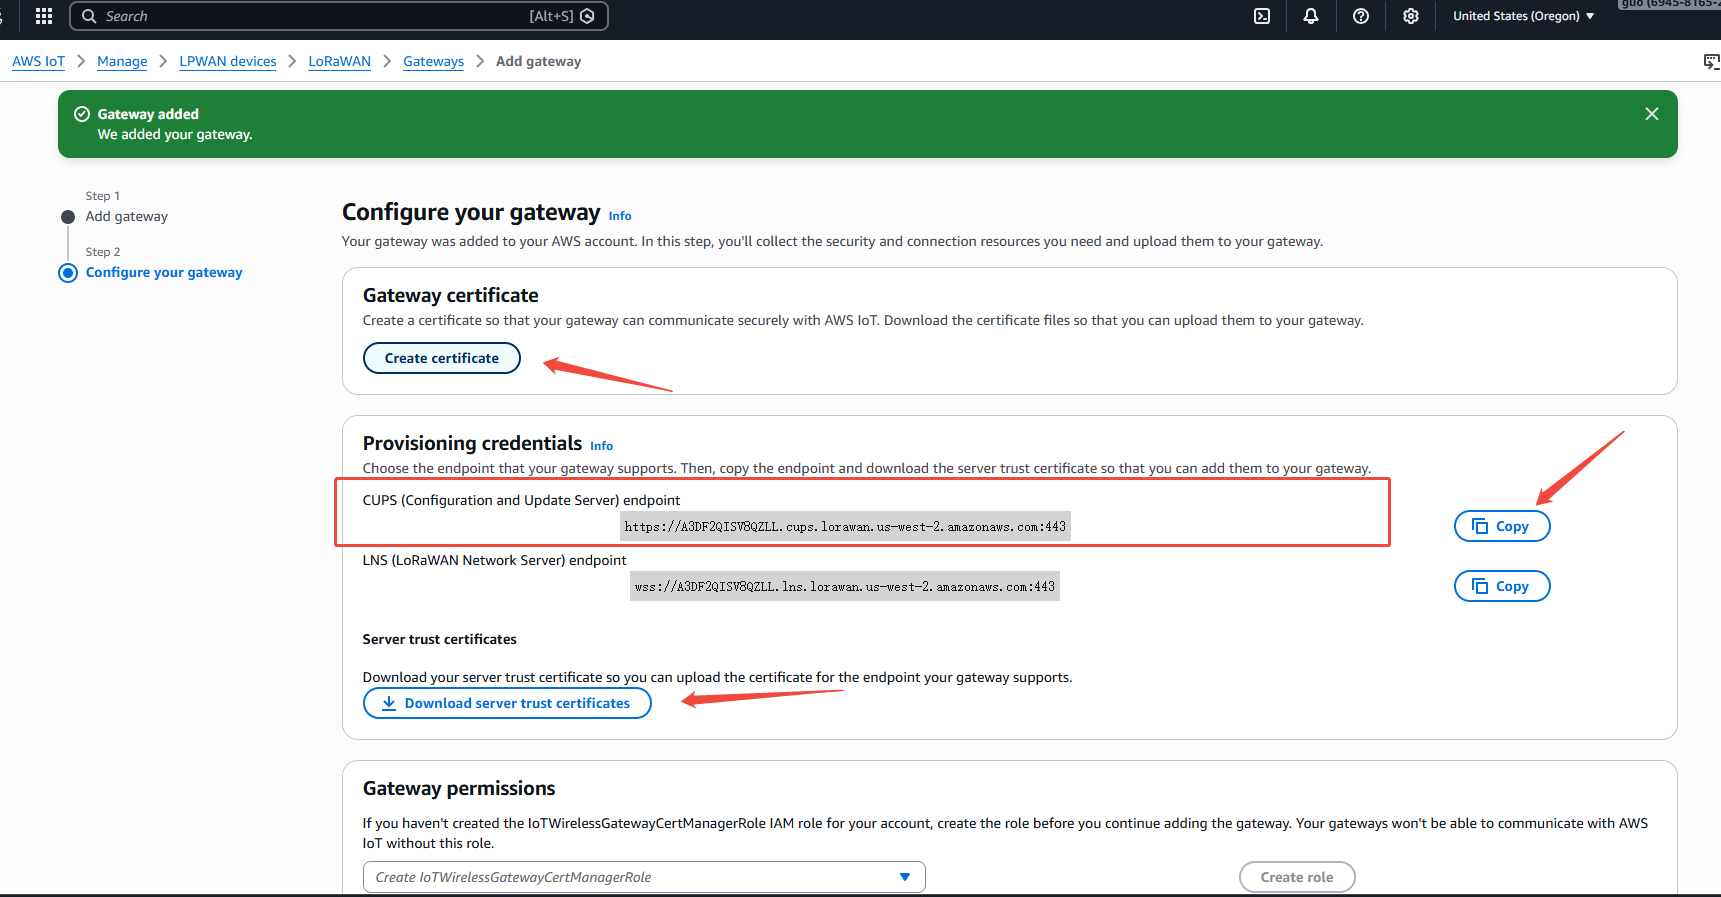
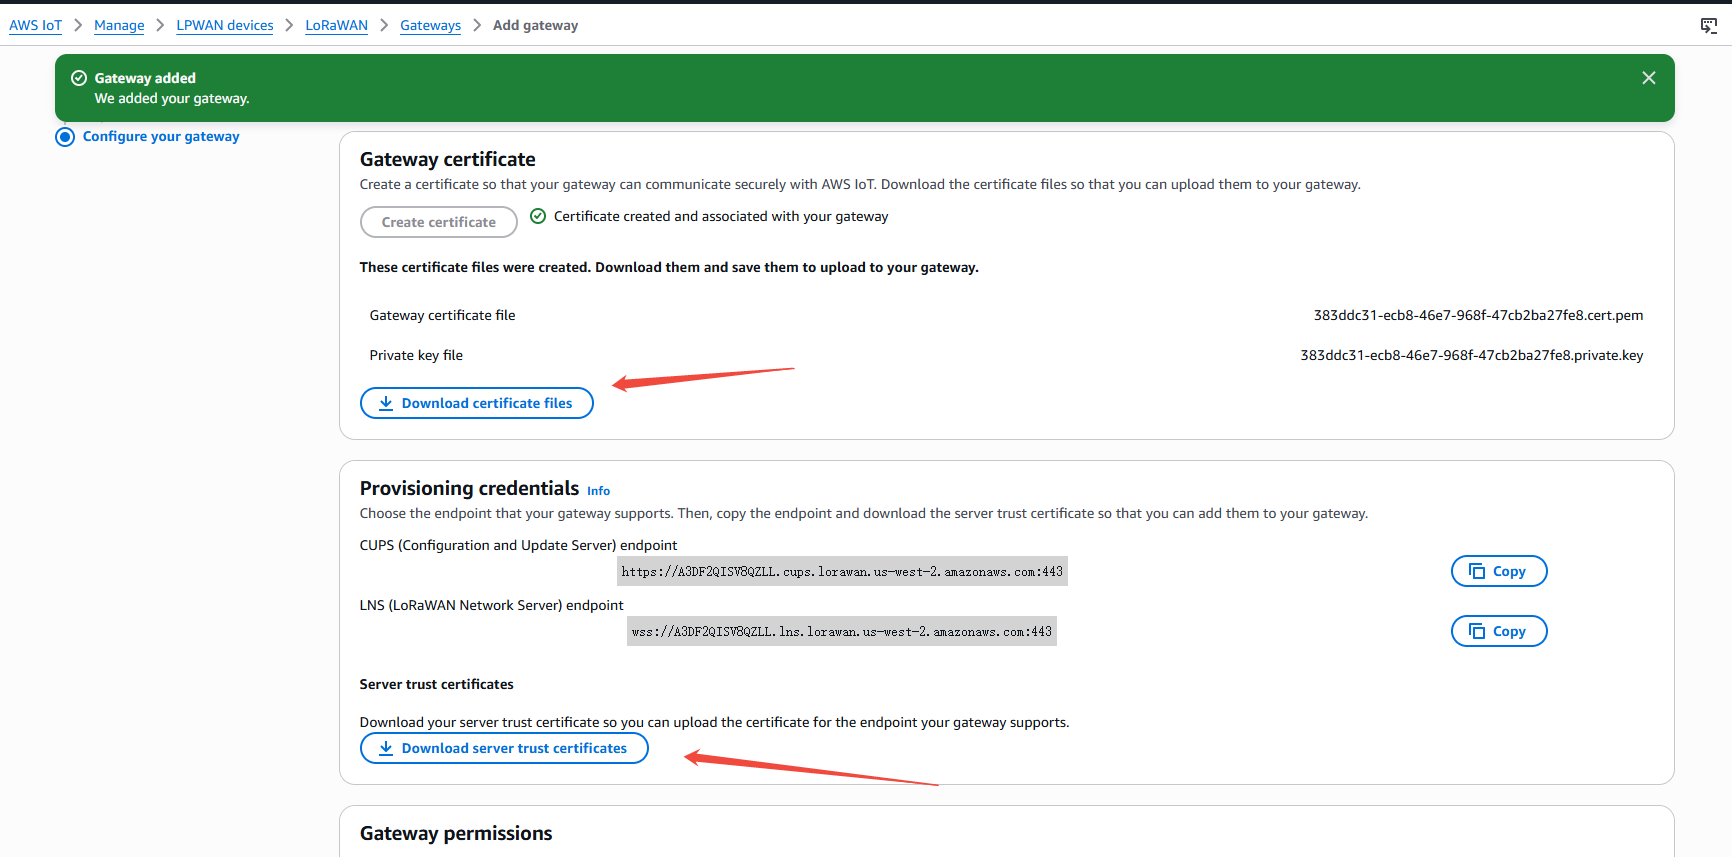
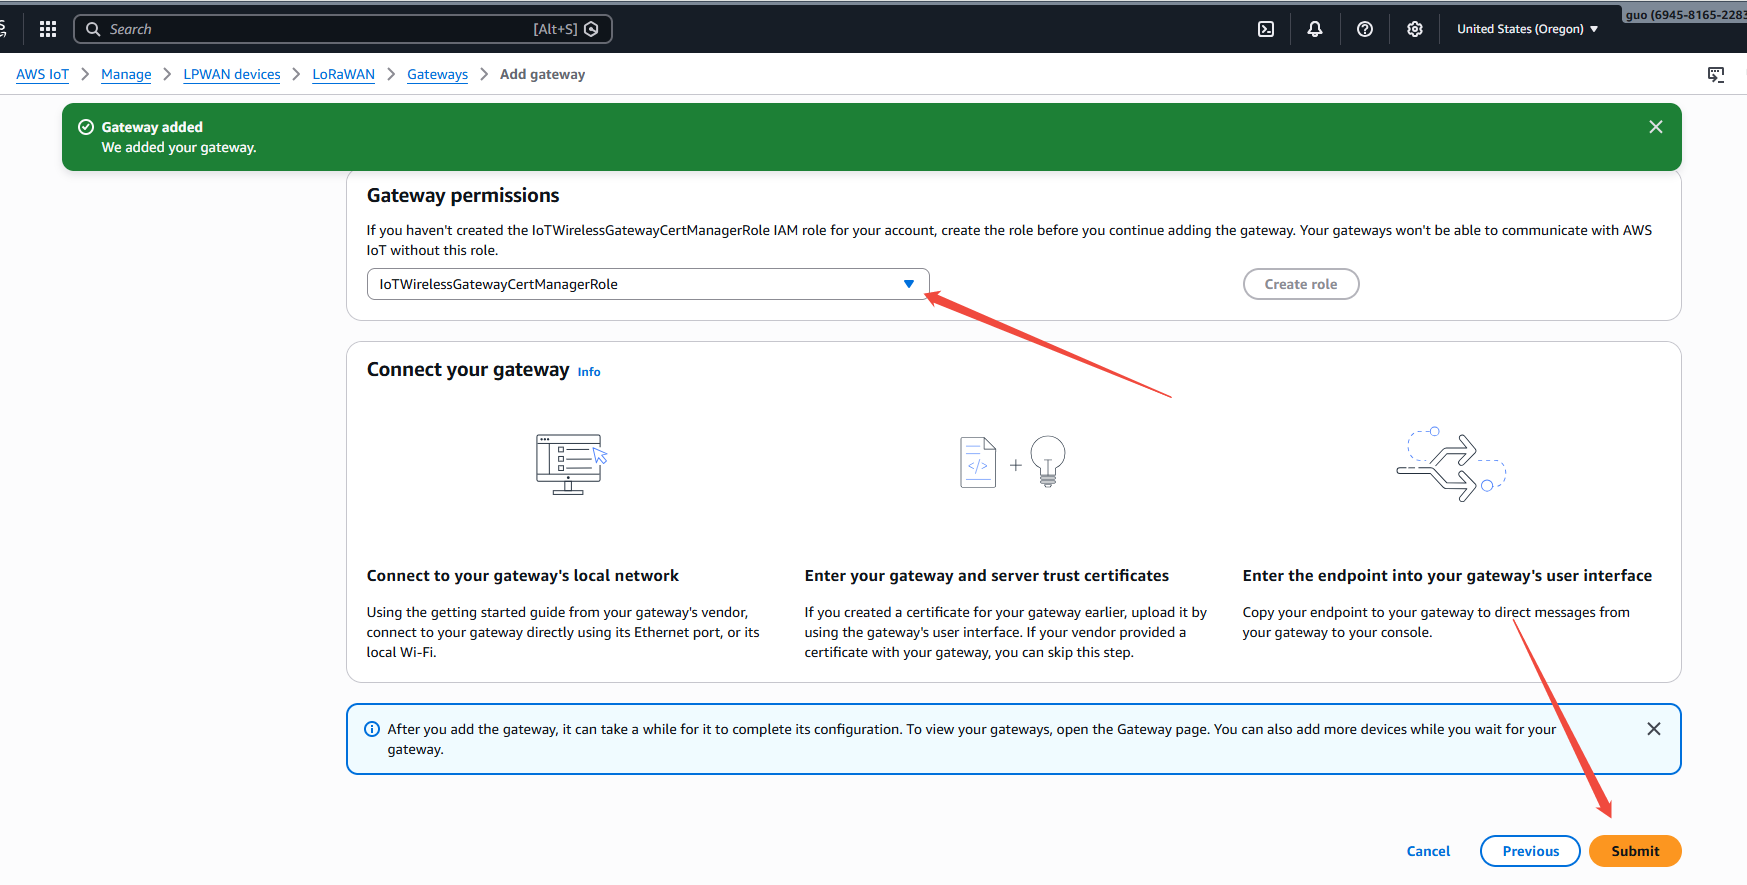
- In
Gateway permissions, selectAWSIoTWirelessGatewayCertManager, then submit
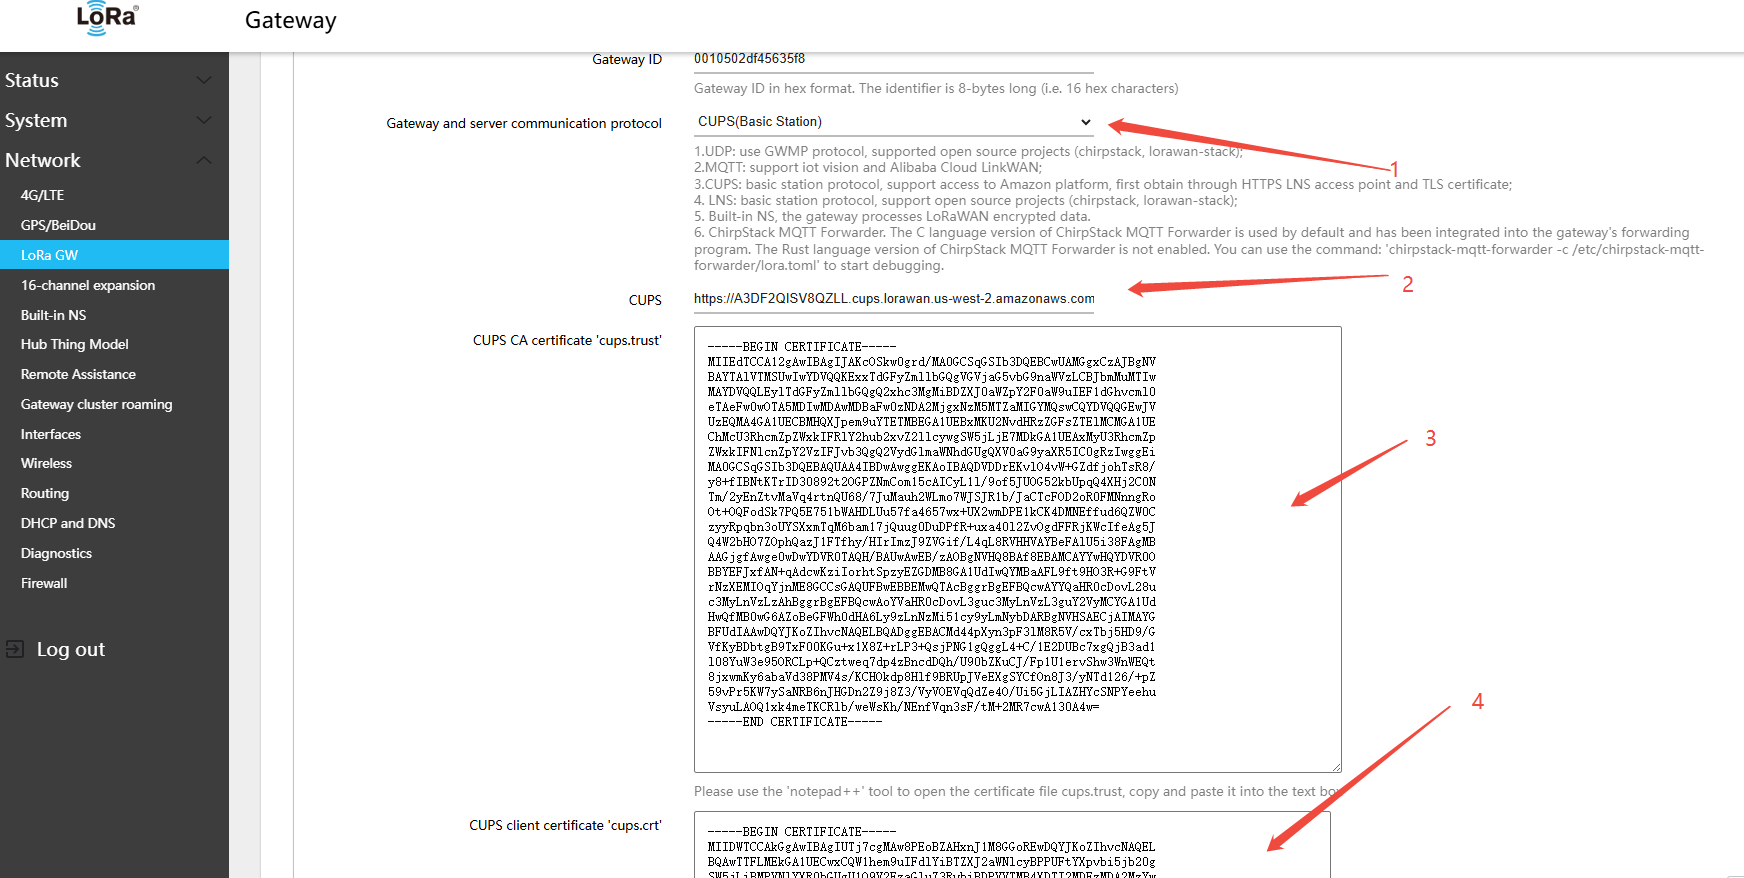
- Return to the gateway Web UI: Network → LoRa GW → Configuration, and configure the following settings:
- Gateway and server communication protocol (gateway-to-server communication protocol):CUPS(Basic Station)
- CUPS: HTTPS address (e.g.,
https://<account-id>.cups.lorawan.amazonaws.com:443) - CUPS CA certificate 'cups.trust': Open the cups.trust file, copy the certificate content and paste it into the text field
- CUPS client certificate "cups.crt": Open the xxx.cert.pem file, copy the certificate content and paste it into the text field
- CUPS client private key "cups.key": Open the xxx.private.key file, copy the key content and paste it into the text field
- Click Save & Apply in the lower-right corner of the page
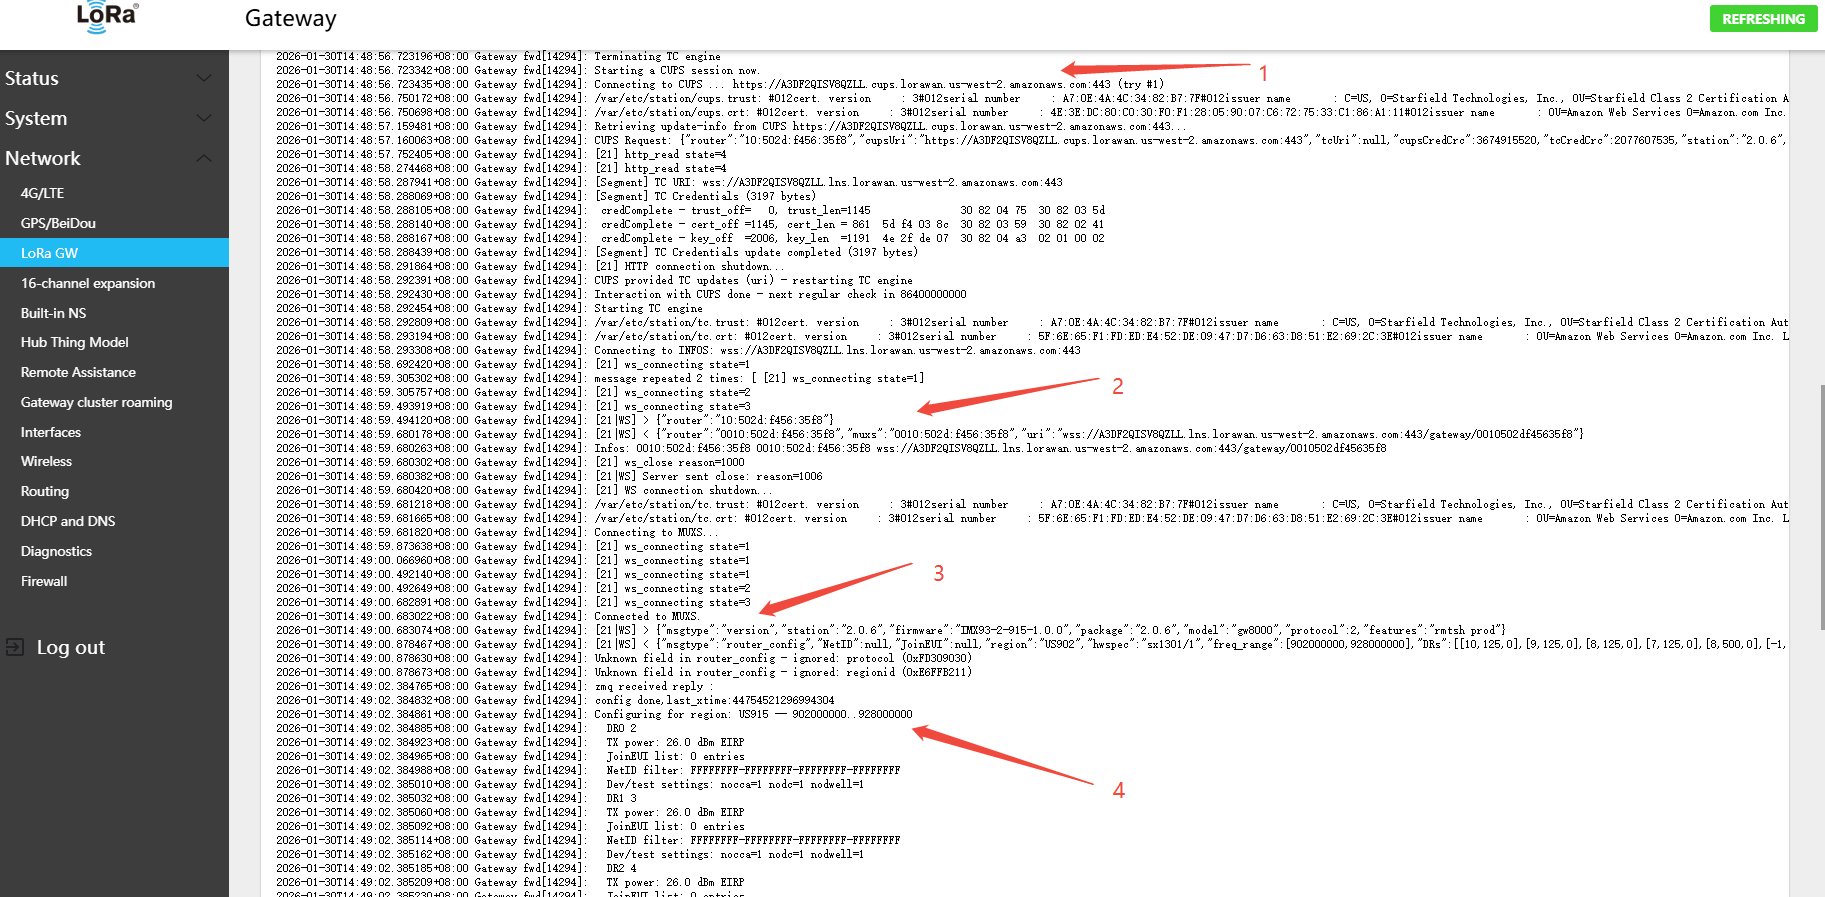
- The gateway will automatically fetch the LNS configuration from the CUPS server; view the corresponding communication log to verify
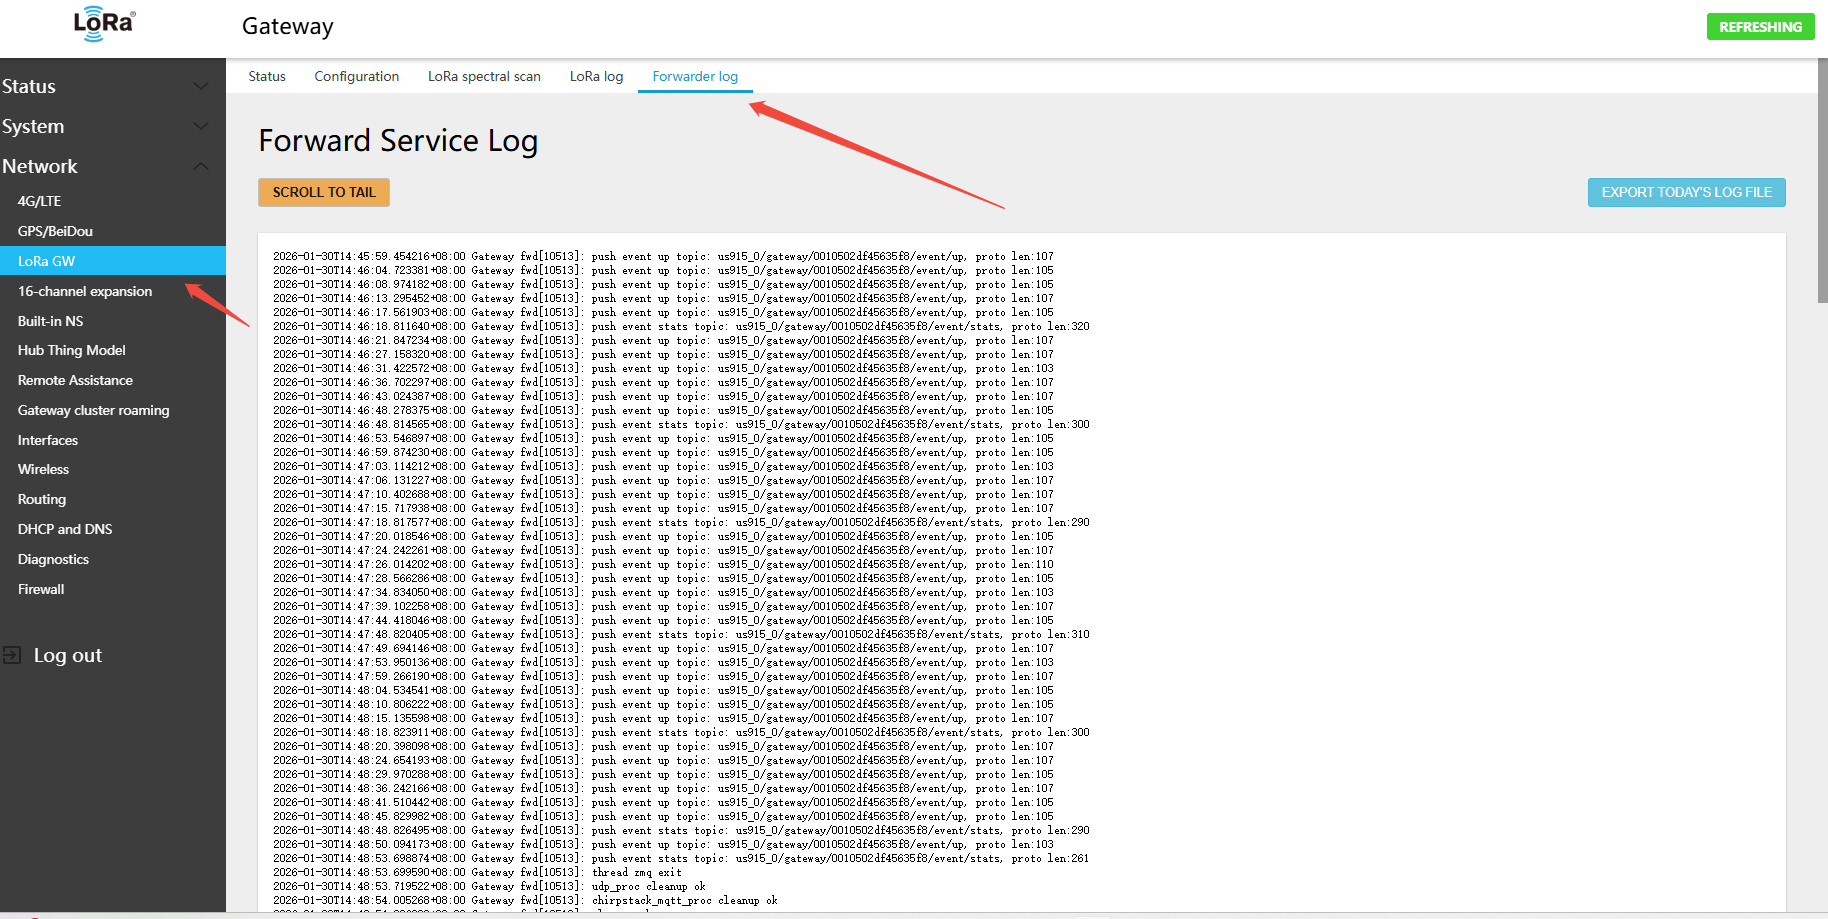
- On the gateway side: Network → LoRa GW → Status — view the gateway\'s online connection status on the platform
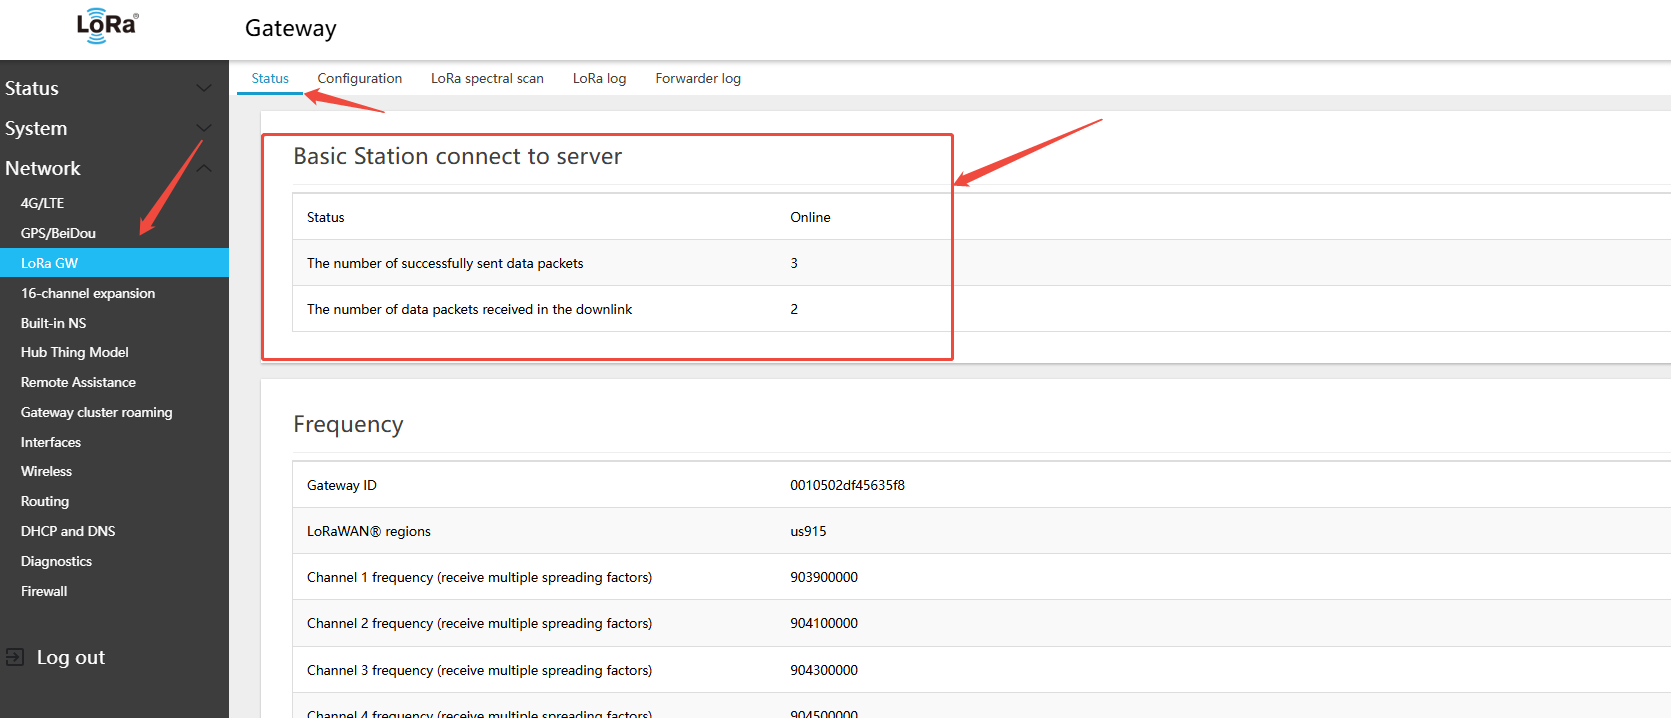
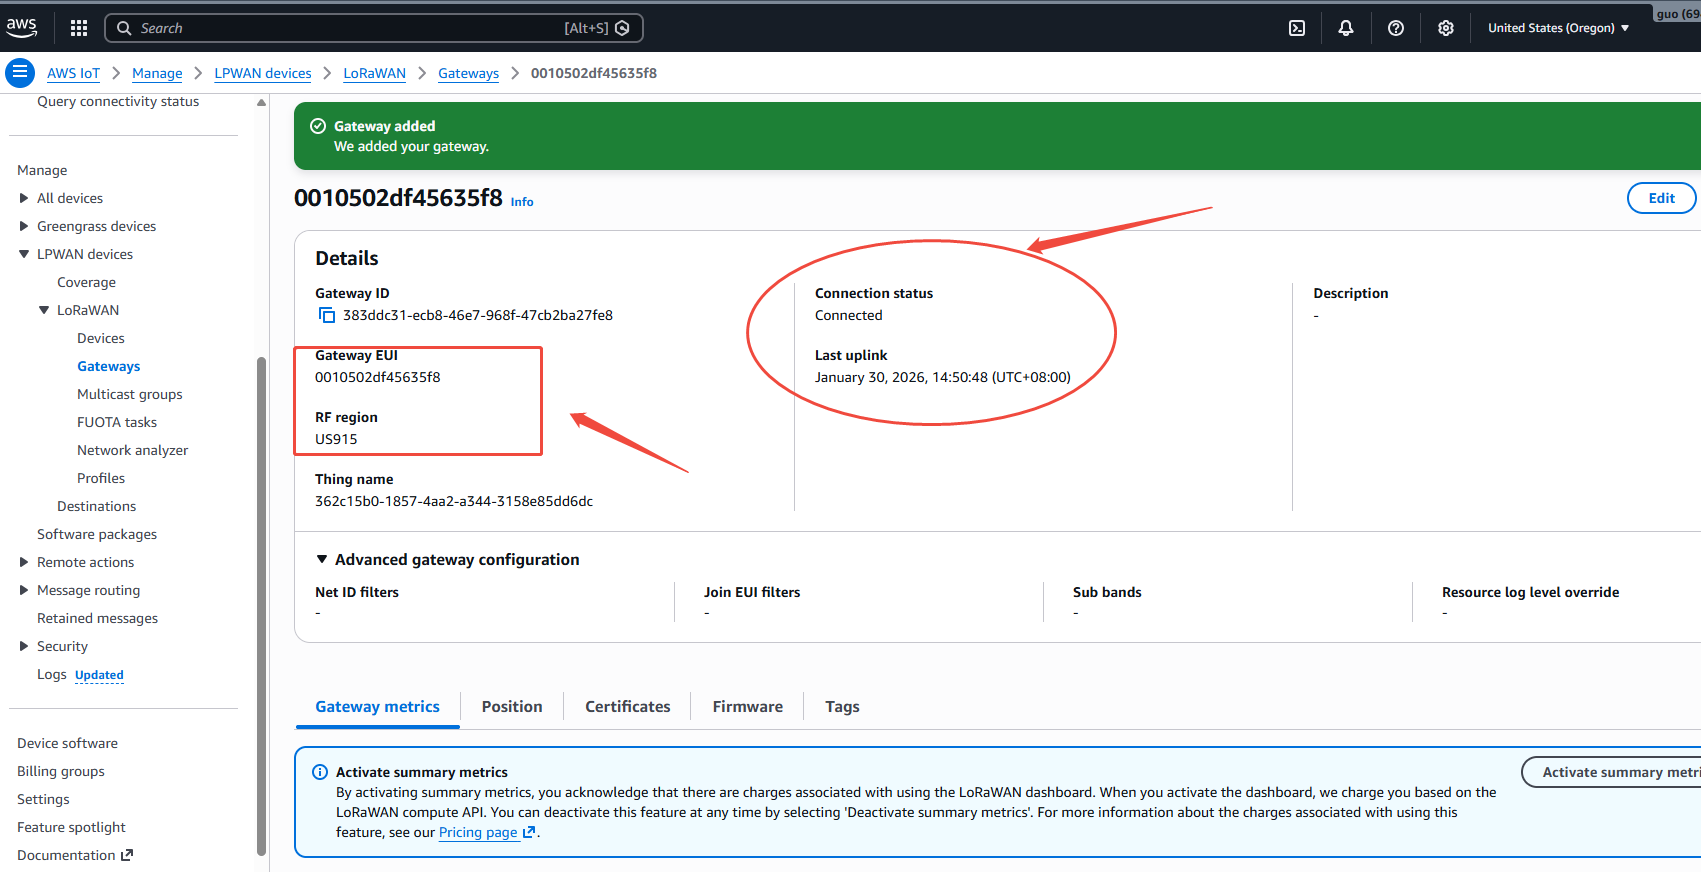
- On the AWS IoT platform page, verify the gateway online status
5.1.5 Using Basic Station LNS
The LNS (LoRaWAN Network Server) protocol is WebSocket-based and supports connecting to TTN, ChirpStack, Microsoft Azure IoT, and other platforms.
Application Scenario: ChirpStack, TTN, Microsoft Azure IoT Central.
5.1.5.1 Connecting to TTN via Basic Station LNS
Note:
- A pre-registered TTN platform account is required
- Using the au1 region as an example: https://au1.cloud.thethings.network/console/gateways
- In the gateway Web UI, navigate to Network → LoRa GW → Configuration and copy the Gateway ID. Example:
0010502df45635f8
- Add the gateway on the TTN platform
- gateway EUipaste
0010502df45635f8,clickConfirm
- Next
- gateway IDpaste
0010502df45635f8 - gateway namepaste
0010502df45635f8 - Frequency planselect
United States 902-928MHz,FSB1 - Check Require authenticated connection
- Check Generate API key for LNS
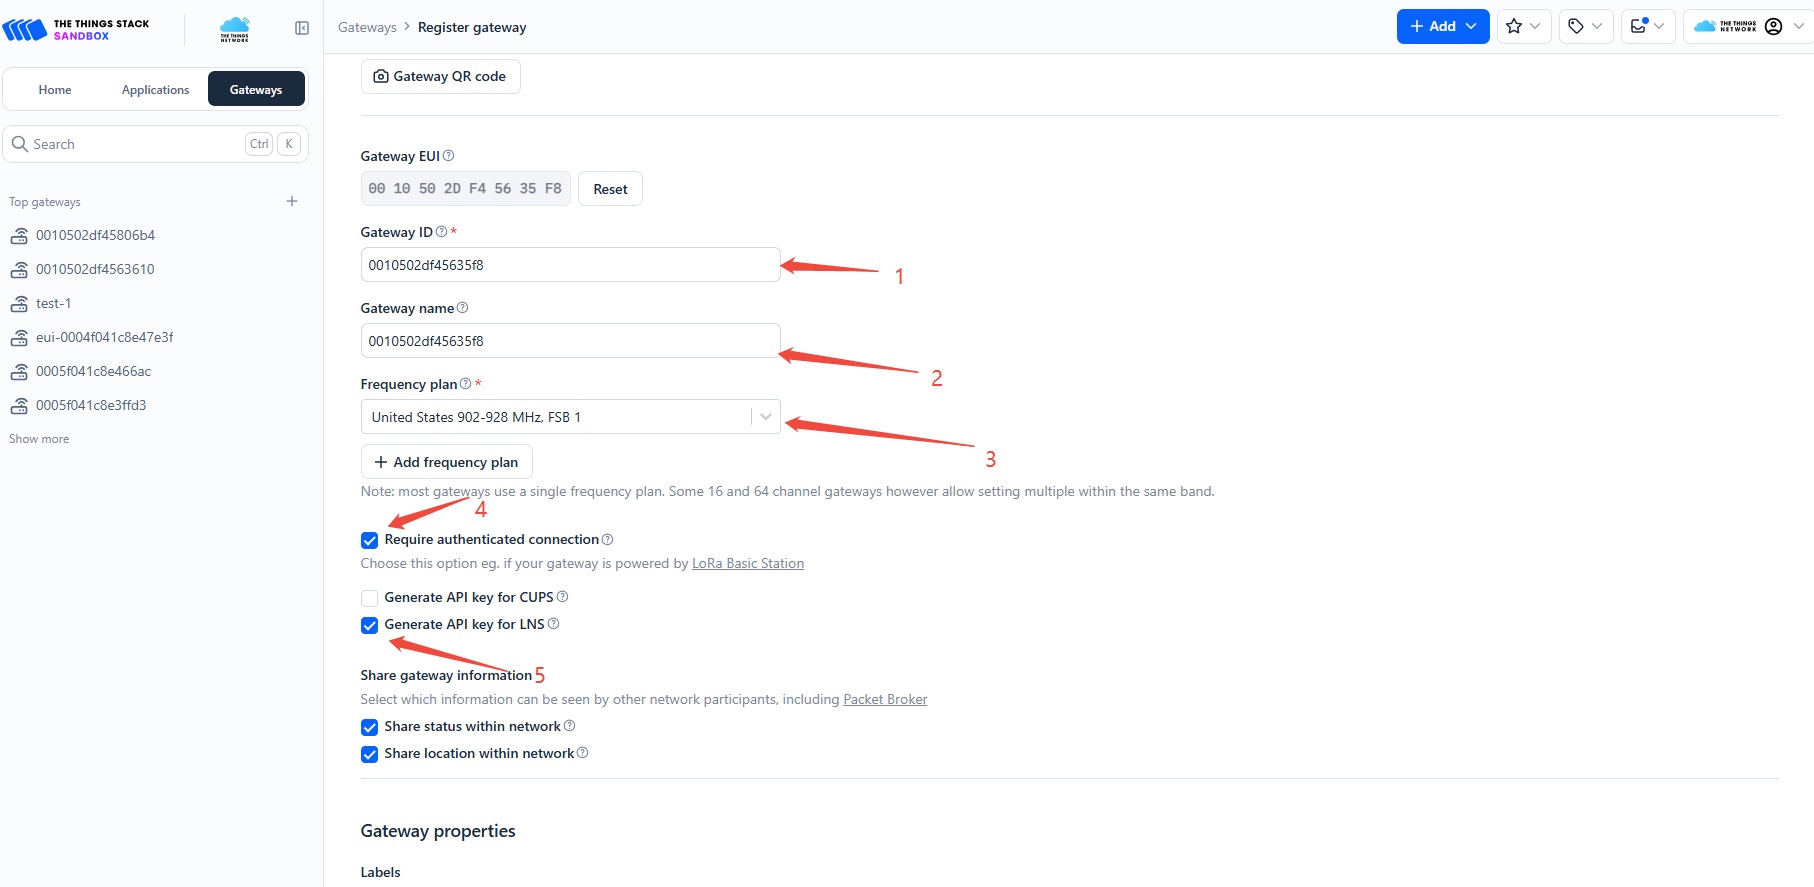
- Click
Register gatewayat the bottom of the page
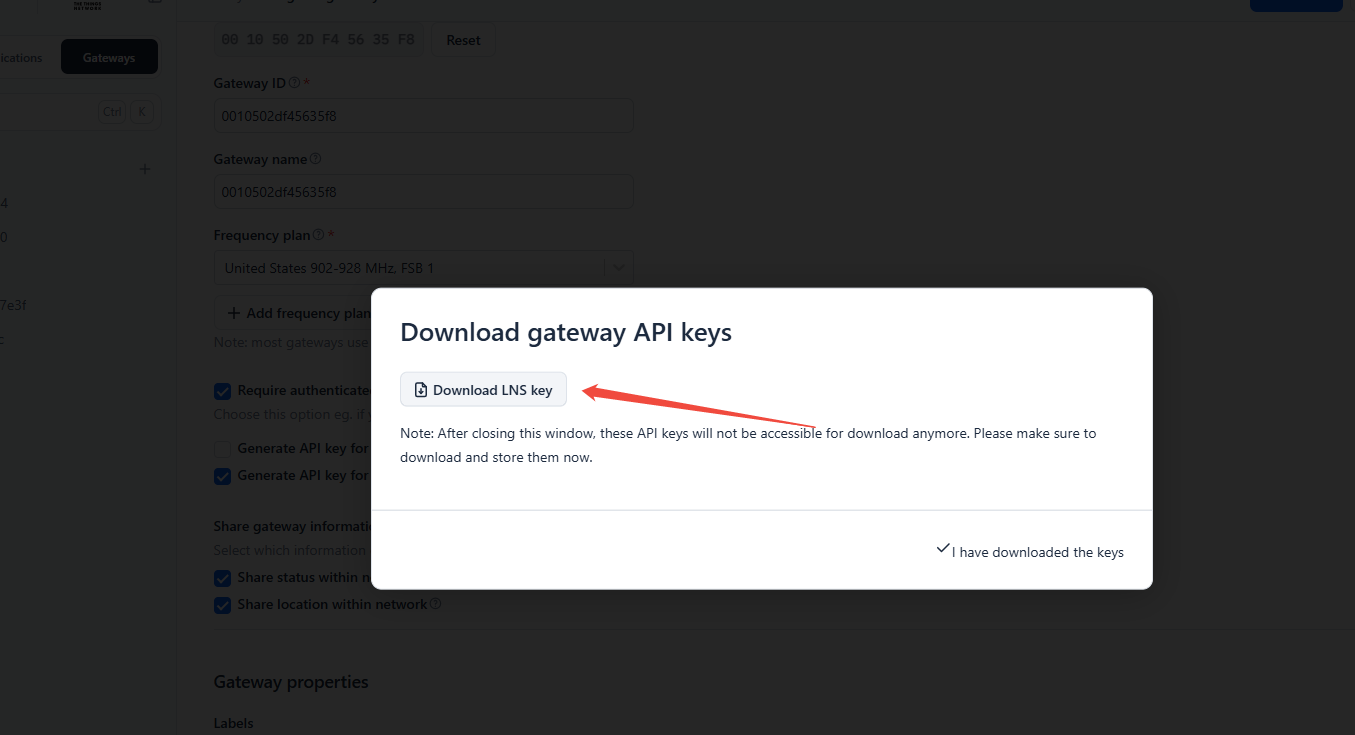
- In the dialog box, click to download the certificate
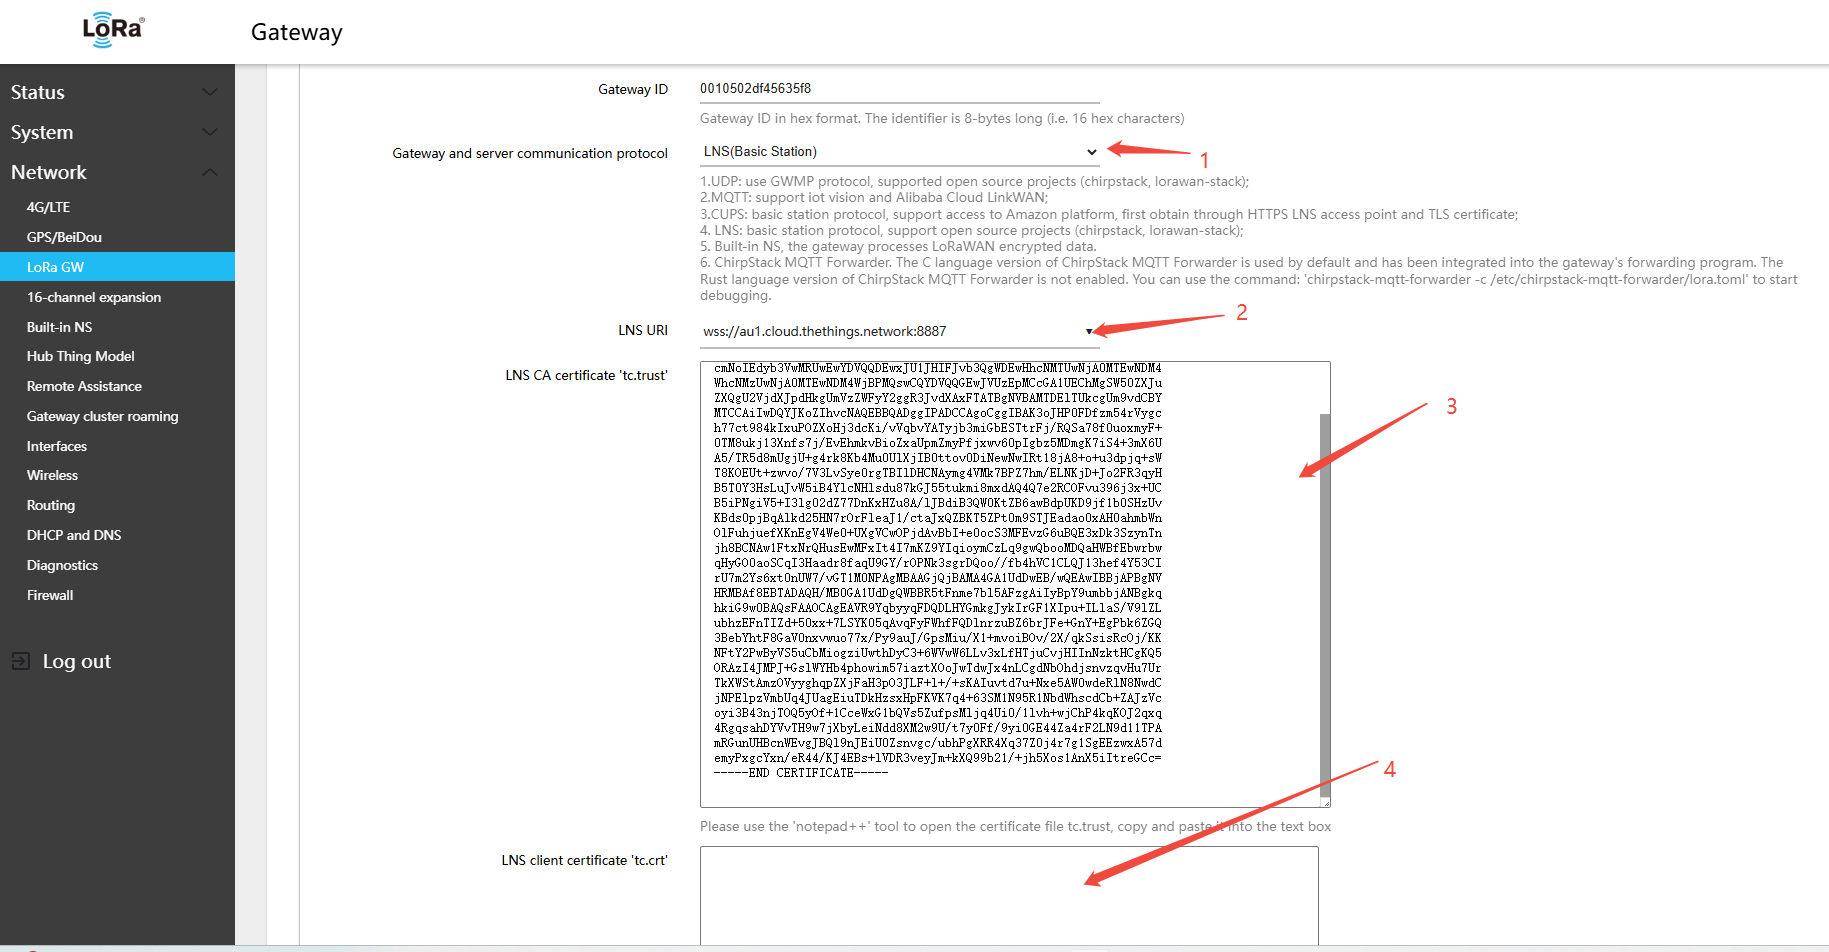
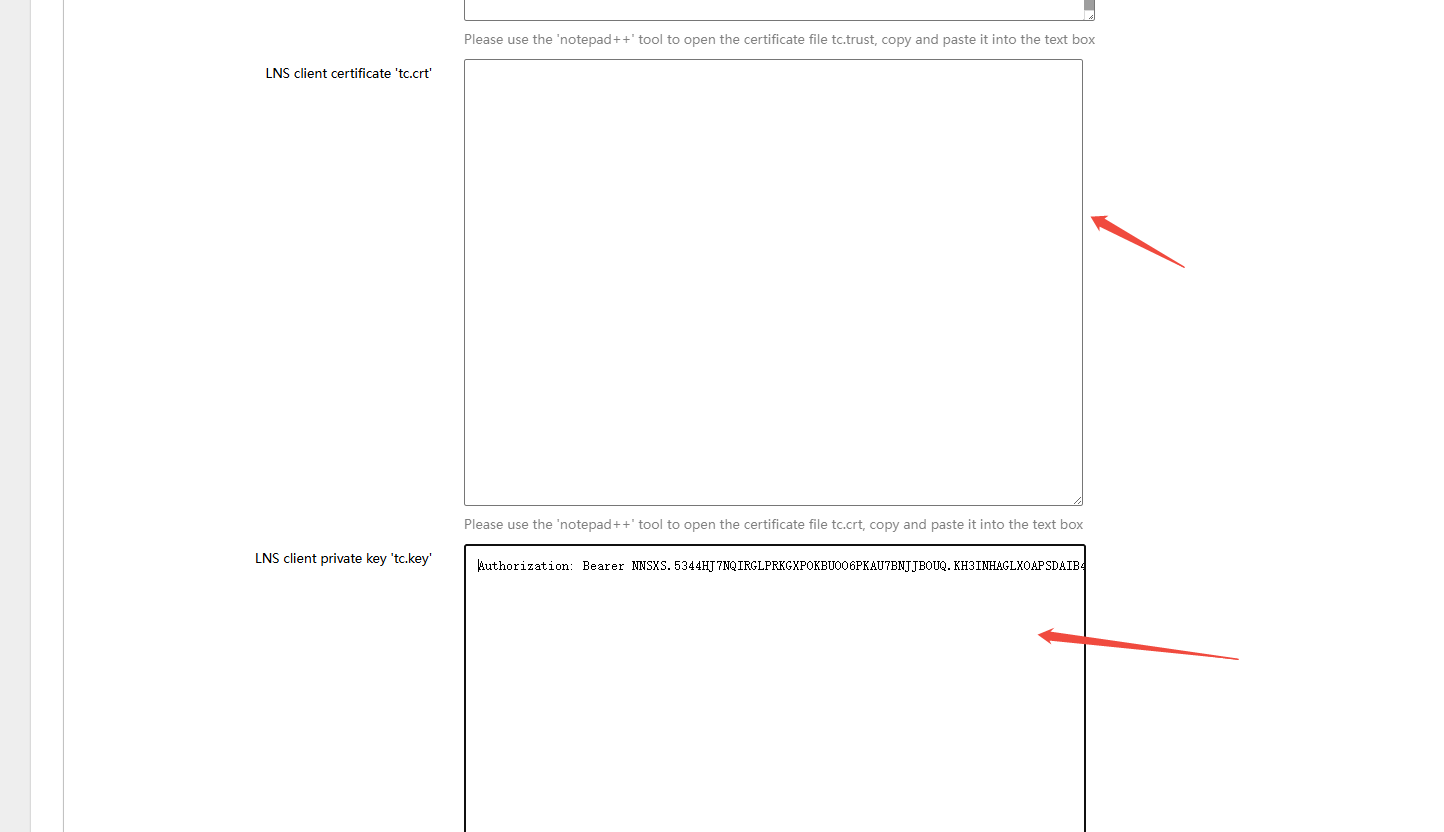
- Return to the gateway Web UI: Network → LoRa GW → Configuration, and configure the following settings:
- Gateway and server communication protocol (gateway-to-server communication protocol):LNS(Basic Station)
- LNS: WebSocket address (e.g.,
wss://au1.cloud.thethings.network:8887) - LNS CA certificate 'tc.trust': Download from https://www.thethingsindustries.com/docs/concepts/advanced/root-certificates/
- LNS client certificate 'tc.crt': Leave blank — TTN does not require this field
- LNS client private key "tc.key": Open the downloaded tc.key file, copy the certificate content and paste it into the text field
- Click Save & Apply in the lower-right corner of the page
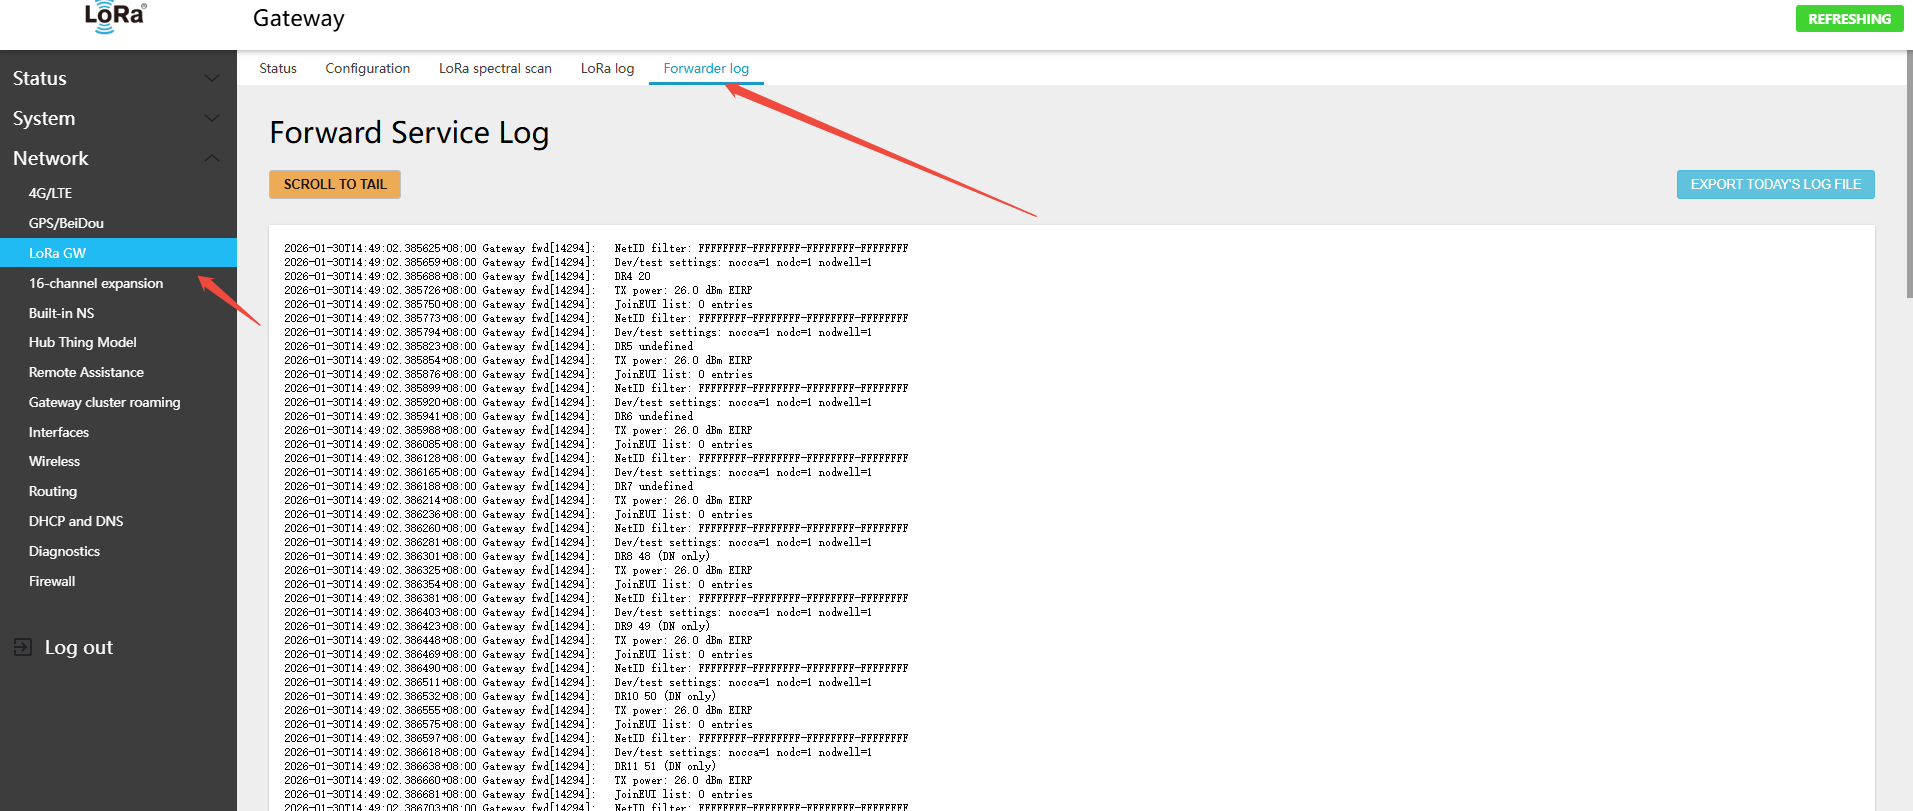
- Gateway-to-server WSS communication log, as follows
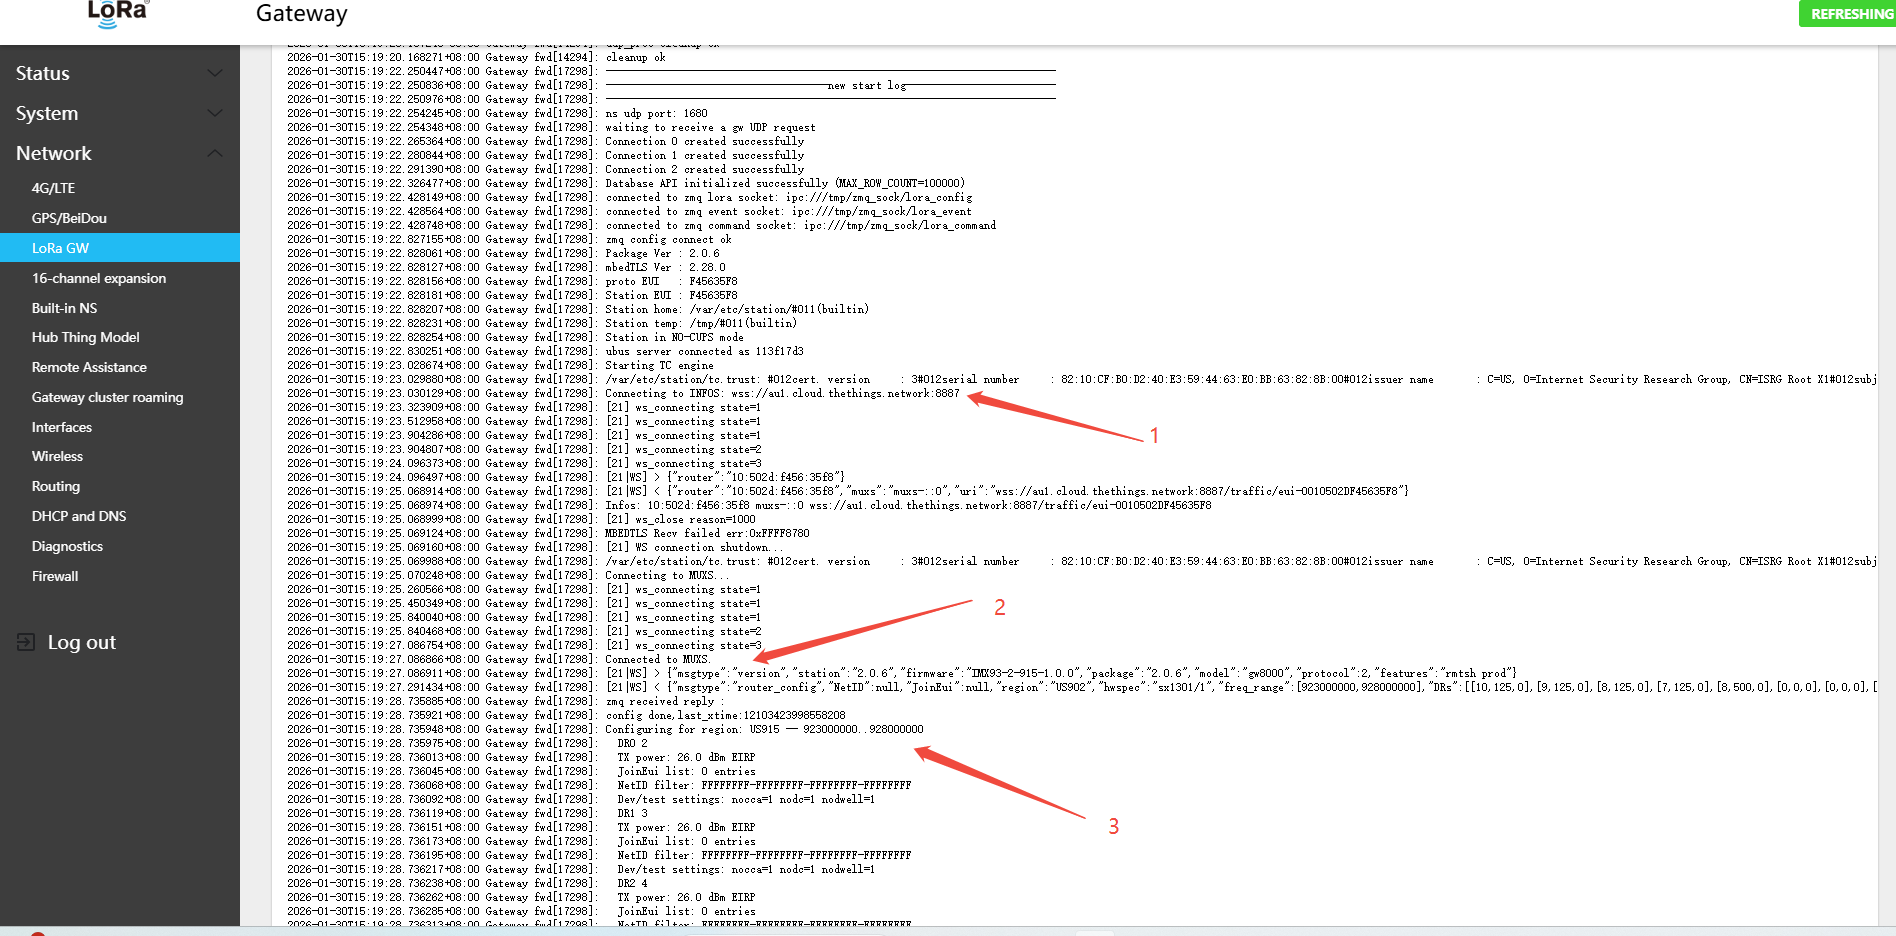
- On the gateway side: Network → LoRa GW → Status — view the gateway\'s online connection status on the platform
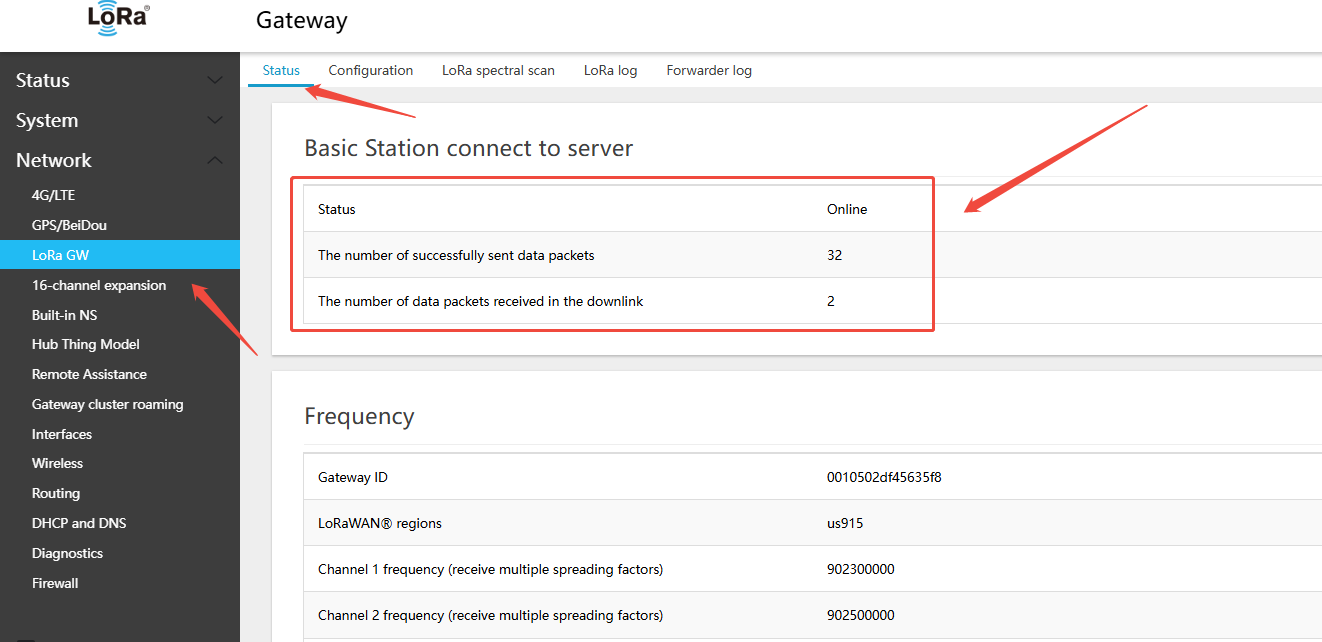
- On the TTN platform page, view the gateway online status
5.1.5.2 Connecting to ChirpStack via Basic Station LNS
Note:
- Consult the ChirpStack documentation to set up a domain name and TLS certificate beforehand. LNS connections require a domain name — IP addresses are not supported.
- Using the built-in ChirpStack 4.19.0 as an example
- If you are unfamiliar with deploying ChirpStack in LNS mode, it is recommended to use UDP or MQTT mode, or consult additional documentation.
- Example gateway ID:0010502df45635f8
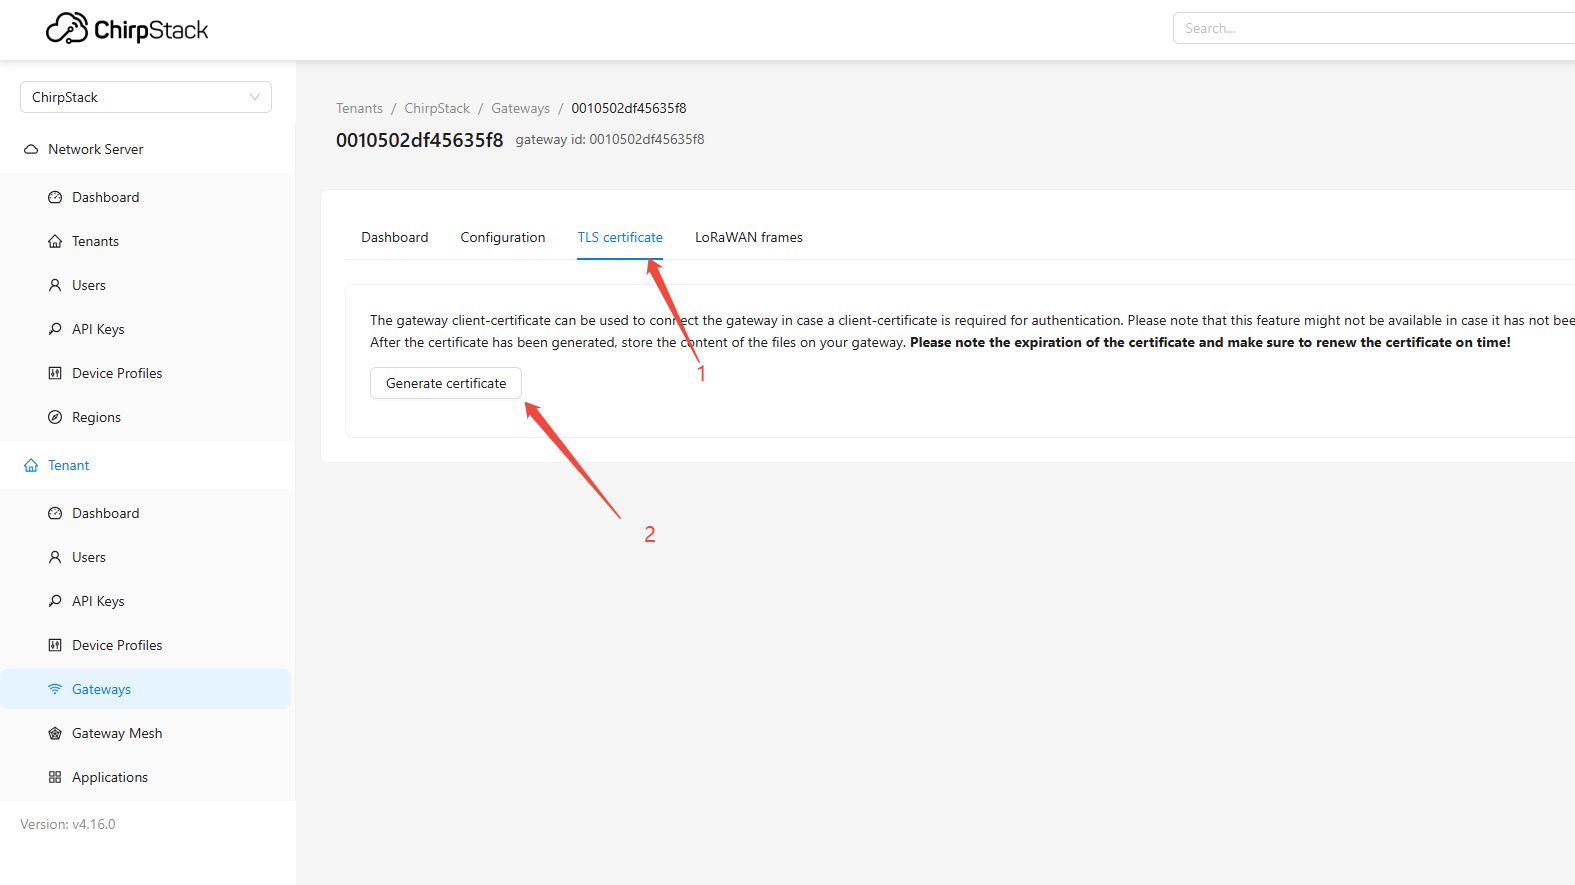
- In the ChirpStack UI, add the Gateway ID:
0010502df45635f8. UnderTLS certificate, clickGenerate certificateto generate the LNS certificate
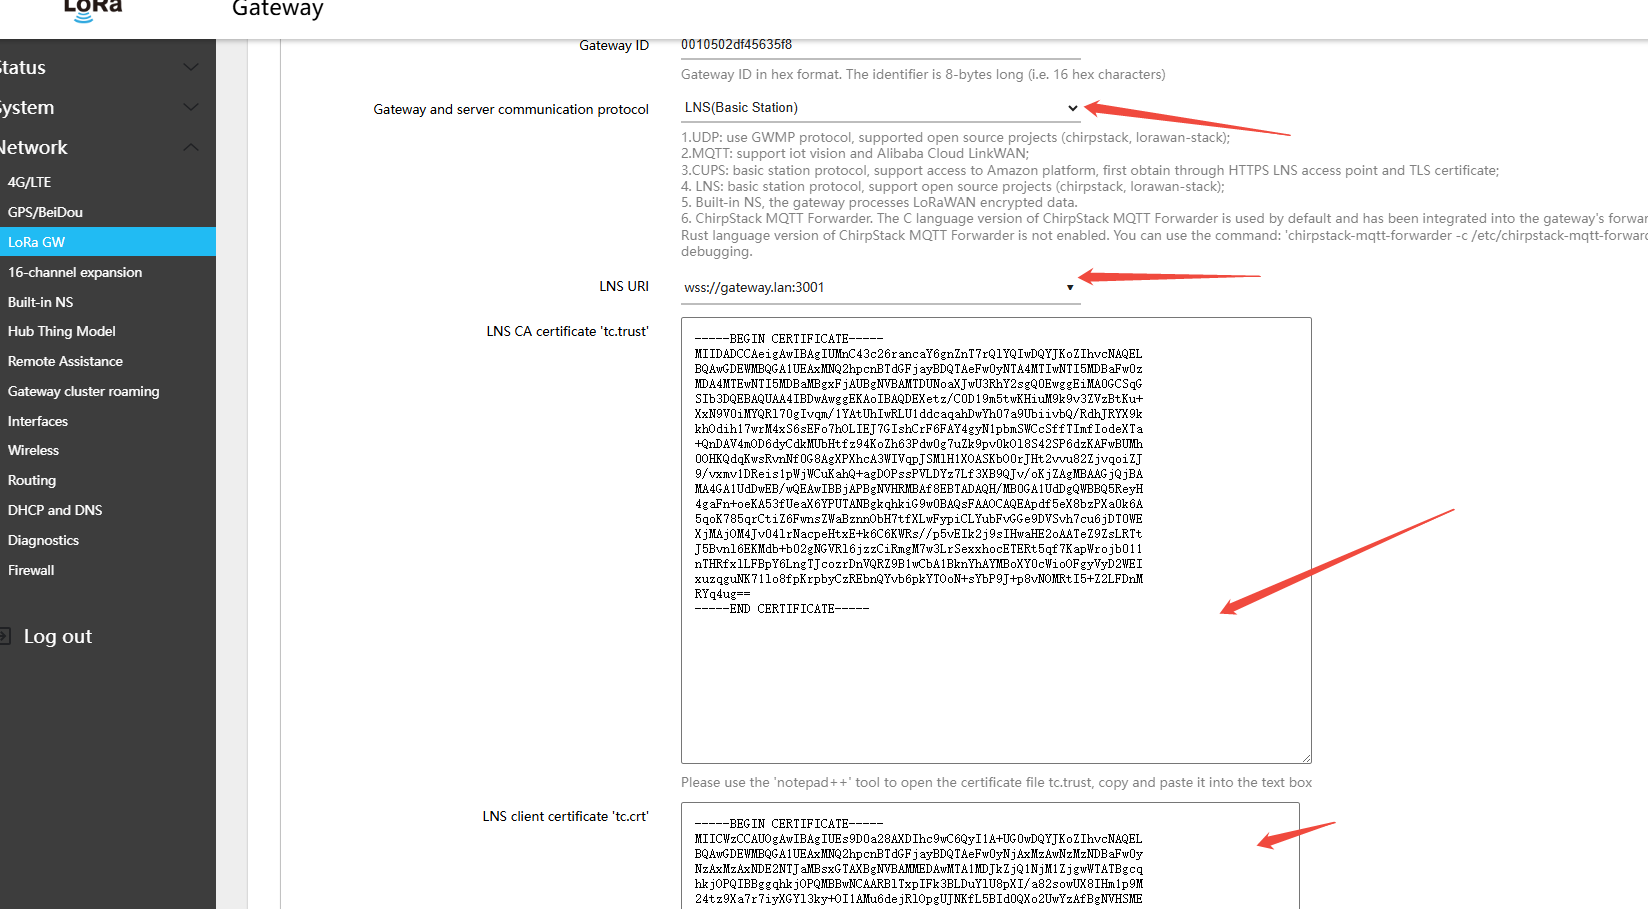
- Return to the gateway Web UI: Network → LoRa GW → Configuration, and configure the following settings:
- Gateway and server communication protocol (gateway-to-server communication protocol):LNS(Basic Station)
- LNS: WebSocket address (e.g.,
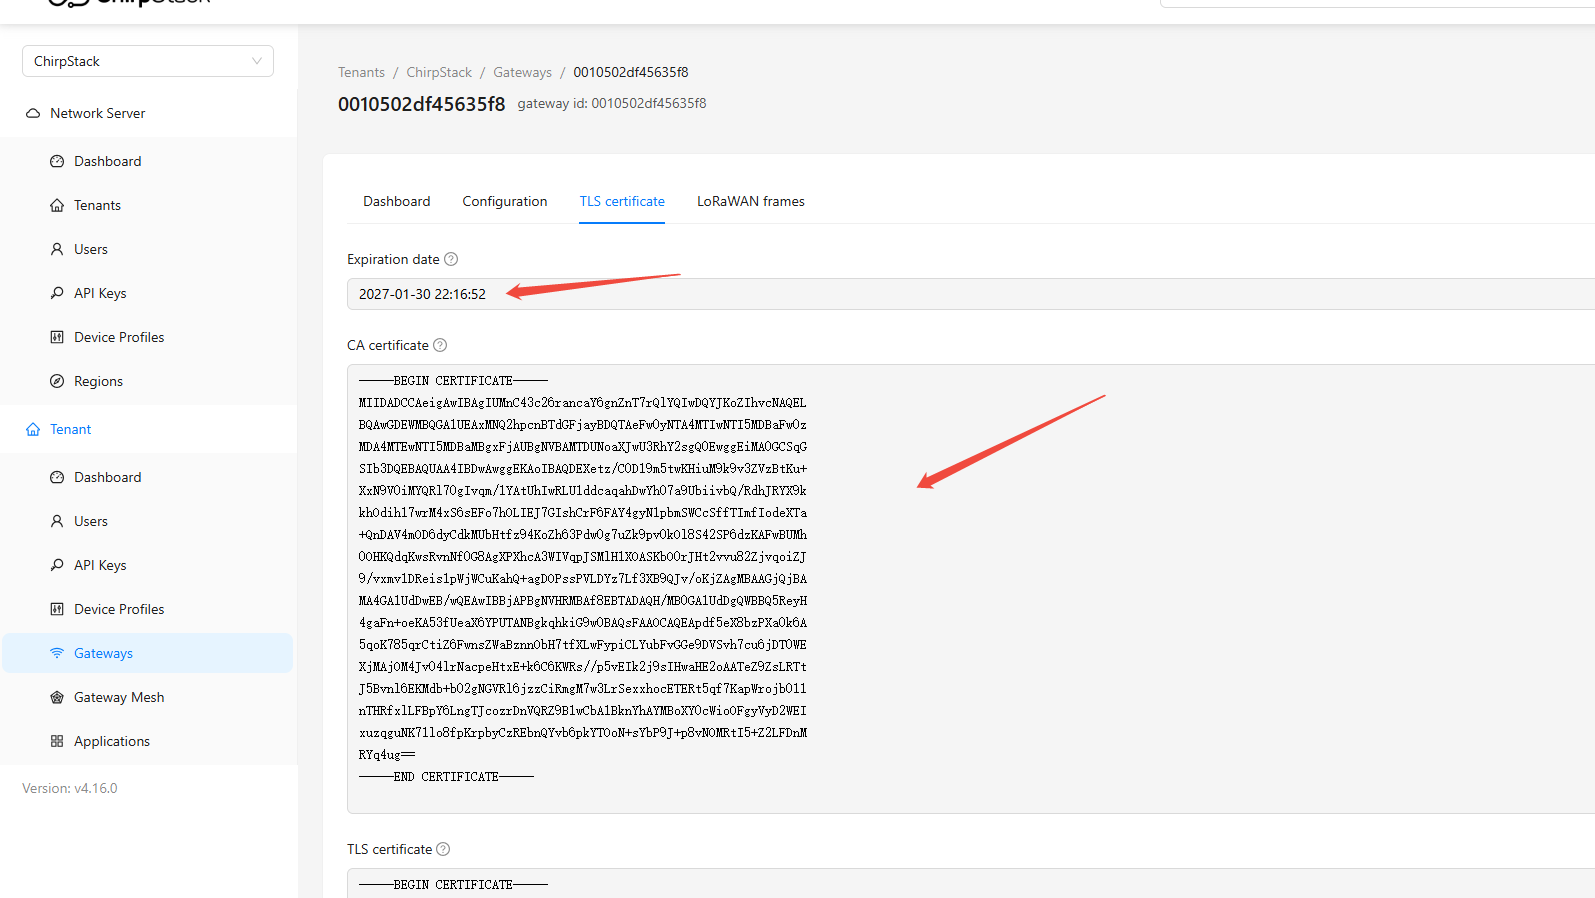
wss://gateway.lan:3001) - LNS CA certificate 'tc.trust': The CA certificate generated in step 1 on the ChirpStack page
- LNS client certificate 'tc.crt': The TLS certificate generated in step 1 on the chirpstack page
- LNS client private key 'tc.key': The TLS private key generated in step 1 on the chirpstack page
- Click Save & Apply in the lower-right corner of the page
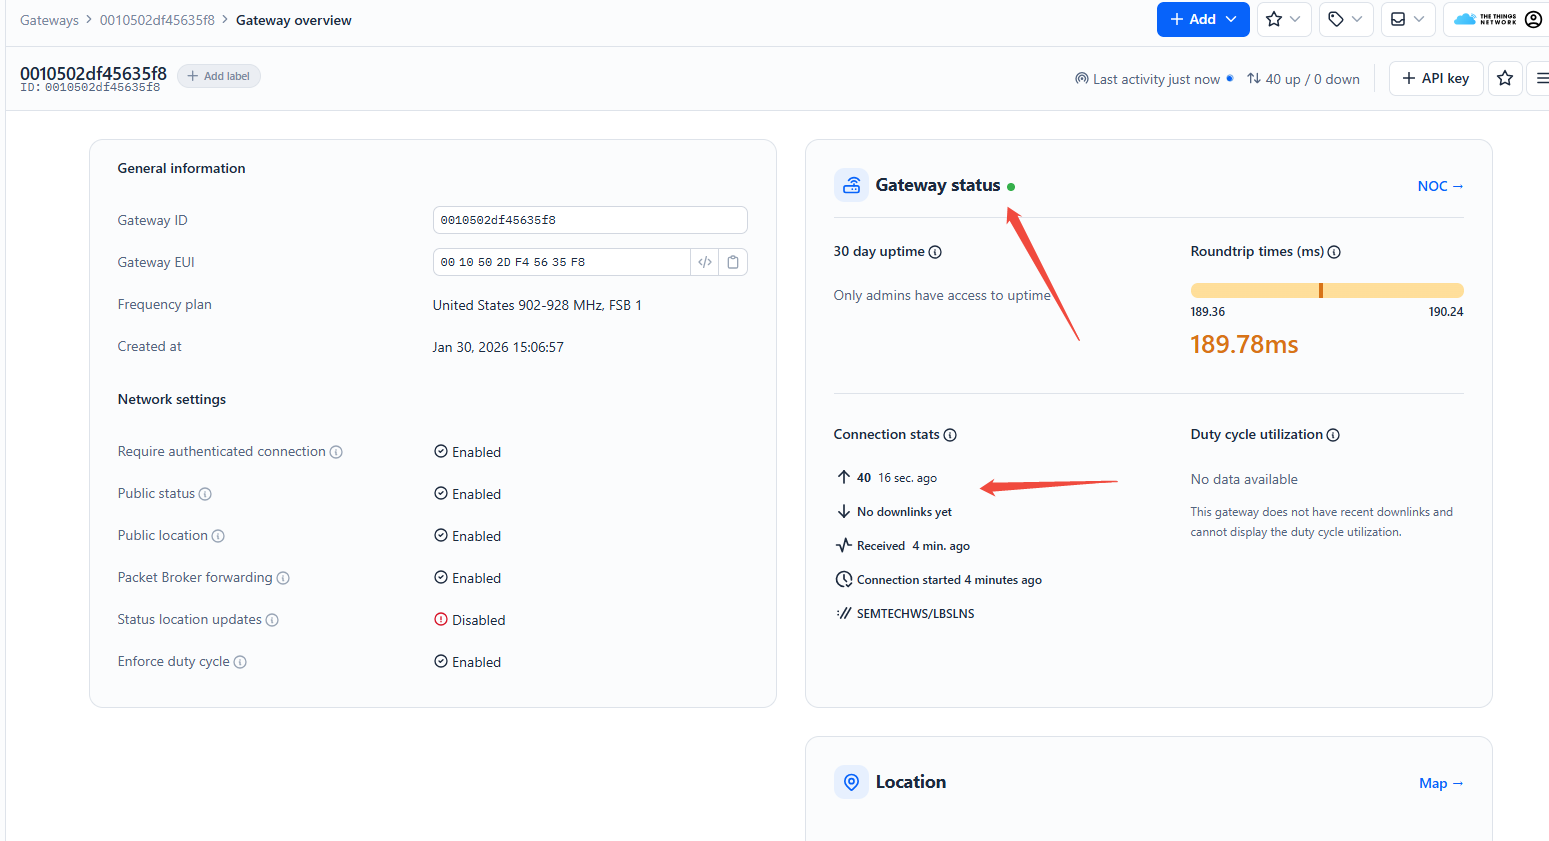
- On the gateway side: Network → LoRa GW → Status — view the gateway\'s online connection status on the platform
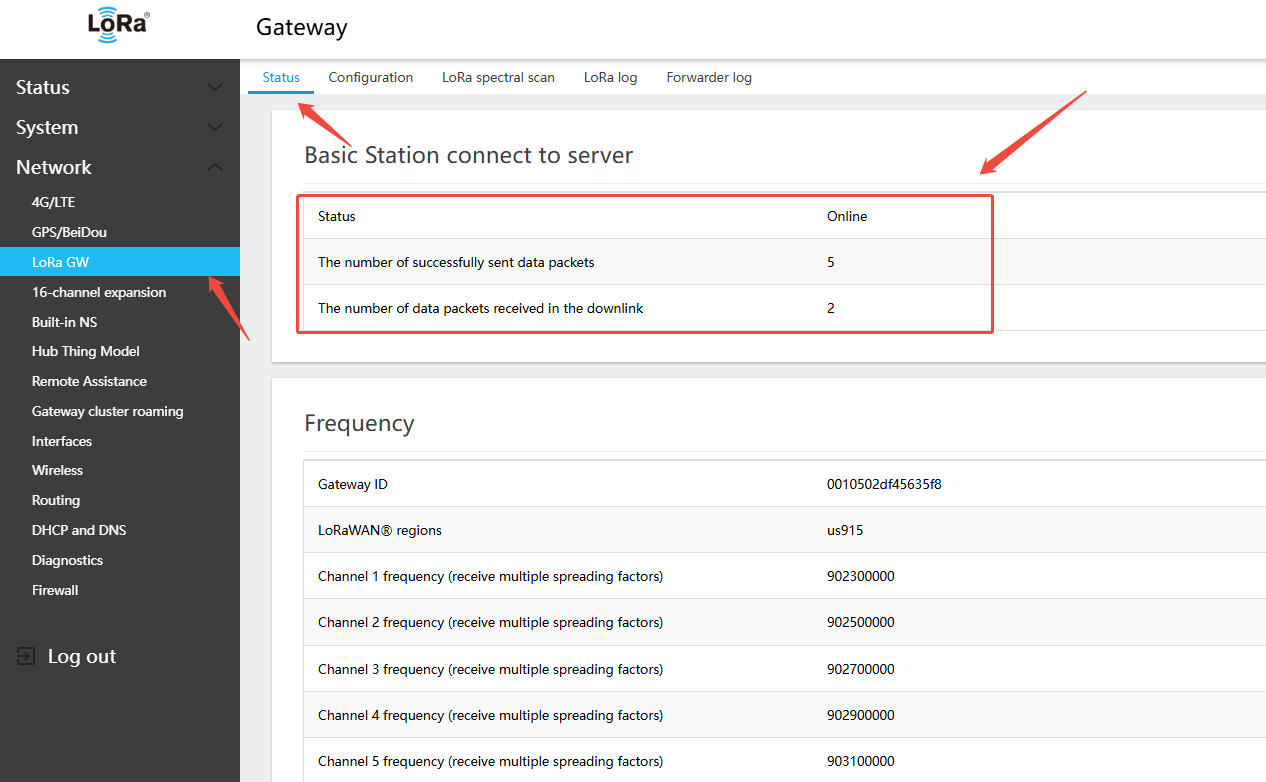
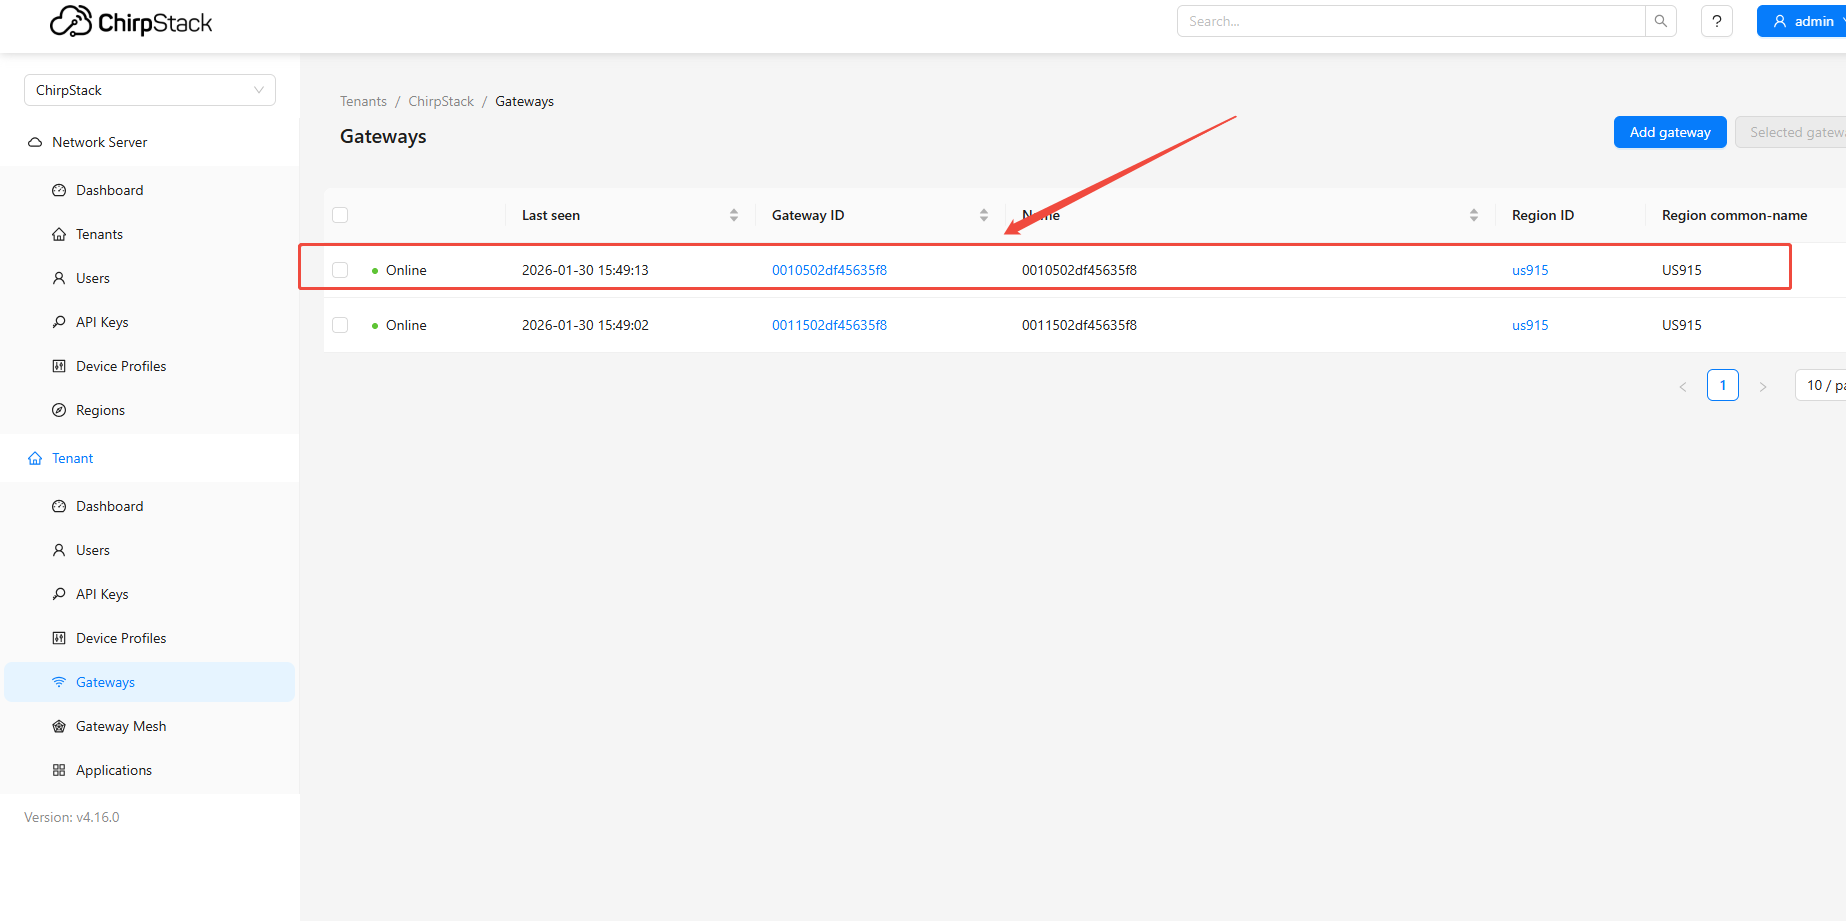
- On the ChirpStack platform page, view the gateway online status
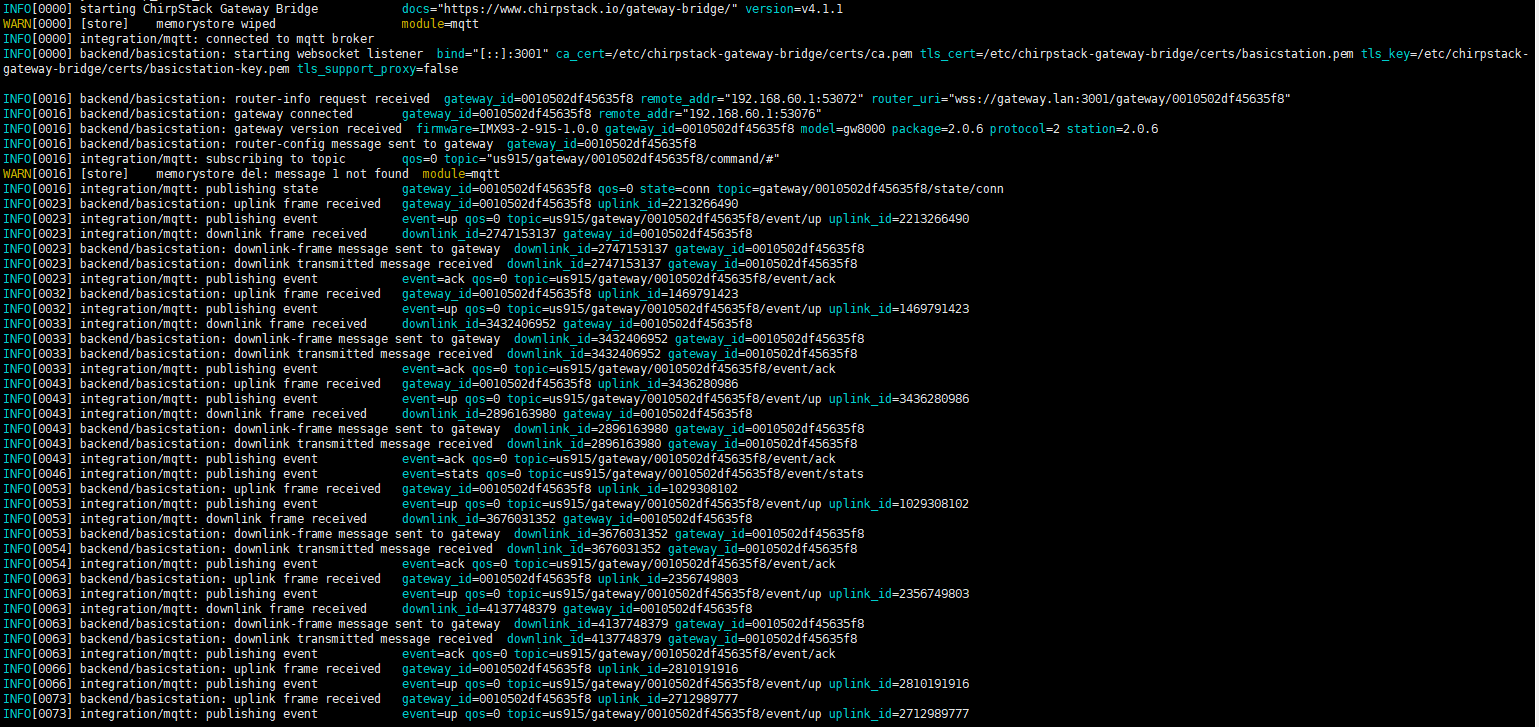
View ChirpStack communication log
5.2 16-Channel Gateway Frequency Band and Channels
On the gateway Web page: Network → 16-channel expansion → Configuration
- Follow the same steps as channels 1–8: 3.3 Configuring LoRa Gateway Band and Channels
5.2.1 16-Channel Gateway CN470 Frequency Configuration
On the gateway Web page: Network → 16-channel expansion → Configuration
- Follow the same steps as channels 1–8: 3.3.1 CN470 Full-Duplex Hardware Band and Channel Configuration
5.2.2 16-Channel Gateway 868 Band Switching
On the gateway Web page: Network → 16-channel expansion → Configuration
- Follow the same steps as channels 1–8: 3.3.2 EU868/RU864/IN865 Band Switching and Channel Configuration
5.2.3 16-Channel Gateway 915 Band Switching
On the gateway Web page: Network → 16-channel expansion → Configuration
- Follow the same steps as channels 1–8: 3.3.3 US915/AU915/AS923 Band Switching and Channel Configuration
5.3 16-Channel Gateway Connecting to External NS
The gateway supports multiple LoRa protocols and forwarding modes, allowing flexible integration with various network servers and IoT platforms. The following sections describe each configuration method.
5.3.1 16-Channel Gateway Using UDP
UDP GWMP (Gateway Message Protocol) is the standard protocol defined by Semtech, widely used to connect TTN, ChirpStack, and other open-source network servers.
Application Scenarios: Connecting to The Things Network (TTN), self-hosted ChirpStack servers, and similar platforms.
5.3.1.1 Configuring the 16-Channel Gateway to Connect to ChirpStack via UDP
On the gateway Web page: Network → 16-channel expansion → Configuration
- Follow the same steps as channels 1–8: 3.4.1.1 Connecting to Self-hosted ChirpStack via UDP
5.3.1.2 Configuring the 16-Channel Gateway to Connect to TTN via UDP
On the gateway Web page: Network → 16-channel expansion → Configuration
- Follow the same steps as channels 1–8: 3.4.1.2 Connecting to TTN via UDP
5.3.2 16-Channel Gateway Using MQTT-GWMP
The MQTT protocol is suitable for scenarios requiring a more flexible messaging mechanism. It supports connection to Winext's IoT Vision public cloud and private deployments of IoT Vision.
Application Scenarios: IoT Vision public cloud, IoT Vision private deployment.
5.3.2.1 Configuring the 16-Channel Gateway to Connect to Public Cloud IoT via MQTT-GWMP
On the gateway Web page: Network → 16-channel expansion → Configuration
- Follow the same steps as channels 1–8: 3.4.2.1 Connect to IoT Vision Cloud via MQTT GWMP
5.3.2.2 Configuring the 16-Channel Gateway to Connect to Private IoT via MQTT-GWMP
On the gateway Web page: Network → 16-channel expansion → Configuration
- Follow the same steps as channels 1–8: 3.4.2.1 Connect to IoT Vision Cloud via MQTT GWMP
5.3.3 16-Channel Gateway Using ChirpStack MQTT Forwarder
On the gateway Web page: Network → 16-channel expansion → Configuration
- Follow the same steps as channels 1–8: 3.4.3.1 Connecting to Self-hosted ChirpStack via MQTT Forwarder
5.3.4 16-Channel Gateway Using Basic Station CUPS
CUPS (Configuration and Update Server) protocol is used to automatically retrieve the LNS configuration and certificate, commonly used with AWS IoT Core.
Application Scenario: AWS IoT Core for LoRaWAN.
5.3.4.1 Configure 16-Channel Gateway to Connect to AWS Using Basic Station CUPS
On the gateway Web page: Network → 16-channel expansion → Configuration
- Follow the same steps as channels 1–8: 3.4.4.1 Connect to AWS IoT Core Using Basic Station CUPS
5.3.5 16-Channel Gateway Using Basic Station LNS
The LNS (LoRaWAN Network Server) protocol is WebSocket-based and supports connecting to ChirpStack, TTN, Microsoft Azure IoT, and other platforms.
Application Scenario: ChirpStack, TTN, Microsoft Azure IoT Central.
5.3.5.1 Configuring the 16-Channel Gateway to Connect to TTN via Basic Station LNS
On the gateway Web page: Network → 16-channel expansion → Configuration
- Follow the same steps as channels 1–8: 3.4.5.1 Connecting to TTN via Basic Station LNS
5.3.5.2 Configuring the 16-Channel Gateway to Connect to ChirpStack via Basic Station LNS
On the gateway Web page: Network → 16-channel expansion → Configuration
- Follow the same steps as channels 1–8: 3.4.5.2 Connecting to ChirpStack via Basic Station LNS